Diablo 4 Season 12: Hammer of the Ancients Barbarian Build Guide
09.04.2026 - 07:14:33
Diablo 4 , Game Guides

Do you want to play a Barbarian Build in Diablo 4 Season 12 that deals heavy damage easily? Do you want a build that you can use to push the highest pit levels in Season of Slaughter? If so, you might be interested in playing the Hammer of the Ancients Barbarian!
Also known as the HoTA Barb, this build is capable of dishing out huge amounts of damage with just a single skill—Hammer of the Ancients. When combined with the damage multipliers from Belligerence, Furious Hammer of the Ancients, and Walking Arsenal, you have a Barbarian that can reach upward of Pit Level 120 with relative ease!
If you want to know how this build works and what D4 items you should invest in, then read further. This is our Hammer of the Ancients Barbarian build guide for Diablo 4 Season 12!
How Does the HotA Barb Work in Diablo 4 Season 12?
This Barbarian build in Diablo 4 utilizes a very powerful skill known as Hammer of the Ancients. When used, it allows the Barbarian to forcefully slam his hammer on the ground, creating a concentrated area that damages enemies that are on top of it.
What makes this particular build awesome is that it leverages the damage-boosting effects of several key items, including:
- Mantle of Mountain’s Fury: Provides additional skill ranks to Hammer of the Ancients. It also makes HoTA create a seismic line that deals damage and slows enemies that are hit.
- Ramaladni’s Magnum Opus: Increasing your maximum fury will also increase the damage of your skills.
- Sabre of Tsasgal: Gives more power to Hammer of the Ancients by increasing its skill rank. It also boosts damage based on how many damaging skills you have on your skill bar.
- Ring of Starless Skies: This unique ring is not only good for reducing the resource cost of HoTA, but it also increases the skill ranks of the said skill.
- Tibault’s Will: It grants an increase in your maximum Fury and Fury generation when equipped. Besides that, Tibault’s Will raises your critical strike chance and attack speed.
- 100,000 Steps: Significantly increases the size of Ground Stomp. It also improves your damage against stunned enemies by a very large amount.
Now, there are many variations of the HoTA Barb in Diablo 4 Season 12. However, I am only going to cover the version that utilizes Ground Stomp and Leap. The former enables you to stun enemies for a few seconds, which activates the unique effect of 100,000 Steps. The latter, on the other hand, slows enemies and lets you move around the map quickly. Leap is actually quite helpful in Season of Slaughter, especially if you want to maintain your kill streak tiers for longer periods of time.
It is also important to note that this build utilizes Frenzy to boost damage via the “Belligerence” passive skill.
In addition, Call of the Ancients is a staple in many HoTA Barb builds because of Korlic’s ability to grant Fury when he hits the enemy (with the “Supreme Call of the Ancients” upgrade). Activating Call of the Ancients provides a 30% increase in damage and 20% bonus attack speed as well.
So as you can see, the Hammer of the Ancients Barbarian is all about stacking damage-boosting effects and ensuring that those effects are active indefinitely.
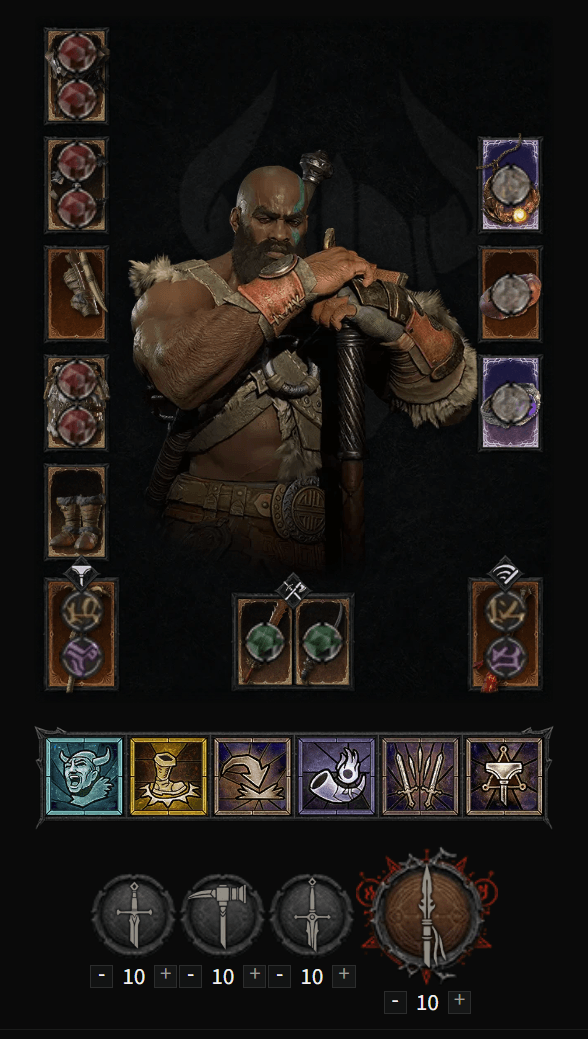
D4 HoTA Barb Class Specialization: Weapon Expertise
- Polearm Expertise: 15% Increased Lucky Hit Chance and increased damage while Healthy.
The Barbarian can master a variety of melee weapons, such as Polearms, Maces, Axes, and Swords. For the Hammer of the Ancients Barbarian, in particular, you want to choose the Polearm Expertise so that you have a permanent 15% increase in damage when you are above 80% of your maximum life (which is the threshold for being considered “Healthy” in D4).
D4 HoTA Barb: Skill Rotation
- Utilize Leap to move around the map in search of enemies.
- Use Ground Stomp to group enemies together, and then unleash damaging seismic waves with Hammer of the Ancients.
- Hammer of the Ancients is your primary damage-dealing ability on this build. Use it liberally whenever you see an enemy.
- Use Frenzy to activate the damage buffs from Belligerence and Walking Arsenal. A simple tap of the said skill should suffice. Do this every three seconds.
- Always utilize Rallying Cry whenever it’s available. This skill increases your movement speed and resource generation, the latter of which is quite handy for the HoTA Barb. It also makes you unstoppable, preventing you from being affected by crowd-control effects like Freeze, Slow, etc.
- Replace Rallying Cry with War Cry when pushing the higher Pit Levels. War Cry significantly boosts your damage for a short time. Activate whenever it’s off cooldown.
- Call of the Ancients should be active at all times. Don’t worry, you will have enough cooldown reduction to make this a reality.
D4 HoTA Barb: Ideal Skill Allocation
- 1 point on Frenzy
- 1 point on Hammer of the Ancients
- 2 points to get the “Furious Hammer of the Ancients” Upgrade
- 4 points on Hammer of the Ancients to max it out
- 3 points on Tempered Fury
- 1 point on Warpath
- Ground Stomp -> Strategic Ground Stomp
- 3 points on Belligerence
- Rallying Cry -> Tactical Rallying Cry
- 1 point on Martial Vigor
- War Cry -> Power War Cry
- Leap -> Power Leap
- 3 points on Booming Voice
- 3 points on Aggressive Resistance
- 1 point on Pit Fighter
- 1 point on Slaying Strike
- 1 point on Thick Skin
- 2 points on Defensive Stance
- 3 points on Counteroffensive
- Call of the Ancients -> Supreme Call of the Ancients
- 3 points on Heavy Handed
- 3 points on Brute Force
- 3 points on Wallop
- 2 points on Concussion
- 1 point on Walking Arsenal
- Max out the following:
- Slaying Strike
- Pit Fighter
- Aggressive Resistance
- Martial Vigor
- Warpath
- Put 1 point on Outburst
- Put 1 point on Tough as Nails
| Gear | Best (BiS) | Alternatives | Best Affixes |
| Weapon | Bludgeoning: Two-Handed Mace with Aspect of Ancestral Force Runes: Ahu + Xan Slashing: Two-Handed Sword with Aspect of Earthquakes Runes: Igni + Ohm Ramaladni’s Magnum Opus (Dual-wield Weapon 1) Socketed with Grand Emerald Sabre of Tsasgal (Dual-wield Weapon 2) Socketed with Grand Emerald | Sword with Executioner’s Aspect (Dual-wield Weapon 1) Sword with Aspect of Incendiary Fissures | Strength Maximum Life Critical Strike Damage Lucky Hit: Chance to Make Enemies Vulnerable for 2 seconds Chance for Hammer of the Ancients to Deal Double Damage (Temper) Feast: Every 20 Kills, Savagely Bite an Enemy and Apply Vulnerable (S12 Only) |
| Helmet | Crown of Lucion | Andariel’s Visage Legendary Helmet with Aspect of Disobedience | Maximum Resource Cooldown Reduction Maximum Life Strength Hammer of the Ancients Size (Temper) Rampage: Resource Cost Reduction per Kill Streak Tier |
| Body Armor | Mantle of Mountain’s Fury | Legendary Body Armor with Aspect of Bul-Kathos | Maximum Resource Strength Maximum Life Hammer of the Ancients Size (Temper) Rampage: Attack Speed per Kill Streak Tier |
| Gloves | Ancestral Legendary Gloves with Vehement Brawler’s Aspect | Legendary Gloves with Aspect of Inner Calm | + to Hammer of the Ancients Cooldown Reduction Strength Attack Speed Hammer of the Ancients Size (Temper) Rampage: Strength per Kill Streak Tier |
| Pants | Tibault’s Will | Legendary Pants with Aspect of Might | Strength Maximum Life Armor Hammer of the Ancients (Size) Rampage: Strength per Kill Streak Tier |
| Boots | 100,000 Steps | Legendary Boots with Ghostwalker Aspect | + to War Cry Fury per Second Strength Maximum Life Hammer of the Ancients Size (Temper) Rampage: Strength per Kill Streak Tier |
| Amulet | Melted Heart of Selig | Battle Trance Legendary Amulet with Aspect of Limitless Rage | Cooldown Reduction Attack Speed +2 to Counteroffensive +2 to Heavy Handed Call of the Ancients Cooldown Reduction (Temper) Hunger: Experience Gained |
| Ring 1 | Ancestral Legendary Ring with Aspect of Anger Management | Ring of Red Furor | Cooldown Reduction Attack Speed Strength Lucky Hit: Chance to Make Enemies Vulnerable for 2 Seconds Call of the Ancients Cooldown Reduction (Temper) Hunger: Experience Gained |
| Ring 2 | Ring of Starless Skies | Legendary Ring with Bold Chieftain’s Aspect | Cooldown Reduction Attack Speed Strength Maximum Life Call of the Ancients Cooldown Reduction (Temper) Hunger: Experience Gained |
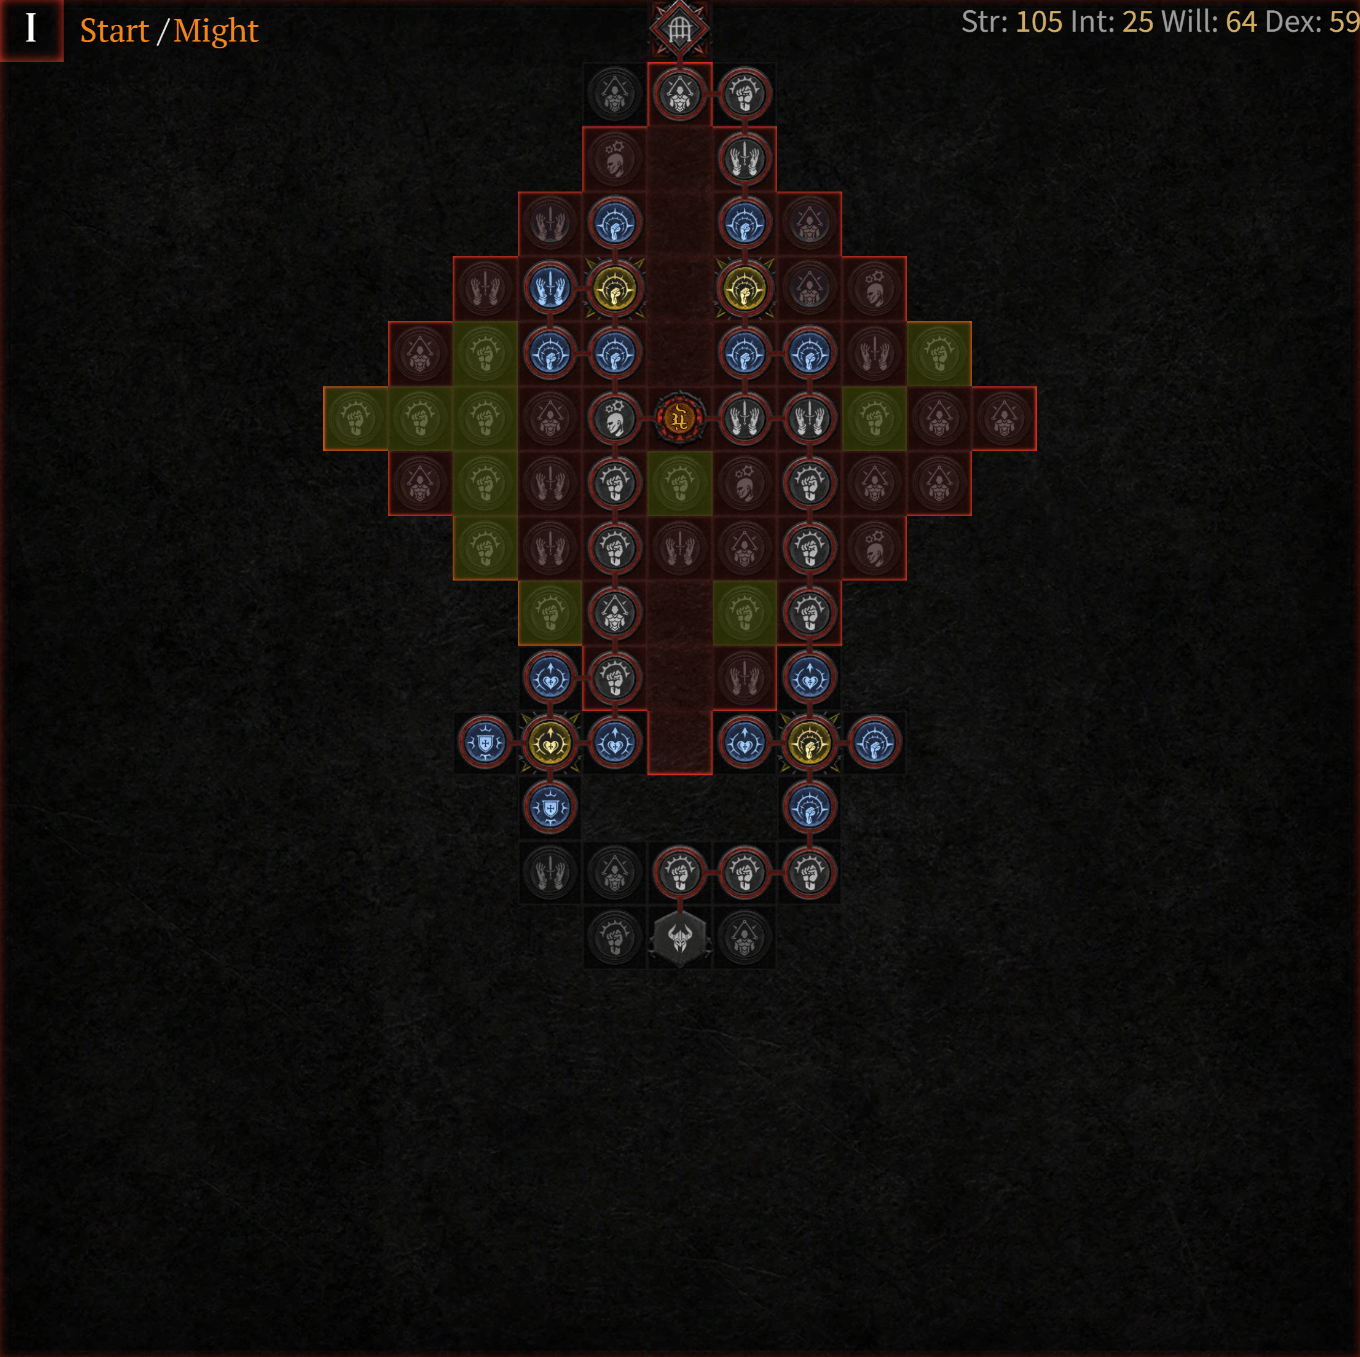
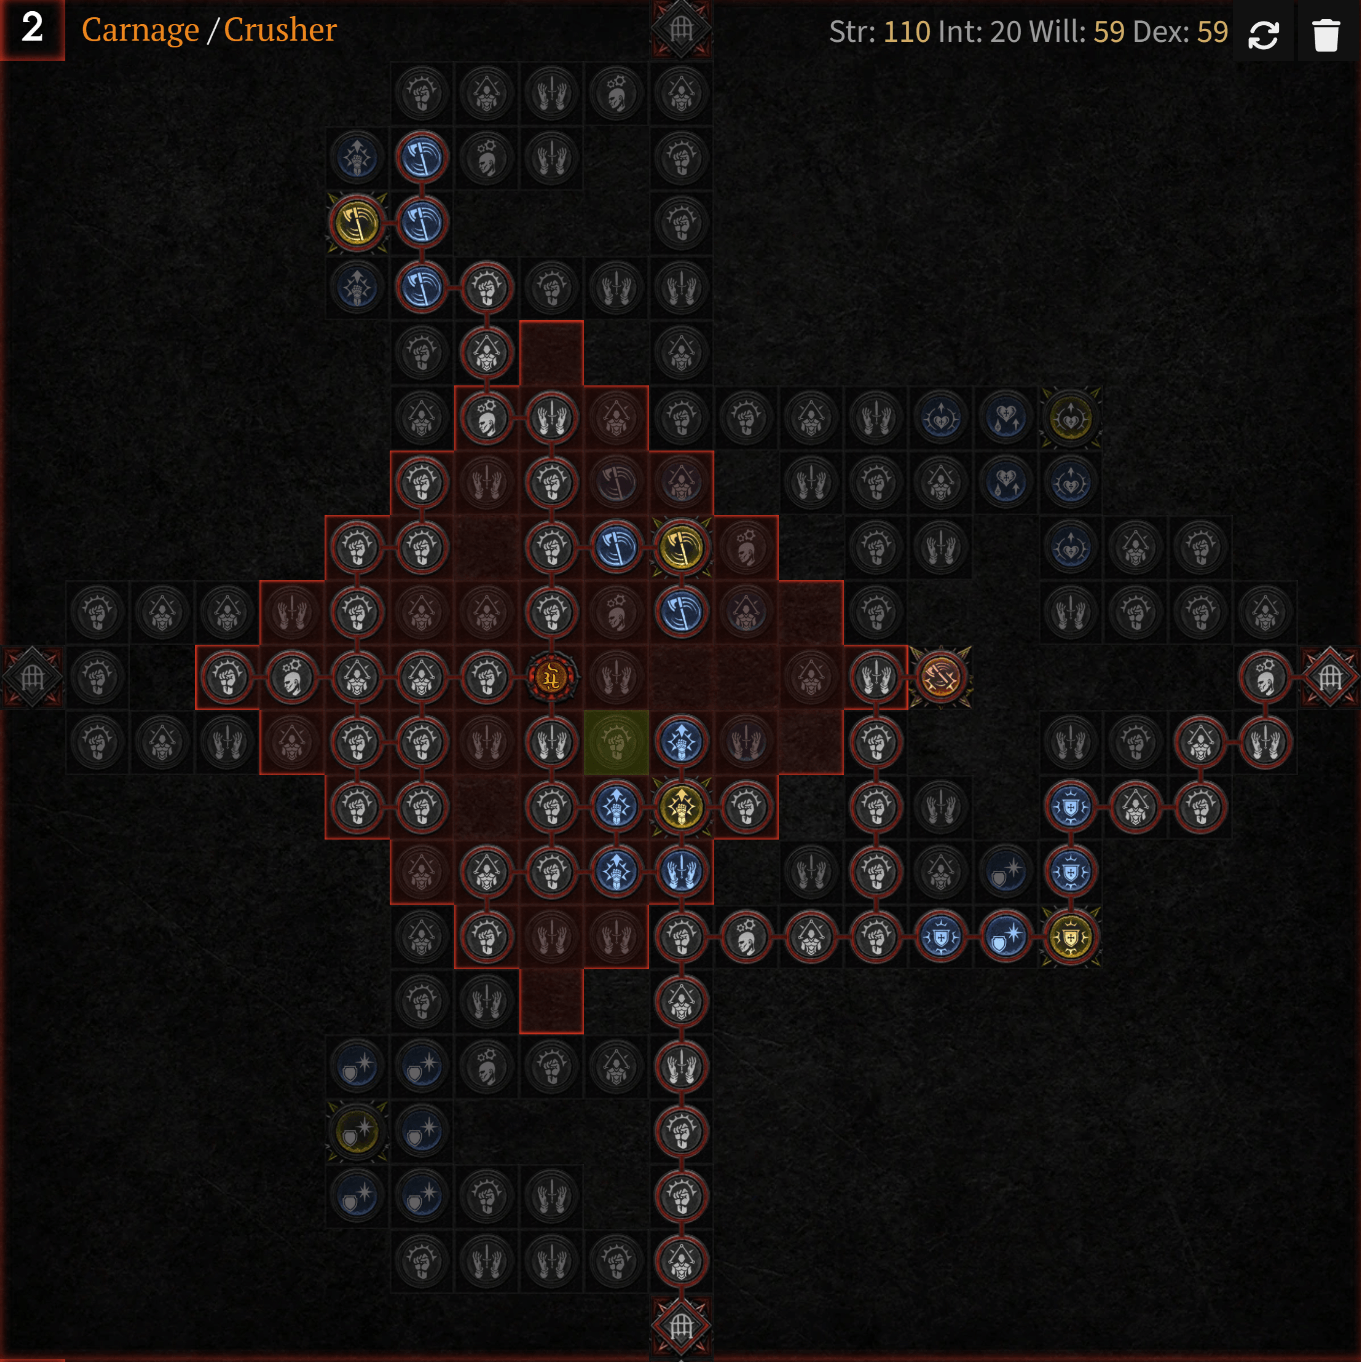
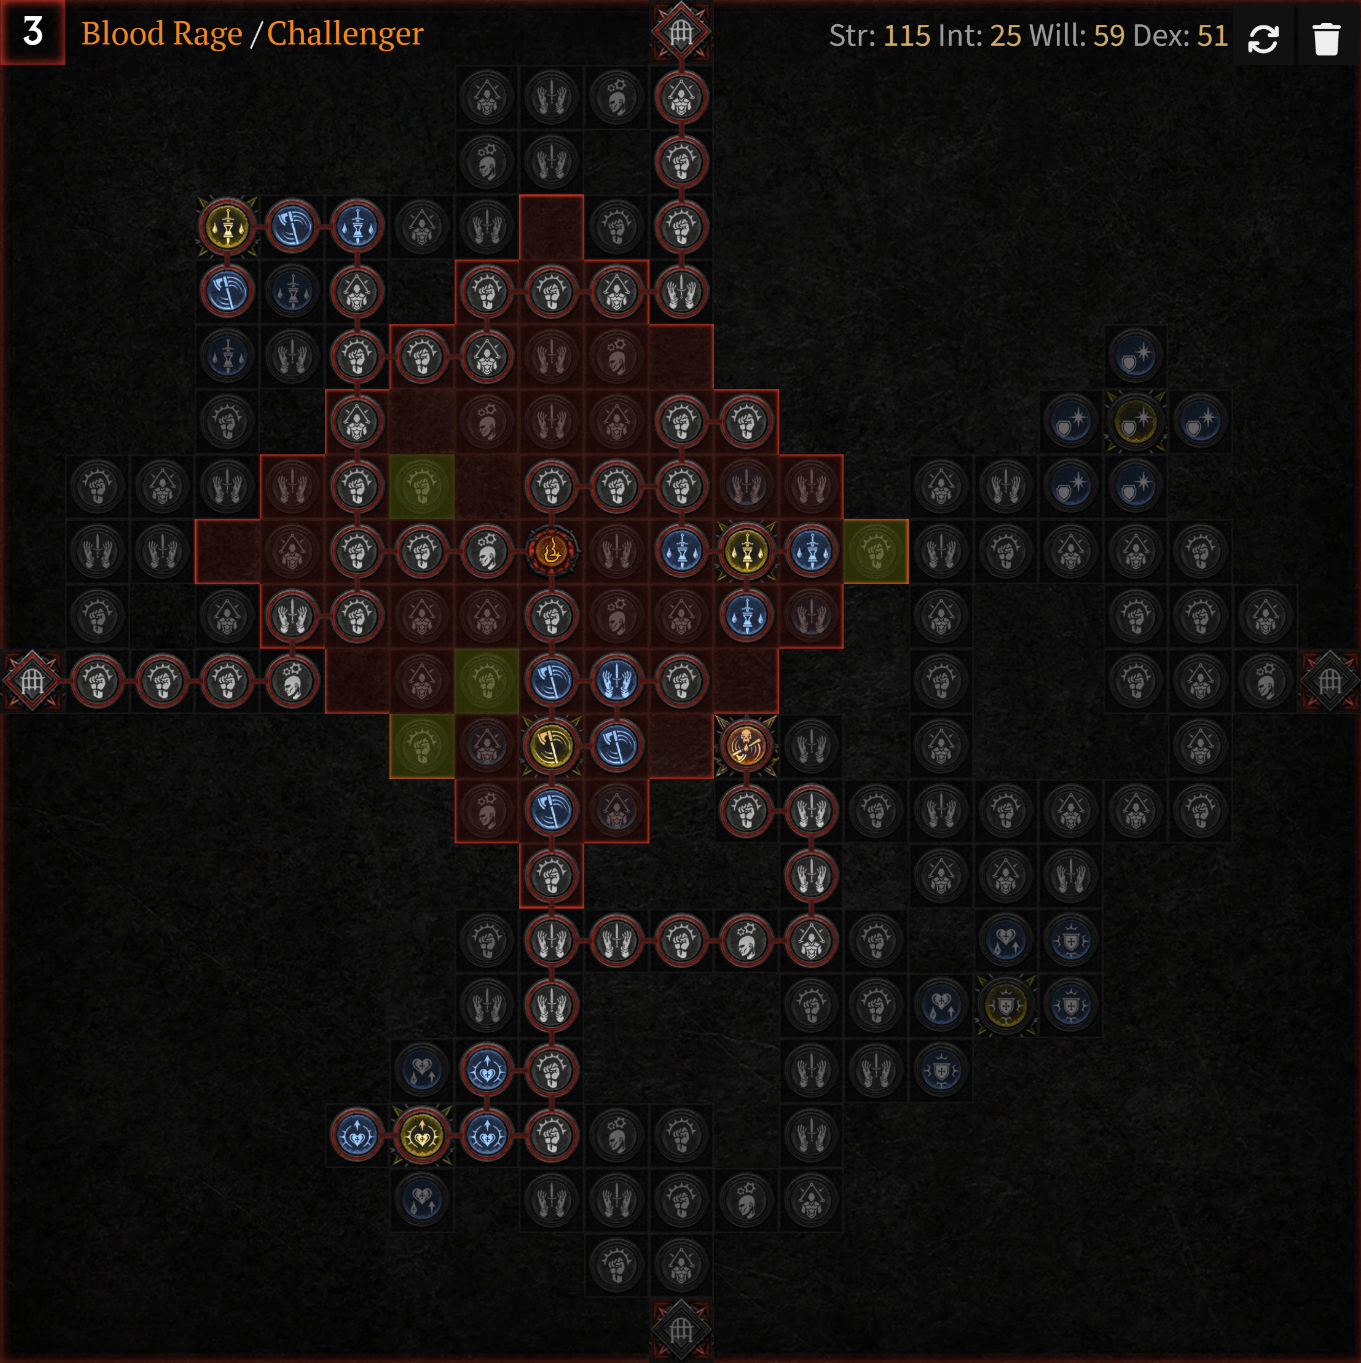
D4 Hota Barb: Paragon Nodes
1st: Might Glyph
2nd: Crusher Glyph
3rd: Challenger Glyph
4th: Wrath Glyph
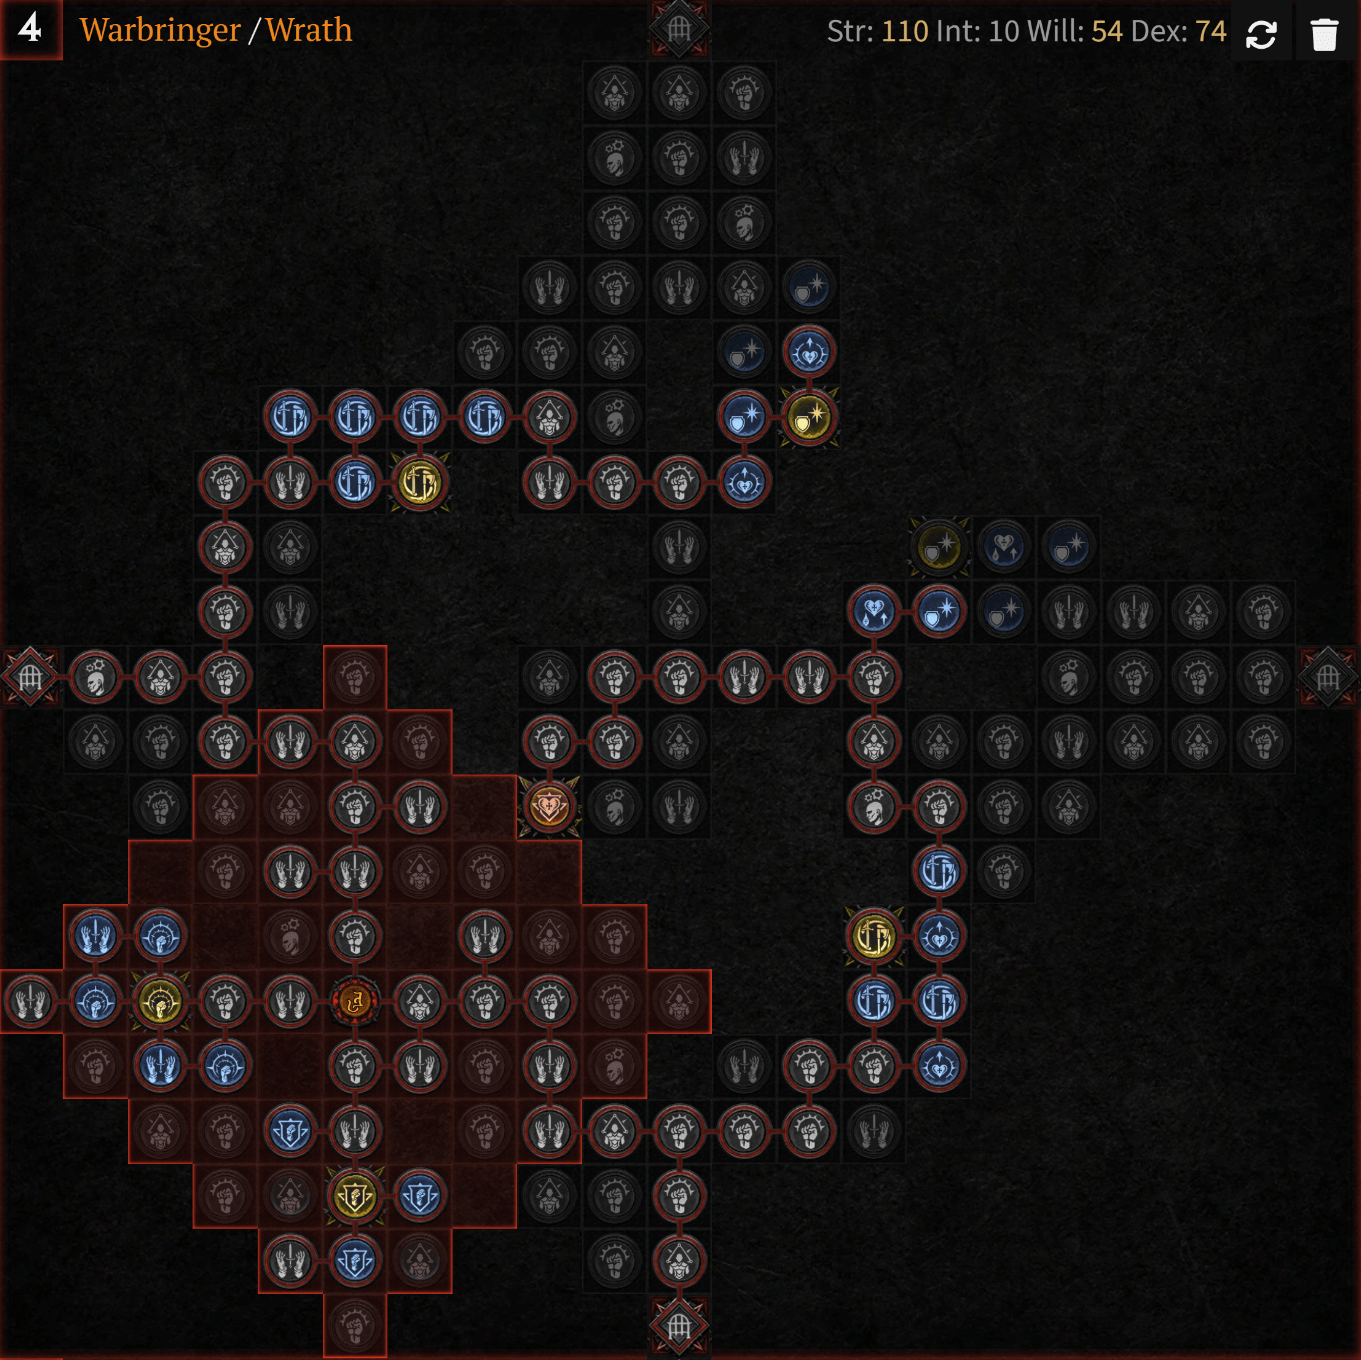
5th: Revenge Glyph
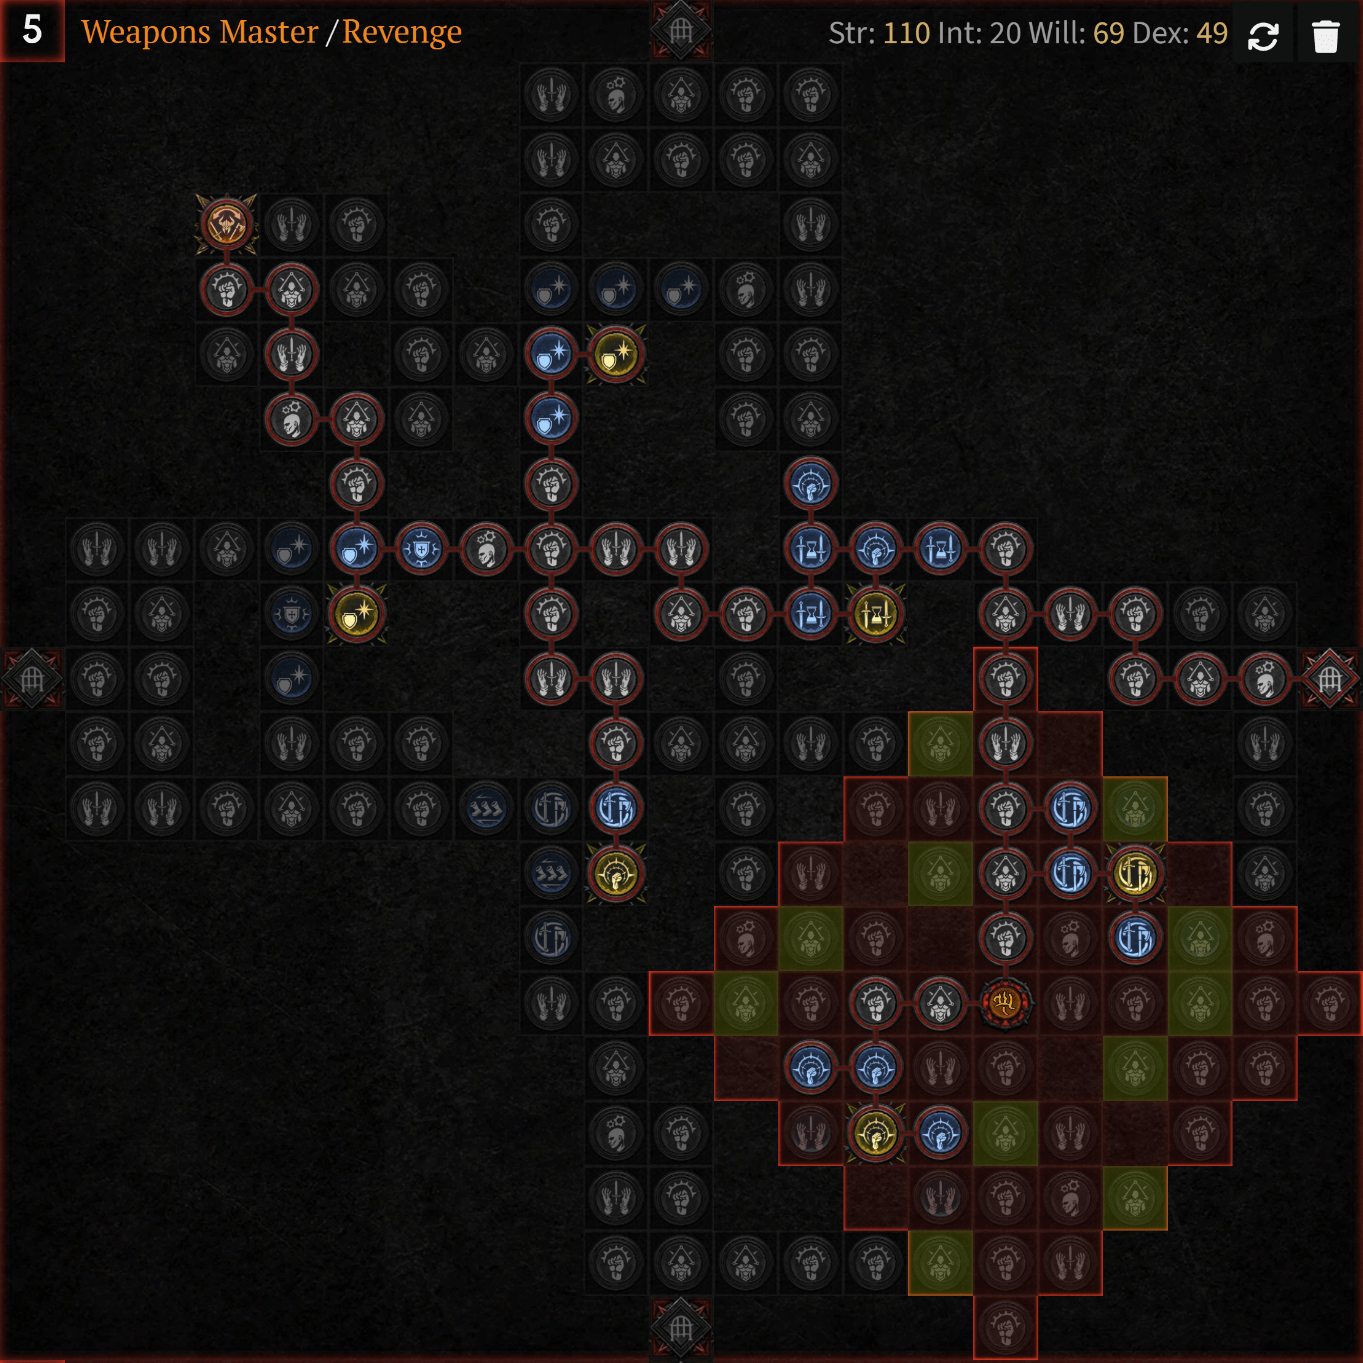
Upgrade Priority:
- Wrath
- Crusher
- Might
- Challenger
- Revenge
PROS
+Insane damage potential.
+Leverages multiple damage-boosting effects really well.
+The most powerful Barbarian Build in Diablo 4 Season 12 for Pit Pushing.
CONS
-Gear dependent.
-Moves slower relative to the Paladin.
-Follows a particular skill rotation to maximize damage output.
FAQ
What is the Best Skill Rotation for the HoTA Barb in D4 Season 12?
You want to make sure that all damage-boosting effects from the items and skills that you use on the Hammer of the Ancients Barbarian build are active. Hence, you should do the following:
- Use Frenzy to activate Belligerence, Walking Arsenal, and the Sabre of Tsasgal.
- Use War Cry to gain Berserking and a huge damage boost.
- Use Ground Stomp to stun enemies and activate 100,000 Steps
- Use Hammer of the Ancients to destroy the enemy = win.
Which Stats Should I Prioritize?
- Maximum Resource
- Cooldown Reduction
- Strength
- Maximum Life
- Attack Speed
What Are the Best Mercenaries to Use on This Build?
- Primary: Raheir
- Ground Slam
- Raheir’s Aegis
- Bastion
- Inspiration
- Reinforcement: Aldkin
- Field of Languish -> Hammer of the Ancients