


OSRS Barracuda Trials Guide: Tips and Rewards
12.01.2026 - 05:27:23
Game Guides , OSRS Guides , Runescape


Within the progression path of Sailing, nothing is more important than the Barracuda Trials. These trials are ship parkours that some players even call “ship agility”. It is the most efficient and the hardest training method a player can do to level up their Sailing. It also hosts a variety of rewards that every player must get to take full advantage of the skill. This guide will take you through every single trial and highlight the methods of beating them.
Before diving into each trial, it is highly recommended that you mark every lost cargo and interactable object within the trial. This will help you keep track of where you are going and make it harder for you to miss lost cargo. You can also download either the “Sailing” or “Barracuda Trials” plugin to help you. These plugins also highlight everything you need to complete the trial.
If you are stuck on one of these trials or want to level up your Sailing without breaking a sweat, you can check out our OSRS Sailing Services to get help from our professionals.
The Tempor Tantrum
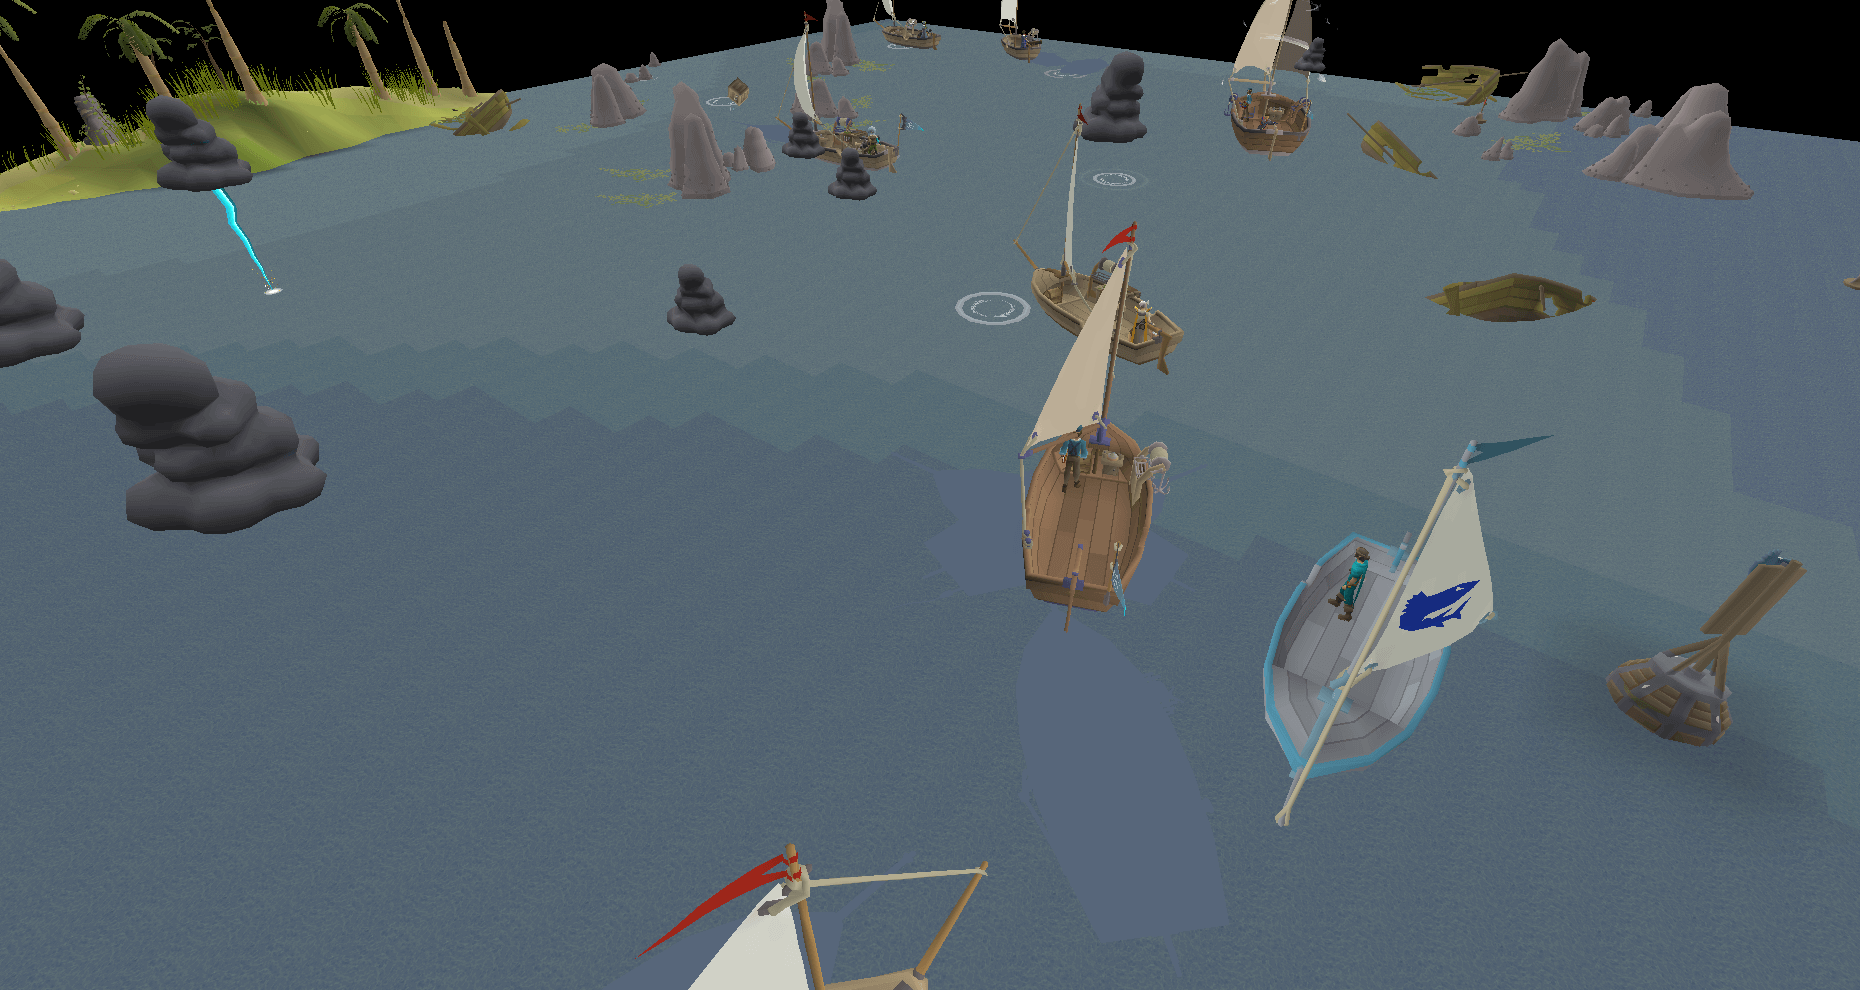
Tempor Tanturm, AKA the first Barracuda Trial, can be located in the Storm Temport near the Pandemonium. To access the trial, you will need to have level 30 Sailing, alongside a skiff with an iron helm and an oak mast.
The trial requires the player to navigate the area, collect lost cargo, pick up rum shipments from the merchant ship, and return all items to the starting point. Throughout the area, there are gentle rapids that can increase the ship's speed if the player navigates through them, and lightning clouds that occasionally discharge lightning, which can damage and slow down the player's ship.
The trial is all about your ship's speed, so you can get the following upgrades before reaching the next Barracuda Trial to help you in this one:
- Level 31 Teak hull: Increases boat health and speed
- Level 36 Teak mast: Increases the boat's speed boost duration.
- Level 52 Mahogany mast: Increases the boat's speed boost duration.
Swordfish
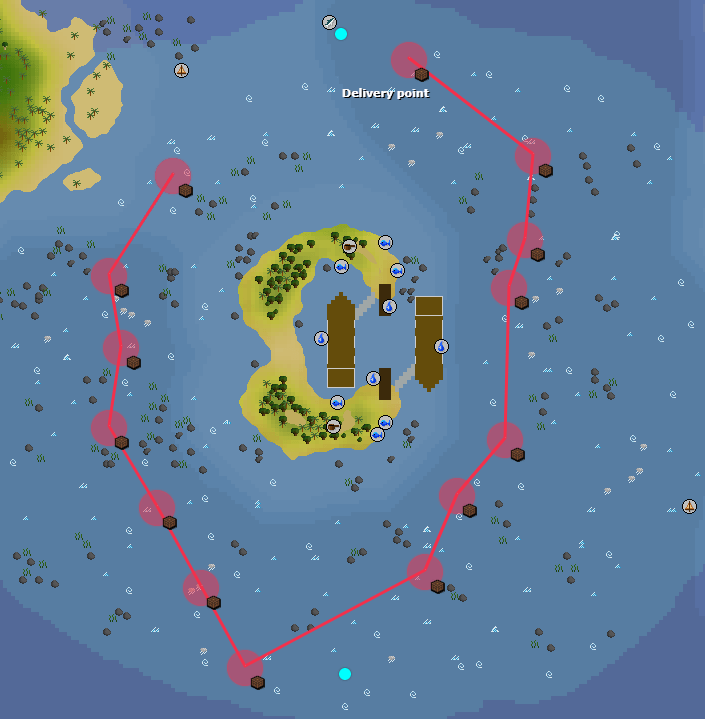
This trial is the easiest, requiring you to complete the course in 1 minute and 48 seconds. This one requires you to do only 1 lap around the course and bring back only 1 rum. Below are the marked locations of every lost cargo and the path that you should take to finish the trial.
Shark and Marlin
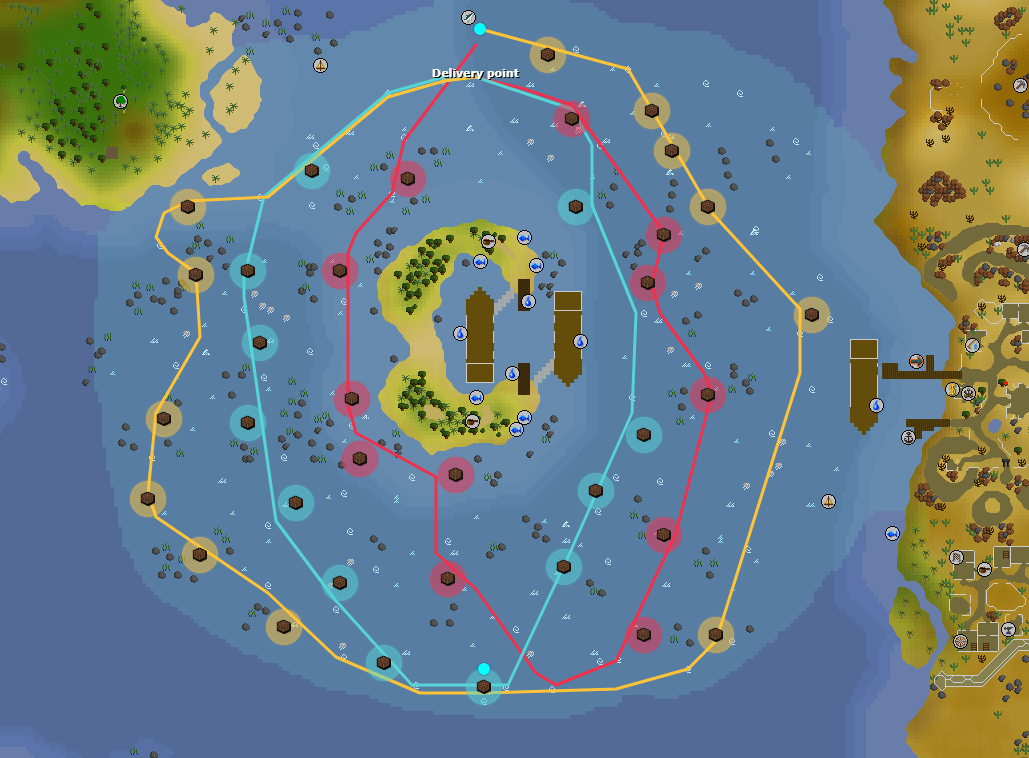
Shark and Marlin trials are significantly harder than the swordfish, requiring you to do multiple laps around the course to collect all the lost cargo and gather all the required rum. Below is the standard route for shark and marlin. Lap 1 is marked by red, lap 2 is blue, and lap 3 is yellow.
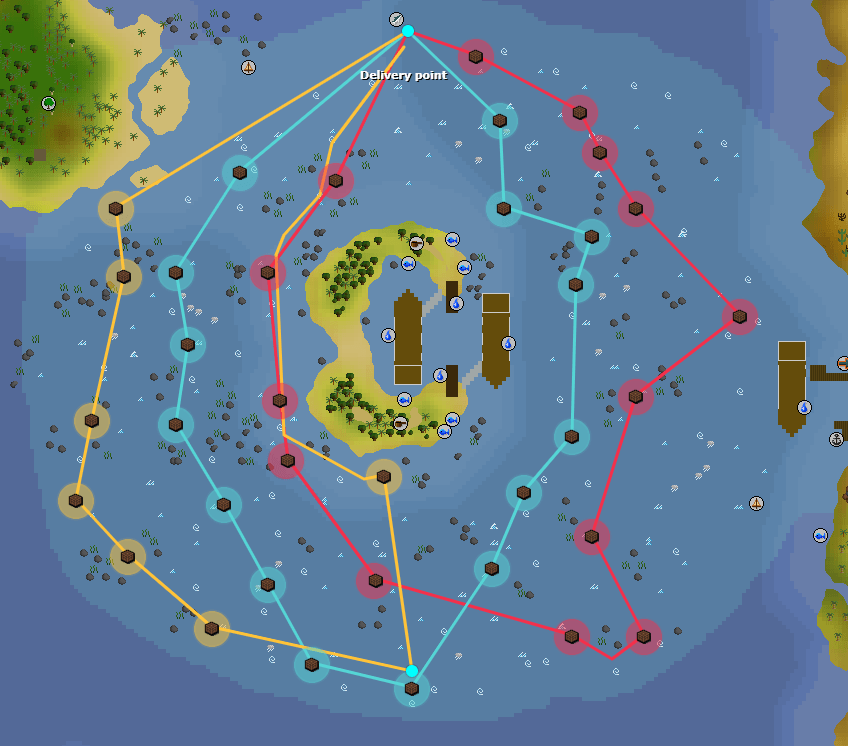
If you have gotten all the rewards and are repeating the course for experience, here is a faster Marlin route for the best experience per hour:
Rewards
Below are the rewards from this trial. The shark tiers' rewards are important for any player, as it gives a drink that can boost your Sailing level, alongside the material to build a keg in your ship, allowing you to take advantage of passive Sailing buffs.
| Rank | Total Exp | Bonus Exp (first time) | Reward |
| Swordfish | 595 | 1000 | Stormy Key |
| Shark | 1025 | 2000 | Barrel Stand Whirlpool Surprise |
| Marlin | 1790 | 3000 | Ralph’s fabric roll |
Jubbly Jive
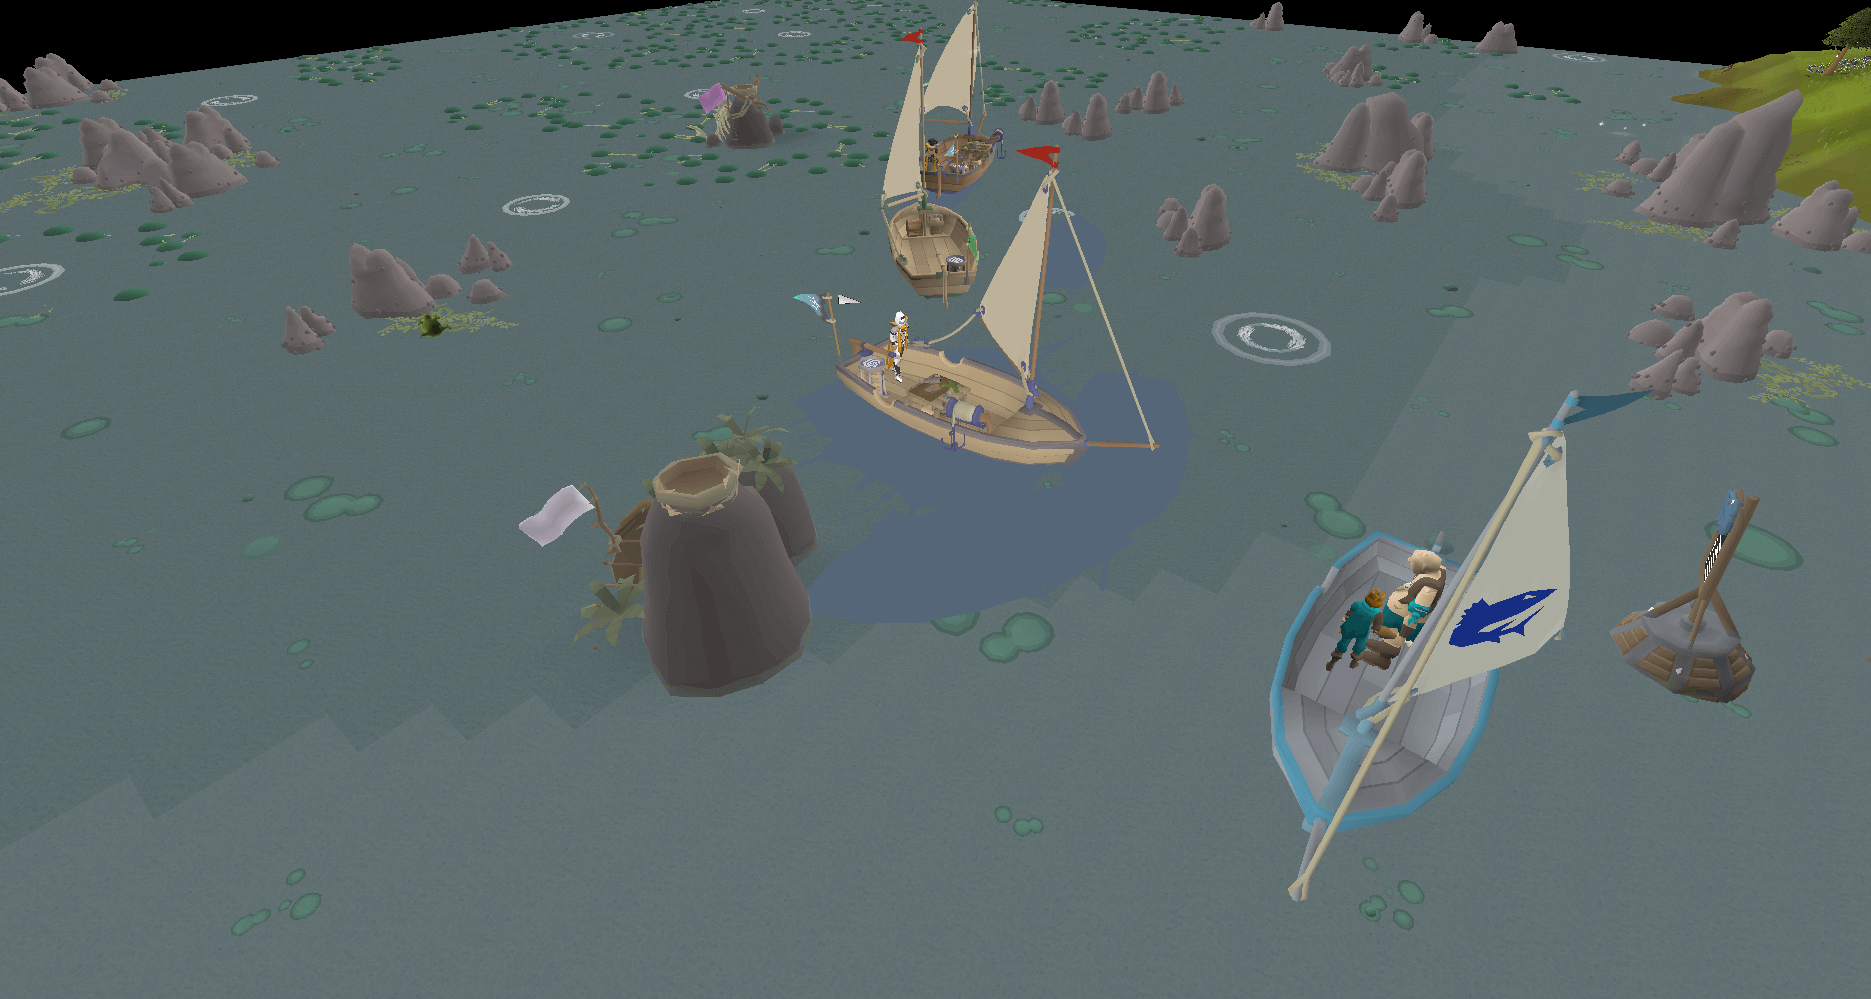
This Barracuda Trial requires level 55 Sailing, and a skiff with a mithril helm and an inoculation station. Jubbly Jive is located right below Castle Wars, and the easiest way to access it is by moving your ship to the Corsair Cove and sailing along the shoreline. This trial is a huge step up from the previous one in terms of difficulty, so get ready to drift in the sea.
Just like the previous trial, you will need to collect all the lost cargo scattered throughout the area. In this trial, however, instead of simply collecting some rum, you will need to lure jubbly birds to the starting location. To do this, you will first need to collect toads from the supply boat located at the back end of the trial and throw those toads at the pillars. Jubblies will move to the next pillar in line to eat the toad. So, your goal is to move the jubbly one pillar at a time from the pillar it spawns to the starting point. There are also fetid pools scattered along the trial grounds, which will drastically slow down your ship if you enter or touch them. You can nullify this effect for a few seconds if you trim your sails.
You can get the following upgrades before reaching the next Barracuda Trial to help you in this one:
- Level 67 Camphor hull: Increases boat health and speed
- Level 68 camphor mast: Increases the boat's speed boost duration.
Strategy
There are a few things to keep in mind to make this trial easier for yourself:
- The first jubbly always spawns on the blue pillar.
- You can pre-throw toads to move jubblies faster. This is a must-do in Marlin. You will be throwing toads on pillars preemptively to prepare for the second and third jubbly that are going to spawn after the first one.
- Never throw toads on the green pillar, as new jubblies will spawn there, so it will be a waste.
- After beating the shark rank, take your boat to a shipyard and build the windcatcher upgrade. This is a requirement for beating the Marlin time.
Swordfish
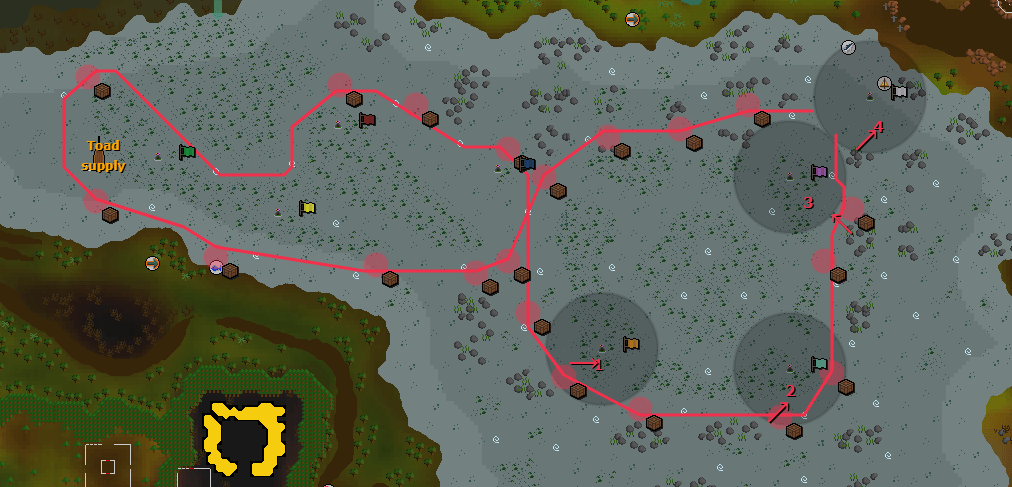
Below are the marked locations of every lost cargo and the path that you should take to finish the trial. The numbers on the flags show the toads that you need to throw in order.
Shark
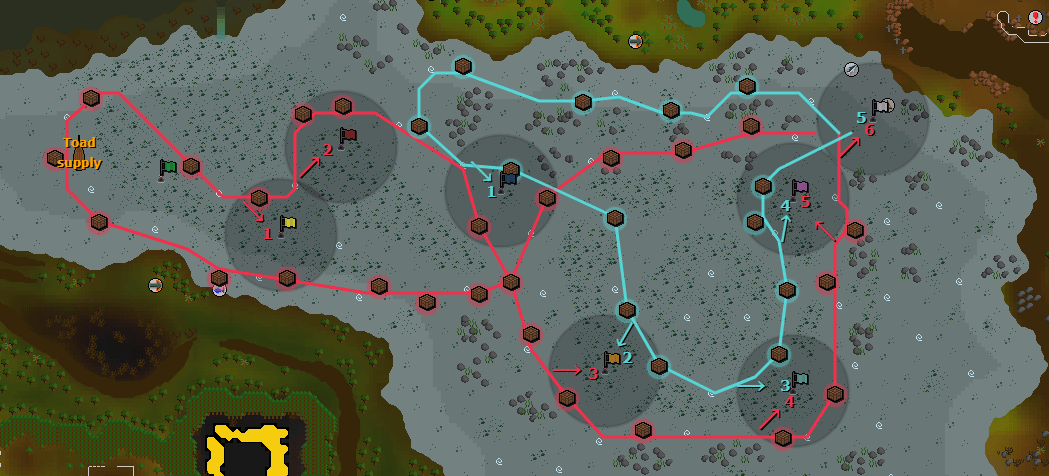
It gets a little more complicated in the shark tier, where you will need to pre-throw some toads to lure in the second jubbly and do two laps around the course, which will have you do some sharp turns with your boat. Below is the optimal way of finishing the course; the red line is the first lap, and the blue is the second:
Marlin
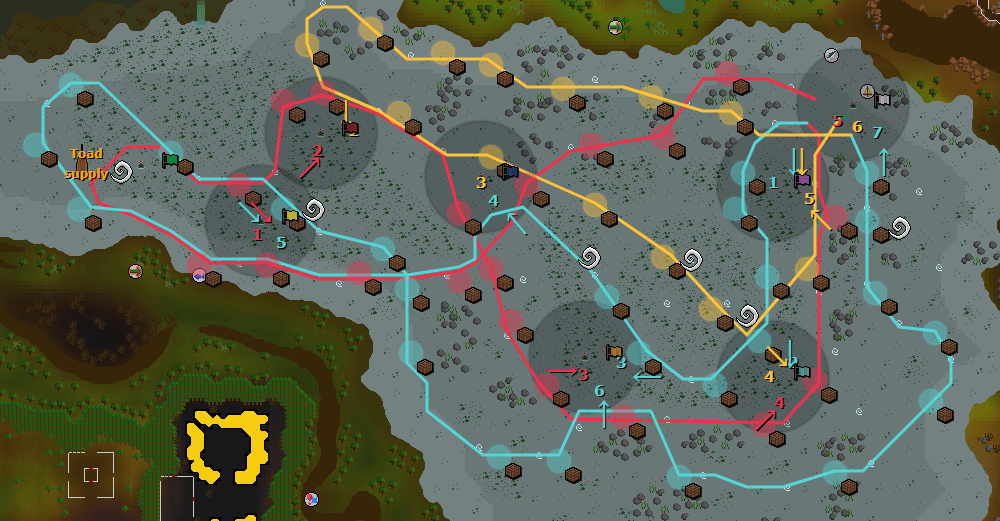
This one is extremely difficult and will require fast and precise clicks. For this trial, you will need to have the windcatcher built on your ship. Throughout the course, you will collect your wind and use it in parts where you will need to go through fetid pools. If you waste your wind motes, you won’t be able to complete this trial in the required time. Below are all 3 laps required to complete this course. Red line is the first lap, blue is the second, and yellow is the third. There are also wind mote icons throughout the image, indicating where you will need to use your speed boosts.
Rewards
Below are the rewards from this trial. The shark tiers' reward is important for any player, as it gives the material to build a wind catcher on your ship.
| Rank | Total Exp | Bonus Exp (first time) | Reward |
| Swordfish | 2392 | 5000 | Fetid key |
| Shark | 4270 | 7500 | Captured wind mote |
| Marlin | 8204 | 10000 | Gurtob’s fabric roll |
The Gwenith Glide
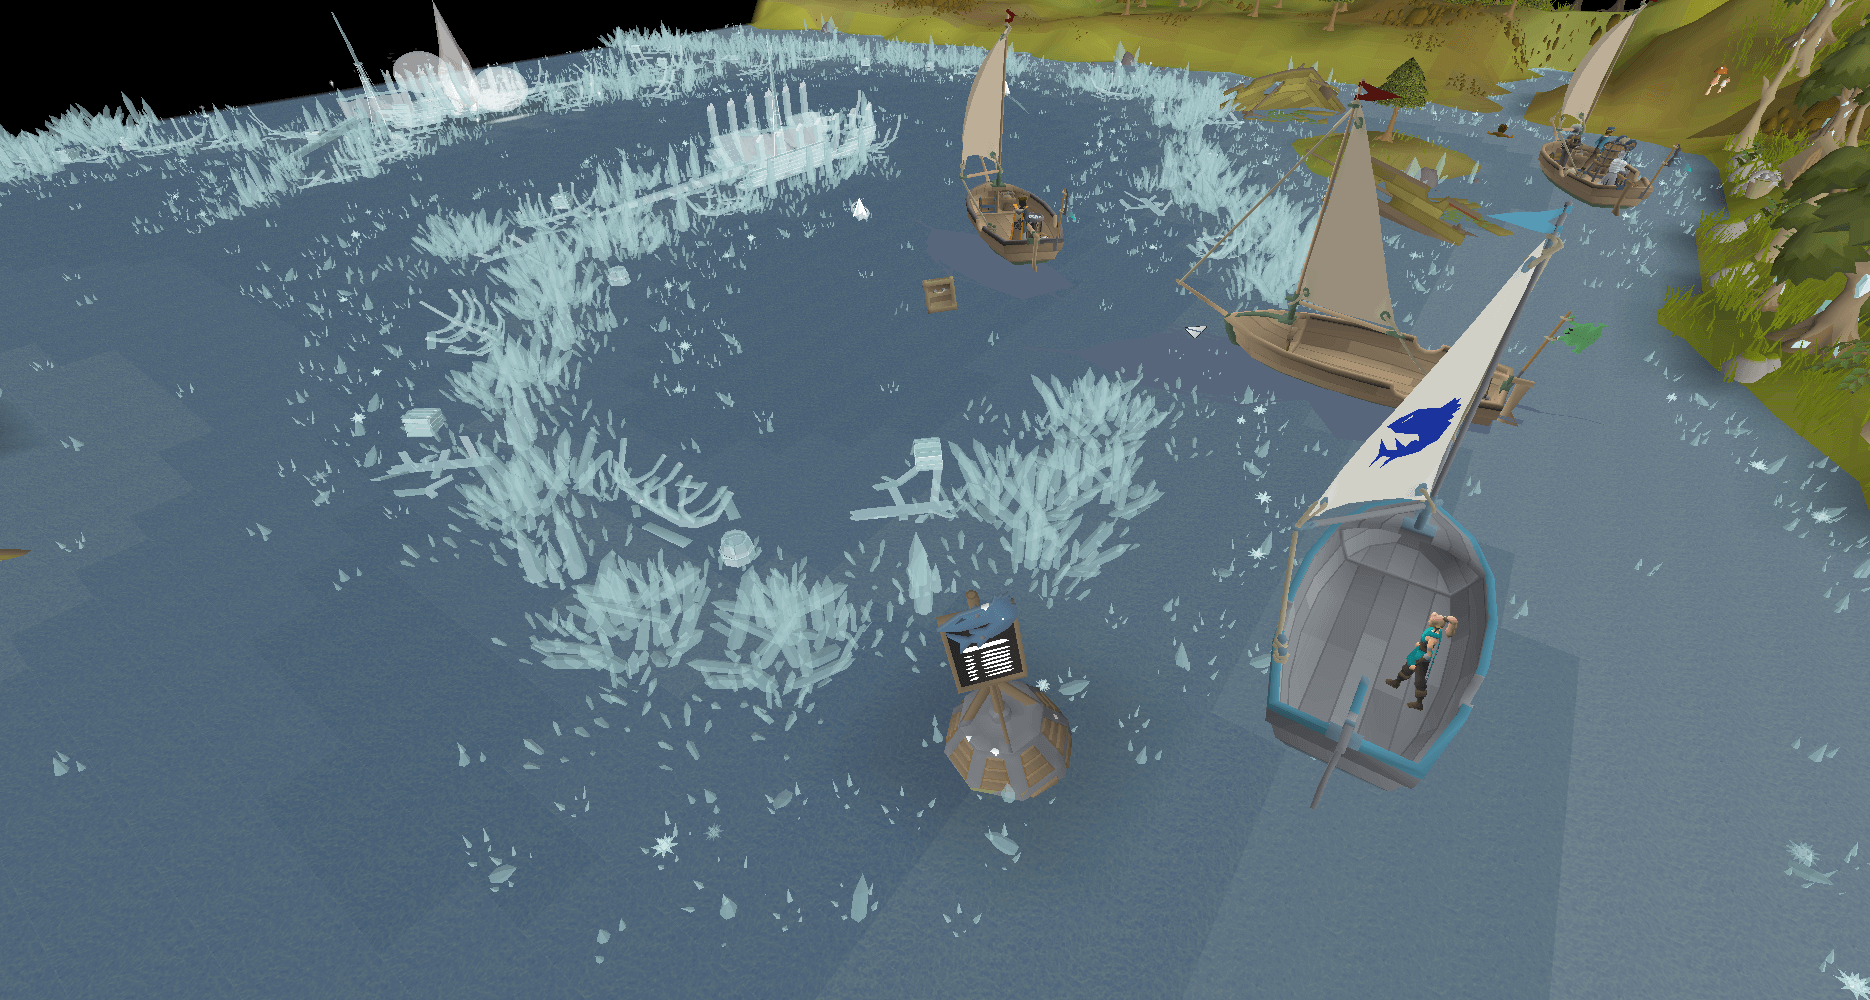
This Barracuda Trial requires level 72 Sailing, the completion of the quest Regicide, and a skiff with adamant keel or better. Gwenith Glide spans across the crystal waters of Prifddinas, and the easiest way to get to the starting location is by docking at the dock of Prifddinas.
For this trial, a wind or gale catcher is a must-have, since instead of speed-boosting whirlpools, there are crystal motes scattered all around the trial. These motes give 1 wind charge for your catcher, allowing you to speed boost whenever you want. To make the time on these trials, you will need to have close to 100% wind up time on your sails, so avoid missing these crystal motes.
Throughout the trial, you will encounter resonance crystals, which spawn white spikes that shoot up from the water. Getting hit by these will cause your helm to be crystalized; this will slow down your boat and start inflicting damage on your player character. Spam clicking the helm will get rid of this effect. The damage is nothing serious and can be negated easily by using either a regen bracelet, a hitpoint cape, or rapid heal prayer.
In this trial, you will have to collect all the lost cargo and imbue all the crystals by teleporting through the required portals scattered around the place. If you are looking to finish the Marlin trial, having a camphor hull and mast is a must. The marlin challenge of this trial is pretty diffucult so if you can’t do it, you can return at level 93 Sailing with a Rosewood hull to complete it with ease. Obviously, getting a rosewood hull is expensive, so if you need OSRS gold, you can check out our OSRS Gold Store for fast and secure transfers.
Swordfish and Shark
Swordfish and shark rank in this trial is pretty straightforward. Following the lost crates will lead you to the portals that you need to pass through. The swordfish trial route is the beginning part of the shark route. In swordfish, the order of portals you need to go through is:
- White portal
- Blue portal
- Green portal
For the shark route you need to go through the following portals in order:
- White portal
- Blue portal
- Green portal
- Yellow portal
- Red portal
Marlin
Marlin is where things get really complicated. This trial is long, requires extreme precision, and one mistake can mess up your time. Here is how you get through this trial:
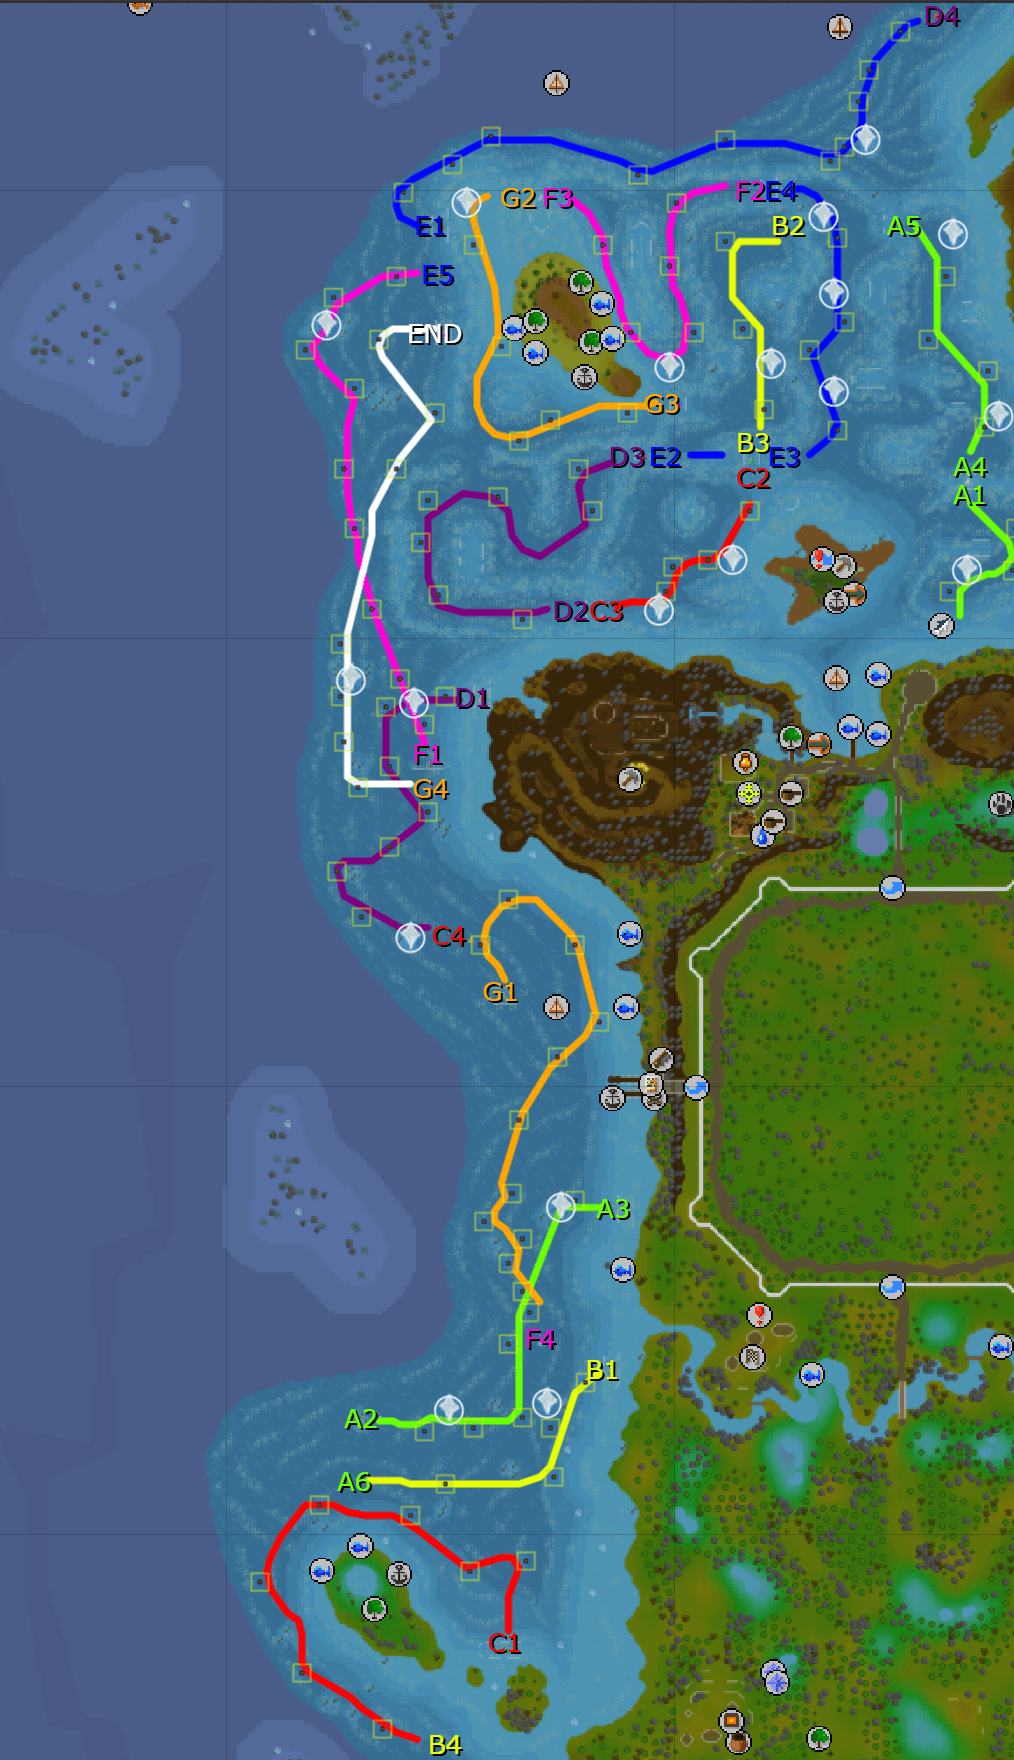
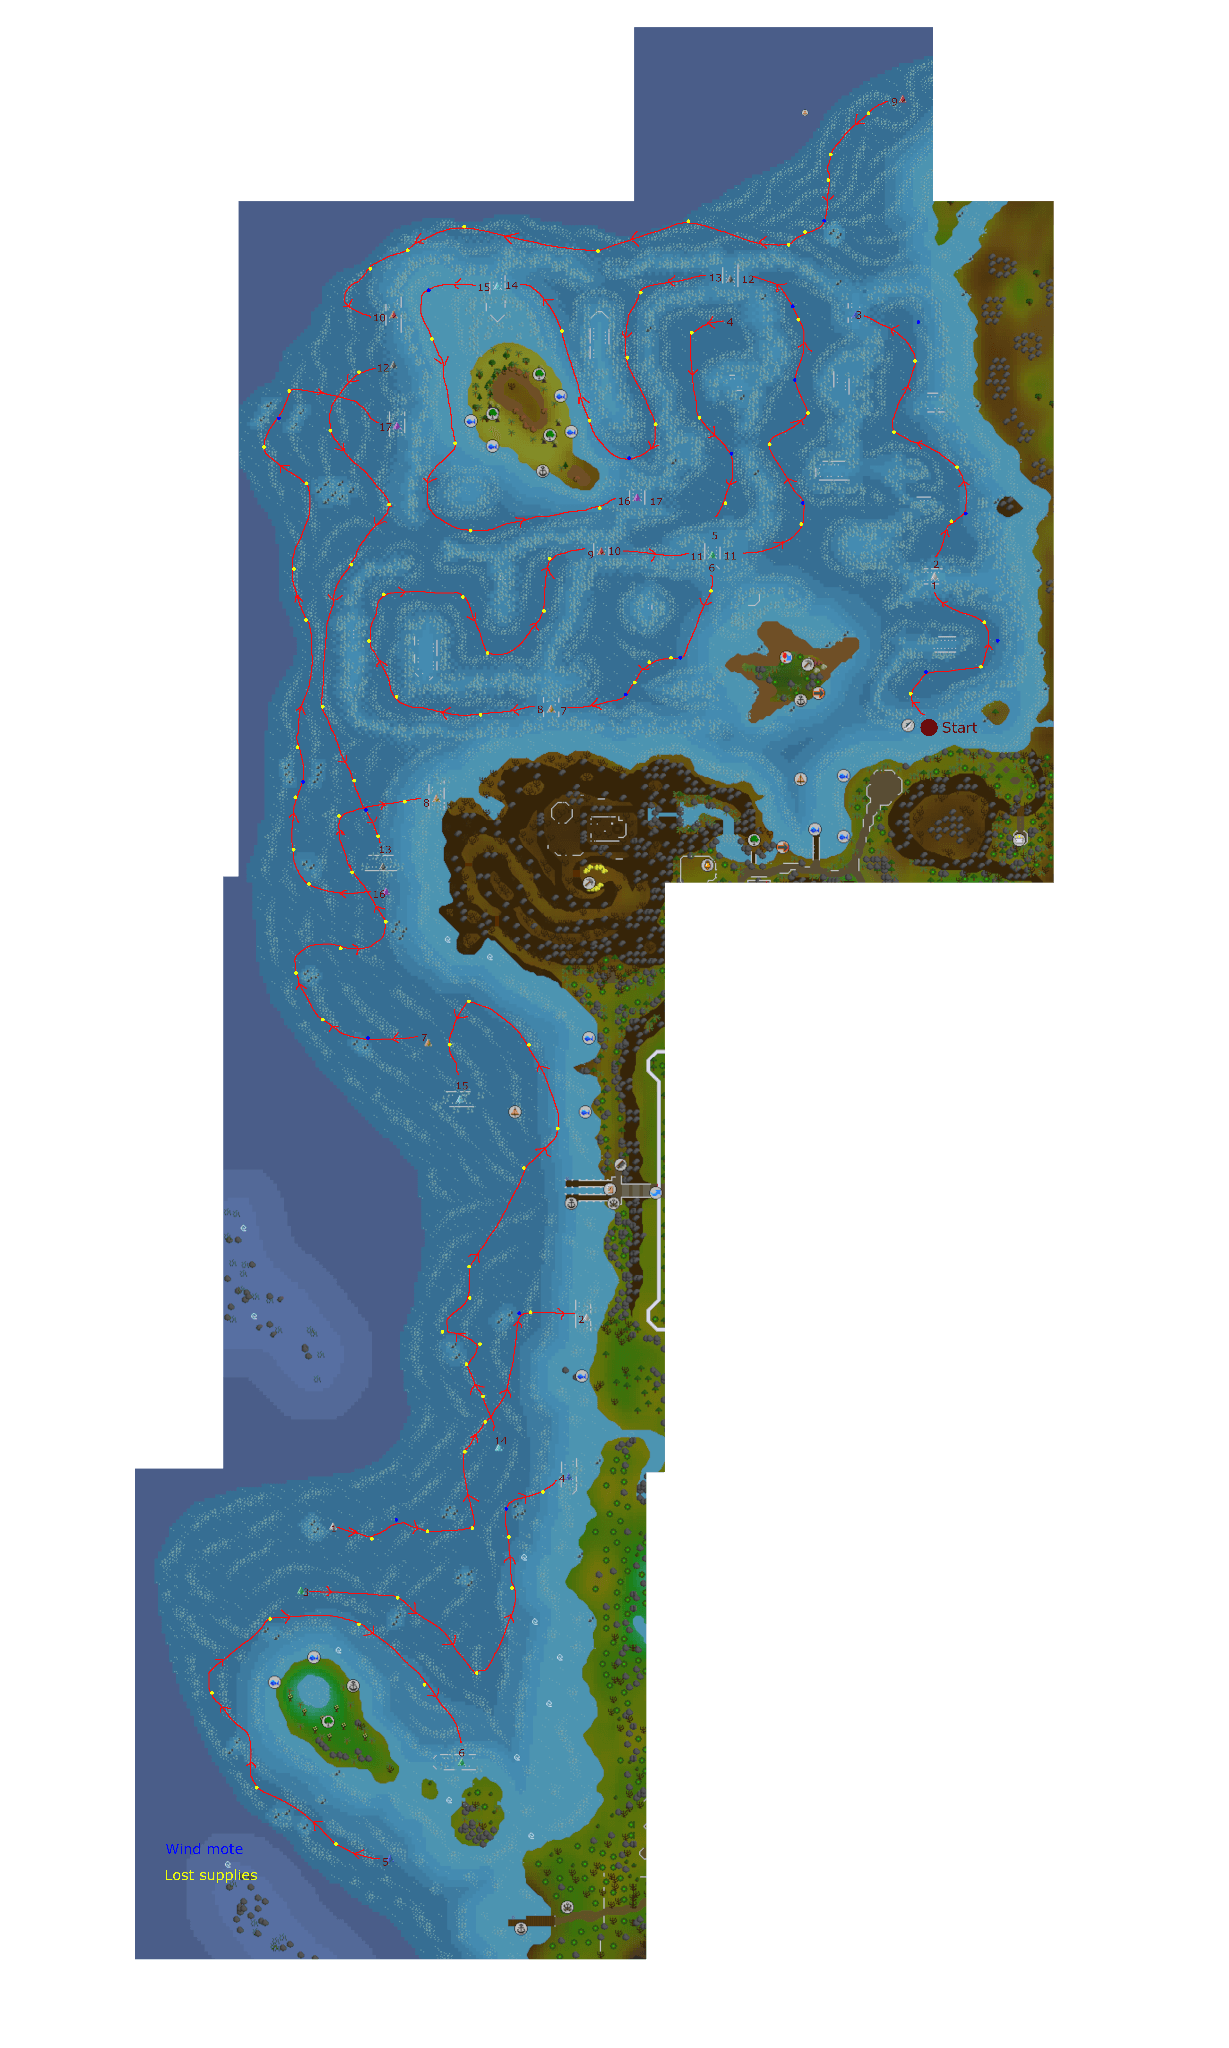
Rewards
Below are the rewards from this trial. The shark tiers' reward is important for any player, as it gives the material to build a crystal extractor on your ship to gain a free wind charge every minute!
| Rank | Total Exp | Bonus Exp (first time) | Reward |
| Swordfish | 4100 | 25000 | Serrated key |
| Shark | 9315 | 35000 | Heart of Ithell |
| Marlin | 19410 | 50000 | Gwyna's fabric roll |
That wraps up everything you need to know about the Barracuda Trials. They're tough, demanding, and definitely not forgiving, but once the routes click and your ship is set up properly, they become one of the most rewarding ways to train Sailing. Take your time learning each trial, don't get discouraged by failed runs, and focus on consistency over perfection. Stick with it, grab those upgrades, and before long, you'll be clearing trials that once felt impossible. If you need more help with everything related to Sailing, you can check out our OSRS Blog for more guides!