PoE 2 Fate of the Vaal League: Vaal Temple Guide
19.01.2026 - 05:07:43
Game Guides , Path of Exile 2

The Fate of the Vaal League for Path of Exile 2: The Last of the Druids is now in full swing. While many people have used the new league mechanic to print Divine Orbs like crazy, some are left scratching their heads on how to actually create the ideal temple layout. If you are one such person, you’ve come to the right article!
For today, I am going to give you everything you need to know about the Vaal Ruins (aka Vaal Temple, especially if you’ve played the original Path of Exile). This is our definitive Vaal Temple Guide for PoE 2 Fate of the Vaal League!
Now, venturing forth into the Vaal Ruins is no easy feat because if you come unprepared, you will get decimated. Head to our PoE 2 Store to get the stuff that you need before entering the dangerous Vaal Ruins!
PoE 2 Vaal Temple Guide: The Main League Mechanic
In our Fate of the Vaal League overview, I explained that you can explore the Vaal Ruins by powering up the beacons scattered throughout Wraeclast. The Ancient Beacons give you energized crystals (anywhere between one and two per beacon). You need about six energized crystals to power up the Temple Console, so you might need to interact with three to six beacons if needed.
By default, you only have a very finite number of energized crystals. Upon exploring the Vaal Ruins, you will get Xopec’s Medallion, which increases the maximum capacity of energized crystals by six on each use. The total number of energized crystals you can carry is 60, so you should spend time farming Xopec’s Medallion to achieve this.
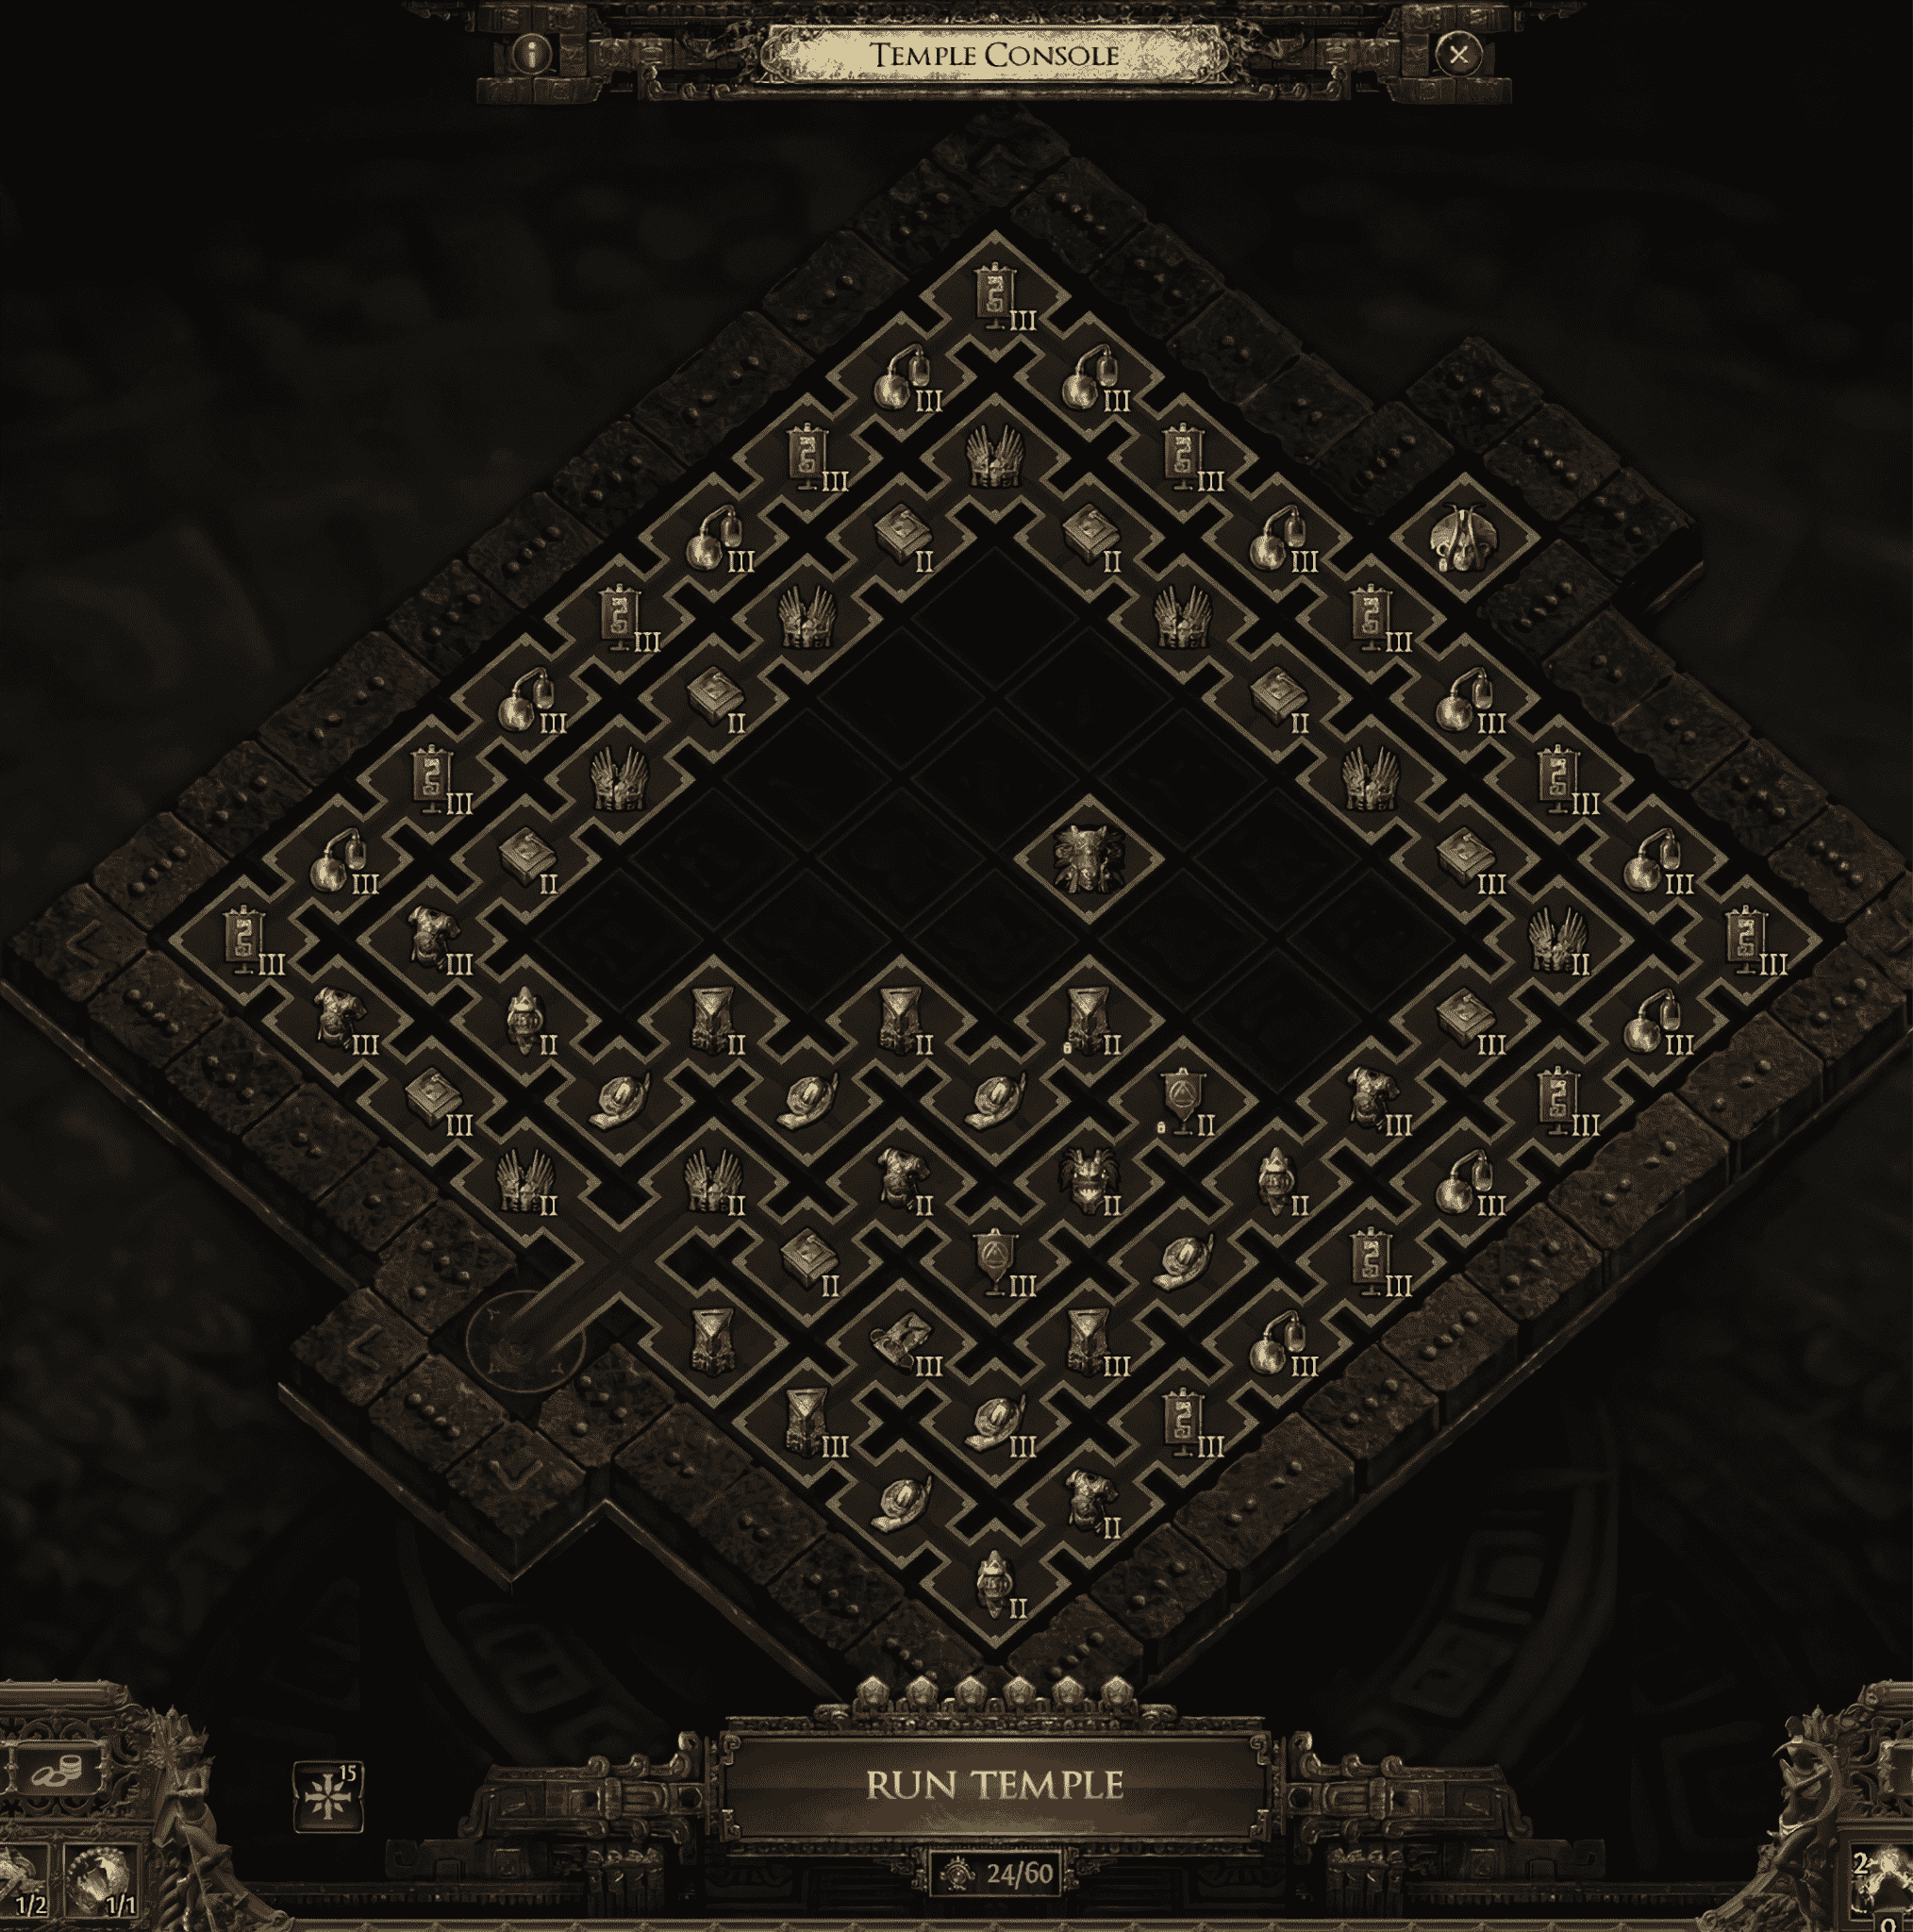
Anyway, after powering up six Ancient Beacons, a portal to the Vaal Ruins will open. Enter to get to the infamous temple itself! Once you are inside, you will come across the Temple Console, which is going to be an important fixture in the temple as it allows you to place various rooms and paths in order to complete the layout.
Ultimately, you want to populate the layout with various rooms, including the Spymaster, Garrison, and Armory, among others. Don’t worry, I will give you some useful tips later on about optimizing your Vaal Ruins setup.
PoE 2 Vaal Temple Guide: Basics
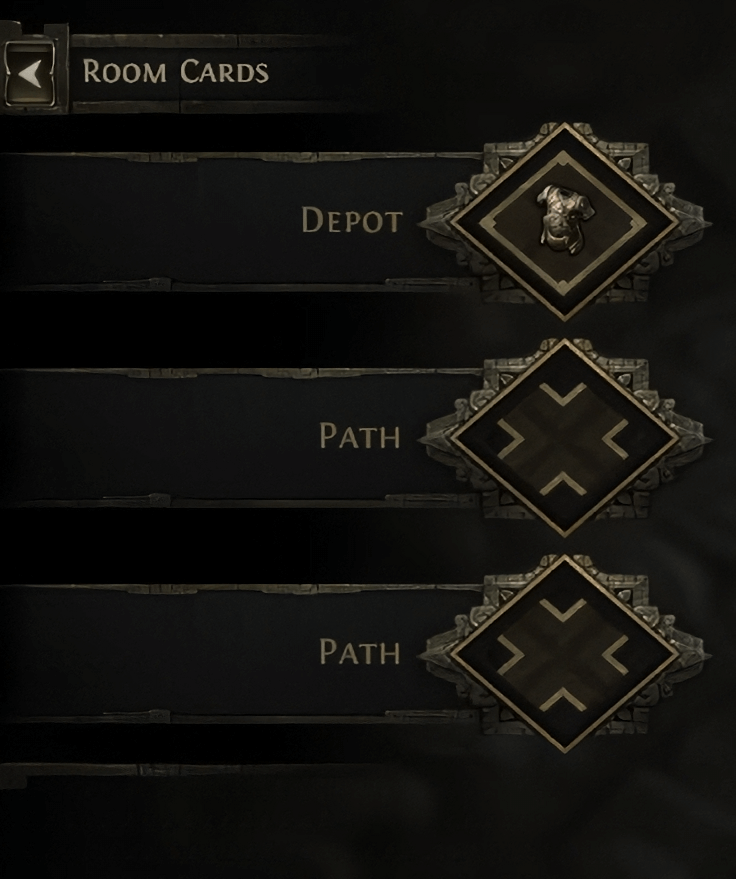
Every time you enter the Vaal Temple, you will be given six random rooms and paths that you can place on the 9x9 grid. Take note that you cannot just put rooms anywhere on the Temple Console because every room must be connected via a chain (with the exception of the special reward rooms from the Architect’s console). You will begin this chain from the lower-left corner of the temple layout.
Although you have full control over how you want to set your temple up, you don’t have any control whatsoever with regard to the actual rooms that are given to you per run. That is why those who want to have several Spymaster rooms find it difficult to achieve that because of the heavy RNG that is involved.
Now, there are two main points of interest in the Vaal Ruins. These are the Architect’s Chamber and Atziri’s Chamber. The former allows you to interact with a special console after defeating the boss in the area named Xipocado, Royal Architect. The latter, on the other hand, is where the main boss of the temple resides: none other than Atziri herself!
Anyway, if you are entering the temple for the first time, all you really need to focus on is getting to the Architect’s Chamber and defeating Xipocado. This is not only to interact with the special console mentioned earlier, but also to acquire Azcapa’s Medallion, which increases your medallion capacity by one (up to a total of six).
Medallions are necessary to ensure that your ideal temple layout is preserved through your runs. In case you are not aware, ending a run will cause various parts of the temple to destabilize, essentially removing some rooms from your layout.
To prevent that from happening, you will need a special medallion called the Juatalotli’s Medallion. This thing can be farmed from the Spymaster room, which is why it is highly sought after.
While you cannot prevent destabilization from happening once you “close” the temple, you can “lock” certain rooms so that most of your layout is preserved, no matter what happens. Hence, you need to use three Juatalotli’s Medallions per run if you want to maintain your current layout for future visits.
PoE 2 Vaal Temple Guide: Advanced Strategies
As previously mentioned, there is a way to prevent some rooms from being removed through destabilization. One way to do that is by doing the “snake method,” where you place paths and rooms in a relatively straight, snake-like pattern, and then use the Juatalotli’s Medallion on the last three rooms.
The reason why that works is that GGG somehow programmed the destabilization procedure to work only the rooms on the tail-end, particularly when you do the snake method. So, if you want to preserve your carefully constructed Spymaster, Garrison, and Armory combo, then the snake method has never failed in this regard.
Speaking of which, there are many different types of rooms in the Vaal Ruins, but the only ones you need to concern yourself with are the aforementioned Spymaster, Garrison, and Armory. Now, there are a couple of reasons why these rooms are special.
For one, these are the rooms that you can connect with each other. The game actually tells you this. For instance, you cannot directly connect the Garrison to a Thaumaturge because the latter requires the Alchemy Lab to be placed beforehand.
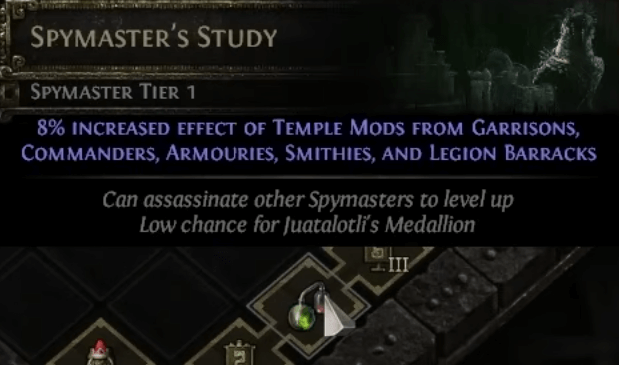
Aside from that, certain rooms in the Vaal Ruins provide bonuses that actually work all throughout the temple. The Spymaster is the most sought-after, mainly because it increases the effects of temple mods from the Garrison (rare monsters), Armory (humanoids), and Smithy (more item rarity). Plus, it has a much higher chance of dropping the “lock medallion” itself, the Juatalotli’s Medallion.
You might be wondering why the Garrison is also a must-have in your temple configuration. Well, that is because it increases the number of monsters that can spawn in the temple by up to 20% when it’s fully upgraded. Combined with the increased effect that it gets from the Spymaster’s Study, you will have more monsters to kill, therefore, a greatly improved chance of getting high-value items like the Headhunter and Lavianga’s Spirits.
The Armoury does not provide a ton of value if all you want is to get Divine Orbs in Path of Exile 2: The Last of the Druids. However, since the ideal configuration involves placing at least three different rooms on the grid, and considering that the Armoury is required to connect the two previous rooms mentioned, it should still be a part of your setup.
Snake Method Rooms
Certain rooms cannot be placed adjacent to each other. If you are going to employ the snake method when it comes to completing your temple layout, you must remember the following patterns:
- Armory > Garrison > Spymaster > Garrison > Armory (Best)
- Armory > Commander > Garrison > Commander > Garrison > Armory
- Armory > Alchemy Lab > Thaumaturge > Alchemy Lab > Armory
Of course, those room patterns are only for the best-case scenario. Remember that the rooms you are given every time you enter the Vaal Ruins are completely random. Despite that, at least you know which rooms to prioritize whenever they do come up.
Base Rooms Available in the Vaal Ruins
Name | Effects/Bonuses | Additional Notes |
Armoury | Humanoid monsters have 15/30/60% increased effectiveness | -Mainly used for connecting the Garrison and Spymaster Rooms |
Commander | Rare monsters have 15/30/60% increased effectiveness | -The bonus that the Commander Room provides will work throughout the temple, making it an incredible addition to your temple layout -Will occasionally contain special workbenches that allow you to augment certain rarity gear |
Garrison | 10/15/20% Increased number of monster packs | -Greatly increases the number of monsters you encounter in the temple, resulting in much improved chances of obtaining more valuable loot -Will sometimes have the special workbenches that can be found in the Commander Room |
Generator | Construct monsters have 15/30/60% increased effectiveness | -Supplies power to up to five rooms (when fully upgraded) -The Generator is required if you want to use the Sacrificial Chamber and the Thaumaturge |
Golem Works | 8/15/30% Increased effect of temple mods from Generators, Synthflesh Labs, Flesh Surgeons, Transcendent Barracks, and Alchemy Labs | -At level 3, you will sometimes encounter variants of some enemies inside the temple (such as the Imitation Triumph and Royal Sentinel) |
Smithy | Chests have 15/30/60% more item rarity | -Definitely include some Smithy Rooms in the chain if you get the chance |
Thaumaturge | 8/15/30% Increased effect of temple mods from Corruption Chambers, Treasure Vaults, and Sacrificial Chambers | -A fully upgraded Thaumaturge (Thaumaturge’s Cathedral) contains the Gem Corrupter, which allows you to corrupt a skill gem -The Gem Corrupter is the only way you can add a second corruption outcome to a skill gem (that is currently in the game) -The Gem Corrupter can be taken as a currency called the Crystallised Corruption. While in this form, you can use it at any time you like, or sell them for a profit |
Treasure Vault | 25% Increased rarity of items dropped by monsters | -Include at least one Treasure Vault in your temple layout -This room contains several chests that contain various items, such as uncut gems, currency, and more |
Past-Exclusive Rooms
These are the rooms that can only be seen in the “past” version of the Vaal Ruins. They are definitely more rewarding, so be sure to incorporate them however you can.
Name | Effects/Bonuses | Additional Notes |
Alchemy Lab | 15/30/60% Increased rarity of items dropped by monsters | -The Alchemy Lab is a more powerful version of the Treasure Vault (and also a bit rarer) -At Tier 2, it also increases the gold that you find throughout the temple -Definitely include the Alchemy Lab somehow in your temple layout |
Corruption Chamber | Rare monsters have a 15/30/60% chance to have an additional modifier | -The level 1 and level 2 Corruption Chamber contain a Corruption Altar, which lets you corrupt a non-corrupted item of your choosing -The level 3 upgrade (Locus of Corruption) contains the Corruption Instiller. This lets you corrupt an already corrupted item, with a chance for two corrupted mods (if you are lucky) -If you’d like to use the Locus of Corruption at a later date, you can “take” it, giving you the Architect’s Orb (special currency) |
Flesh Surgeon | Unique monsters have 10/20/40% increased effectiveness | -Upgrading the Flesh Surgeon to level 3 allows you to interact with the Transcension Device -The Transcension Device gives you a Transcendent Limb, giving your character a special modifier of your choosing -The Transcendent Limb gets removed if your character dies, forcing you to make a trip to the Flesh Surgeon again if you like another modification |
Sacrificial Chamber | 15/30/60% Increased amount of rare chests | -You can only have one Sacrificial Chamber in your temple layout at a time -Even though this room can connect to a Corruption Chamber, Generator, or Thaumaturge, the Sacrificial Chamber cannot be upgraded this way -Instead, upgrading the Sacrificial Chamber requires sacrificing (destabilizing) an eligible room that is close to it -The level 3 upgrade (Apex of Oblation) lets you replace up to two modifiers on a corrupted Vaal Unique Item. This effect can be converted into a currency called the Vaal Cultivation Orb for later use |
Spymaster | 8/15/30% Increased effect of temple mods from Garrisons, Commanders, Armories, Smithies, and Legion Barracks | -Can be upgraded only by placing at least two other Spymaster Rooms anywhere on the temple -One of the established Spymaster Rooms will be “assassinated,” causing one random Spymaster Room to be upgraded as a result -The upgrade can only be carried out once you close the temple (ending your run) |
Snythflesh Lab | Monsters grant 10/20/40% increased experience | -Ideal for leveling up your characters to 100 |
Legion Barracks | 30/60% Increased number of rare monsters | -At level 1, this room provides you with a chance of acquiring the Quipolatl’s Medallion -At level 2, you have a much higher chance of acquiring the other medallions |
Transcendent Barracks | 30/60% Increased number of magic monsters | -Not that valuable, though it’s fine if you want to increase the number of monsters that you have to kill in the temple |
Restricted Rooms
These rooms can only be accessed via Xipocado’s Console. It goes without saying that you have to defeat Xipocado, Royal Architect to be able to interact with the said console.
Name | Effects/Bonuses | Additional Notes |
Augments Vault | Contains a random high-level rune | -If you have the Augments Vault placed on the present-day version of the Temple (instead of the Past), then you’ll only get a regular rune as a reward for completing the Augments Vault |
Currency Vault | Has a large treasure chest that contains a boatload of PoE 2 currency | -Will occasionally spawn two treasure chests that have a random set of PoE 2 currency inside |
Lineage Gems Vault | Rewards you with a random Lineage Support upon completion | -This is a good way of acquiring some Lineage Support gems |
Extraction Chamber | A special device that lets you salvage socketable augments is found in this room | -If you need the effect of the Extraction Chamber for later use, you can take it as a currency called the Orb of Extraction |
Tablets Vault | Contains the Corrupted Precursor Machine | -The Corrupted Precursor Machine lets you corrupt a precursor tablet -This process could result in your precursor tablet being destroyed in the process -You can take it as an Ancient Infuser if you want to sell it to other people or use it yourself at a later date |
Uniques Vault | A room that contains random unique items on display | -The Uniques Vault is a good way of getting your hands on some unique items (that you couldn’t find in the overworld) |
Royal Access Chamber | Allows you to access Atziri’s Chamber | -The Royal Access Chamber is necessary if you want to fight Atziri herself -Atziri’s Chamber should be connected to the entrance to use the Access Chamber Ritual, which will initiate the fight |
Temple Room Interactions
For the most part, certain rooms in the temple can be upgraded when you place a compatible room right next to them. Here is a rundown:
- Garrison
- Upgraded by placing the Armory, Commander, Synthflesh Lab, and Spymaster next to it
- When the Synthflesh Lab is adjacent, the Garrison is upgraded to a Level 2 Transcendent Barracks instead
- When the Spymaster is connected, the Garrison is upgraded to a Level 2 Legion Barracks
- Armory
- Upgraded by putting the Smithy and Alchemy Lab beside it
- Smithy
- Upgraded by placing the Generator and Golem Works adjacent to it
- Commander
- Upgraded by putting the Garrison or Transcendent Barracks right next to it
- Take note that the upgrade will only occur when you have at least two Garrisons and Transcendent Barracks connected to the Commander Room
- Corruption Chamber
- Upgraded by placing the Thaumaturge or Sacrificial Chamber right next to it
- Spymaster
- Can only be upgraded by sacrificing (assassinating) another Spymaster Room
- Generator
- Provides power to the Smithy, Golem Works, and Snythflesh Lab
- Does not need to be connected to these rooms directly, so long as the Generator is within three to five tiles (depending on the tier)
For more PoE 2 Guides, visit our RPGStash Blog.