D2R Season 13: Best Bowazon Build Guide
22.04.2026 - 07:50:24
Diablo 2: Resurrected , Game Guides

A major point of playing Diablo II: Resurrected Season 13 is the introduction of the Heralds of Terror—formidable enemies that will hunt you down inside Terror Zones. You not only need a D2R build that can handle the many monsters inside these areas, but also be capable enough of dishing out huge amounts of damage because the Heralds of Terror are no slouch. This is where the Bowazon shines!
Today, I am going to talk about a physical damage build that has the tools to handle Terror Zones really nicely. So, if you are interested in knowing about it, then read further. This is the best D2R Bowazon build guide for Season 13!
Why Play the Bowazon in D2R Season 13?
Terror Zones are all the rage right now in Diablo II: Resurrected. This is because you’ll have a chance to face the Herald of Terror, which is a new and formidable monster that has five tiers of Hell waiting for you. The literal Herald of Terror is so incredibly difficult to defeat that you’d have to exhaust everything in your arsenal just to bring it down.
The good news is that the physical Bowazon can handle the new enemy really well. This particular D2R build in Season 13 uses a couple of skills, namely Multiple Shot and Strafe.
Multiple Shot allows you to fire a bevy of arrows at once. This is great for clearing out the huge packs of monsters inside Terror Zones, right before the grand finale.
Strafe, on the other hand, is what you should use when you come across the Herald of Terror. This is your primary skill for single targets, as it enables you to fire arrows rapidly. Take note that using Strafe will lock you in place until you’ve fired 10 arrows (aka “Strafe Lock”), so playing the Bowazon might not be ideal when you’re in Hardcore.
Be that as it may, the Bowazon is one of the best builds against Uber Bosses in Diablo II: Resurrected, especially if you equip her with the Best D2R items, such as Faith, Fortitude, and Laying of Hands, among many others.
Stat Allocation
- Strength: 103 or 134
- Dexterity: 167 or 187
- Vitality: Dump the rest of the points here
- Energy: None
When it comes to the physical Bowazon build in D2R Season 13, you have a couple of ways to allocate your stat points for maximum damage. The idea of putting your points into STR and DEX rests primarily on what weapon you are going to use.
The Faith Runeword is one of the best weapons for the Bowazon, and it is often placed inside a Matriarchal Bow for its good base damage and faster attack speed (relative to the GMB). Since the Matriarchal Bow requires 187 DEX and 87 STR, you should put your stat points accordingly.
On the other hand, if you don’t want to be bothered by acquiring the runes necessary for Faith, you can opt for the Windforce instead. Windforce needs 134 STR and 167 DEX to wield, hence, the values that I’ve recommended above.
Now, the reason why I put 103 on Strength as a viable option is that you need that many STR to equip an Archon Plate, which is a suitable base for Fortitude. If you’re going to use the Windforce anyway, then 134 strength is fine.
Skill Breakdown
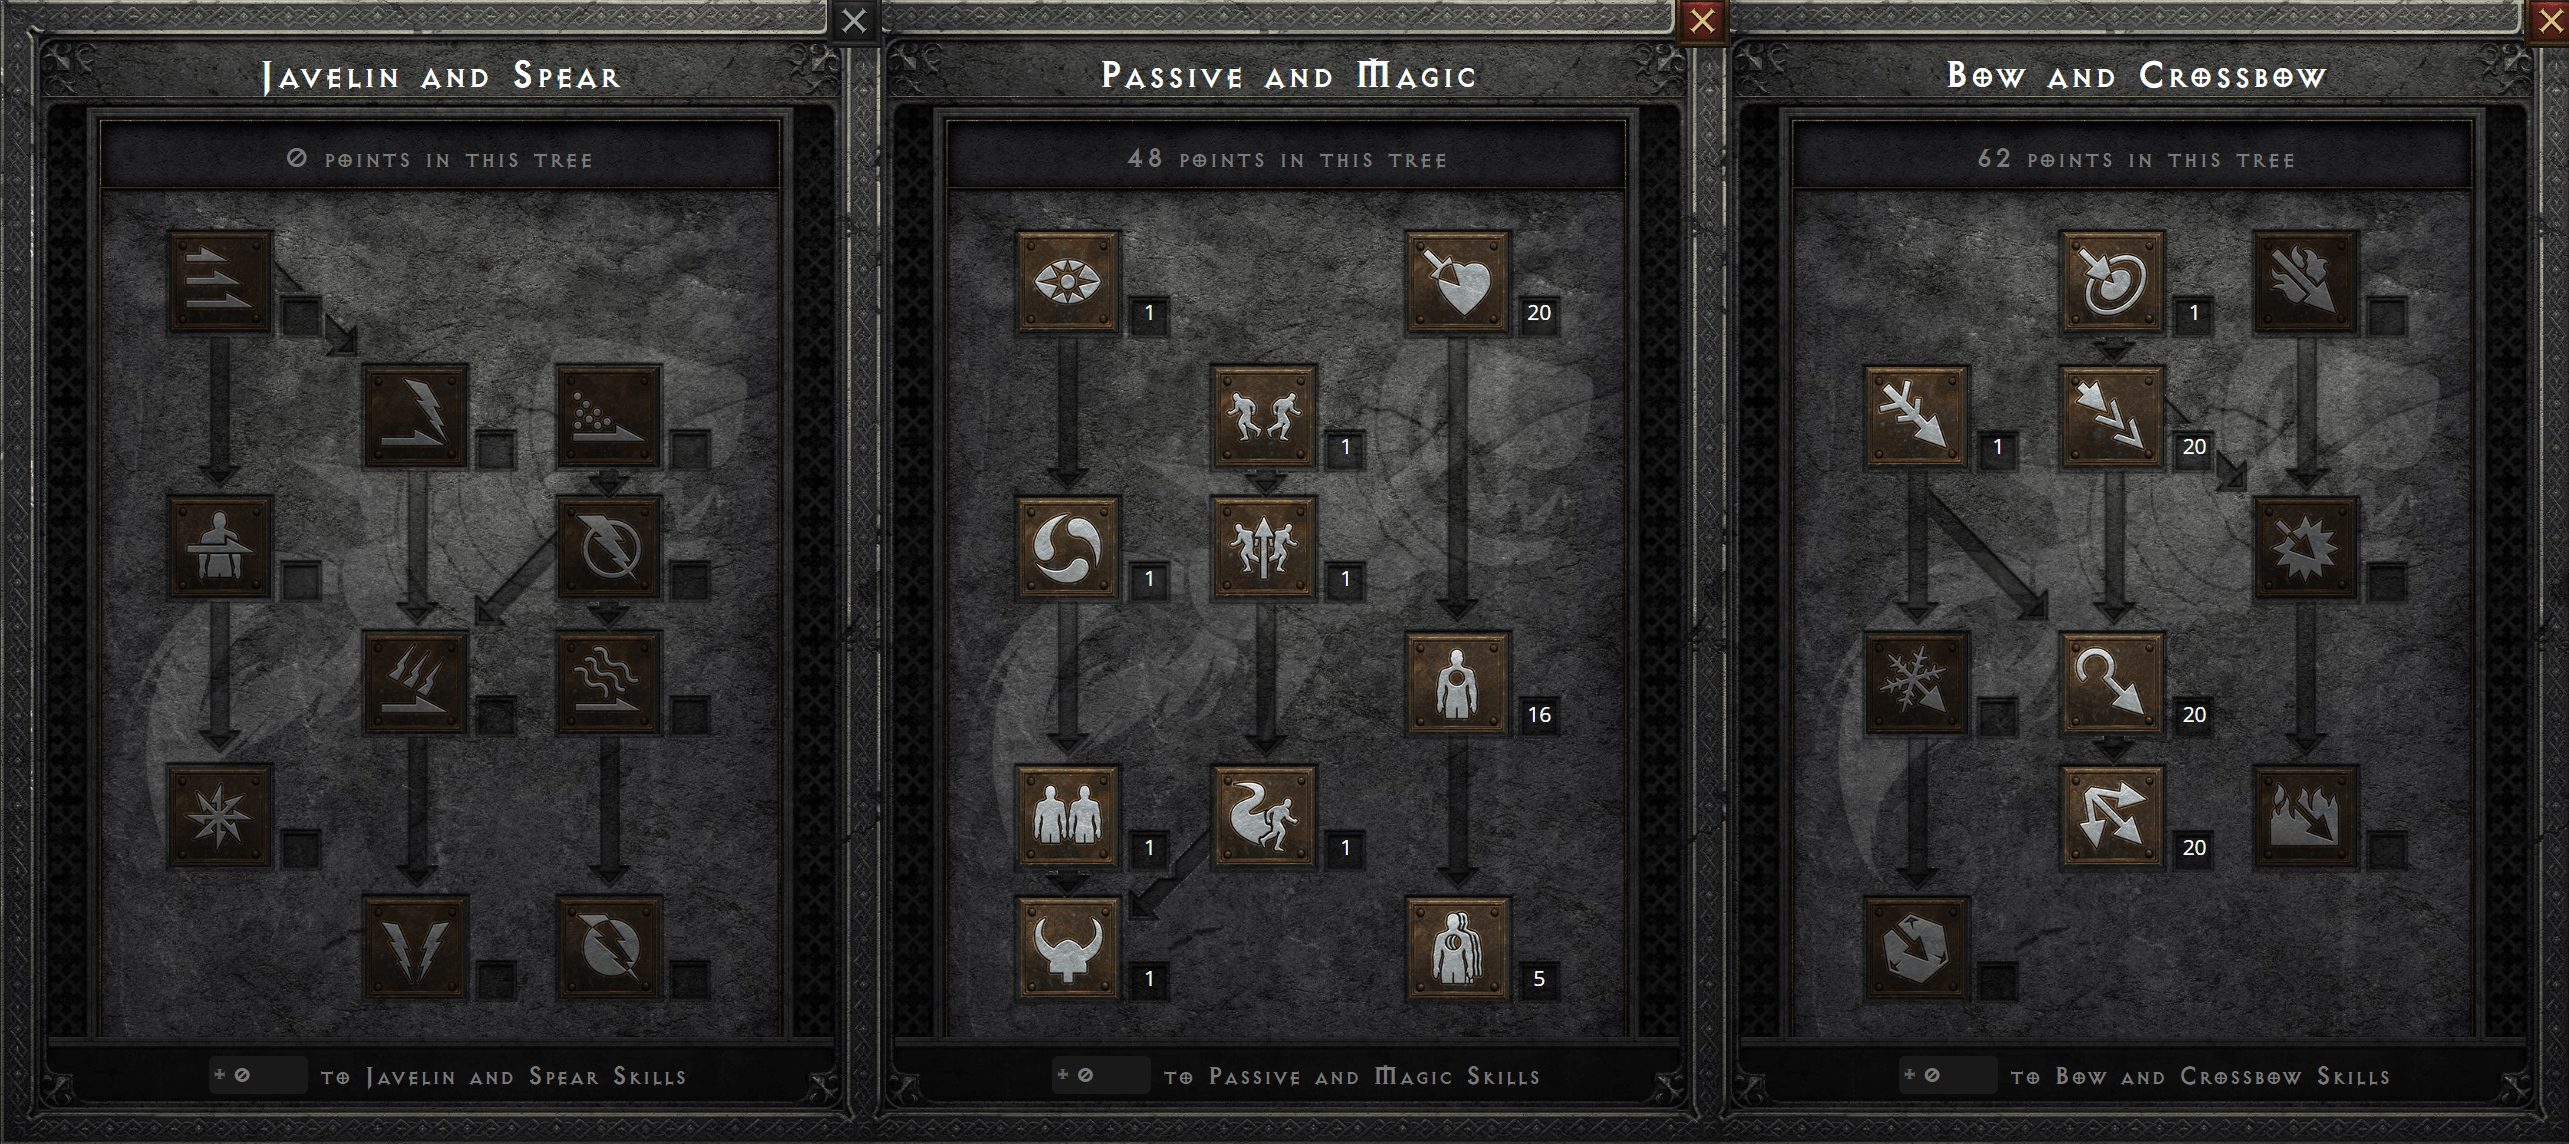
- 20 points on Multiple Shot
- 20 points on Strafe
- 20 points on Guided Arrow
- 20 points on Critical Strike
- 16 points on Penetrate
- 5 points on Pierce
- Put 1 point on the following:
- Magic Arrow
- Cold Arrow
- Inner Sight
- Dodge
- Avoid
- Slow Missile
- Evade
- Decoy
- Valkyrie
The skill point allocation for the Bowazon build in D2R Season 13 is quite simple. Strafe and Multiple Shot are your main attack skills. You max out Guided Arrow because this particular skill increases the damage of both Multiple Shot and Strafe (at 12% and 10%, respectively).
Critical Strike effectively doubles your damage output using Multiple Shot and Strafe. Because you’re going to attack pretty quickly with the said skills, it only makes sense to increase the level of Critical Strike to 20 to maximize your damage output.
As for Pierce and Penetrate, you’d have to do some juggling to achieve a 100% chance to pierce with your primary skills. 5 hard points on Pierce is enough to reach the maximum, though you have to rely on skiller grand charms and the Razortail unique belt to do the rest.
Aside from the prerequisites, the rest of your skill points should be dumped on Penetrate to significantly boost your chance to hit enemies.
Breakpoints
Most of the time playing the Bowazon in Diablo II: Resurrected is spent being away from the enemy, so Faster Hit Recovery (FHR) is not all too important. Just get enough from your gear in whatever amount you can without sacrificing too much to achieve a higher breakpoint.
The most important breakpoint that you should focus on, however, is the IAS. Since you’ll be using a Matriarchal Bow for Faith, and the Windforce (Hydra Bow) as a viable alternative, here are the IAS breakpoints that you need to be aware of:
- Faith (Matriarchal Bow): 42% (9 frames) or 75 (8 frames)
- Windforce (Hydra Bow): 56% (10 frames) or 89% (9 frames)
If you want to use the Grand Matron Bow as the base for the Faith Runeword, you can follow the IAS breakpoints for Windforce, since they have the same base attack speed.
Playstyle
Pre-buff with Battle Command and Battle Orders using Call to Arms. Swap to Mania (Hunter’s Bow) and hit enemies until you proc Burst of Speed. Switch back to your main weapon after that. If you prefer the Demon Limb as a switch weapon, cast Enchant instead.
When trying to eliminate a lot of monsters, use Multiple Shot for such purposes. Utilize Strafe for single targets or against a bunch of tightly-packed enemies. Since Strafe locks you in place, only tap Strafe once and then move to another nearby location (use it again afterward).
If you are being bombarded by plenty of enemies at a time, use Decoy and bring out the Valkyrie to draw some attention away from you.
Do you have a bow with the Harmony Runeword by any chance? If so, you can equip the said bow to run around safe areas faster due to its Level 10 Vigor Aura. This is the only acceptable way to move quickly as a Bowazon, since you don’t have access to Teleport (via Enigma).
Gear
Attack speed is very important for the Bowazon build in D2R Season 13. Thus, you must invest in gear that has “increased attack speed” affixes. For certain items, you can place 15% IAS jewels to maximize that gear slot.
Aside from that, you want to improve your attack rating as well. Attack rating ensures that every arrow you fire from your bow hits the intended target.
The question of whether you need the new Renewed Bone Break or not depends on the Atma’s Scarab. If you have the said unique amulet, then the Renewed Bone Break will not be necessary.
The reason for not needing a physical Sunder Charm in this instance is that Atma’s Scarab allows you to cast a level 2 Amplify Damage on striking. Amplify Damage is a curse that effectively reduces the enemy’s physical resistance by 100%.
You can also look for items that provide Enhanced Damage. ED affects both Multiple Shot and Strafe, but only if you get it from your gear (and not from the weapon).
With that said, here are the best items for the Bowazon in D2R Season 13:
| Gear Slot | Best | Alternatives |
| Weapon | Windforce *Socketed with Protector’s Stone | Faith (Matriarchal Bow or Grand Matron Bow) |
| Switch Weapon | Mania (Grand Matron Bow) or Harmony (Hunter’s Bow) | Call to Arms (Flail, for pre-buffing) Demon Limb (for Enchant) |
| Body Armor | Fortitude (Archon Plate) | Treachery (Archon Plate) Lionheart |
| Helmet | Diadem *Socketed with (3x) 15% IAS jewels | Giant Skull *Socketed with (2x) 15% IAS Jewels |
| Gloves | Laying of Hands | Rare Gloves with IAS and resistance affixes Lava Gout |
| Boots | War Traveler | Gore Rider Sandstorm Trek |
| Ring 1 | Raven Frost | Rare Ring with Attack Rating and Life Leech |
| Ring 2 | Rare Ring with Attack Rating and Resistance Affixes | Nagelring |
| Amulet | Atma’s Scarab | The Cat’s Eye Highlord’s Wrath |
| Belt | Razortail | Goldwrap Nosferatu’s Coil |
| Charms | Hellfire Torch (Amazon) Annihilus Grand Charms with Maximum Damage, Attack Rating, and Life Small Charms with 3% Faster Run/Walk Speed, Maximum Damage, and Attack Rating | Renewed Bone Break Grand Charm with + to Bow/Crossbow Skills and Life |
Mercenary Gear
You can choose either the Act 1 Mercenary (Cold Rogue) or the Act 2 Mercenary (Might Aura) for the Bowazon in D2R Season 13. Here are their ideal items:
Act 1 Mercenary
- Weapon: Faith or Mist (Grand Matron Bow)
- Body Armor: Fortitude
- Helmet: Andariel’s Visage (with Ral Rune)
- Note: Equip Faith on the A1 Mercenary if you’re using Windforce. If you equip Faith yourself, then have the mercenary use Mist instead.
Act 2 Mercenary
- Weapon: Pride (Thresher/Grand Thresher)
- Body Armor: Fortitude or Chains of Honor
- Helmet: Andariel’s Visage (with Ral Rune)
FAQ
Q1: What is the Best Bow Base for Faith in D2R Season 13?
A: I recommend the Matriarchal Bow for its higher base attack speed. However, the Grand Matron Bow is not bad at all, especially since it deals slightly more damage than the previously mentioned Matriarchal Bow.
Q2: Where Does the Bowazon Shine in D2R Season 13?
A: The Bowazon’s real strength lies in her ability to destroy enemies in Terror Zones. She can even go head-to-head with the Heralds of Terror.
Q3: What Affixes Should I Look for When Buying Gear for the Bowazon?
A:
- Increased Attack Speed
- Attack Rating
- Enhanced Damage
- Life
- Resistances