OSRS Sailing Guide
12.11.2025 - 13:57:32
Game Guides , OSRS Guides , OSRS Skills & Skilling , Runescape

How to Start Sailing in OSRS
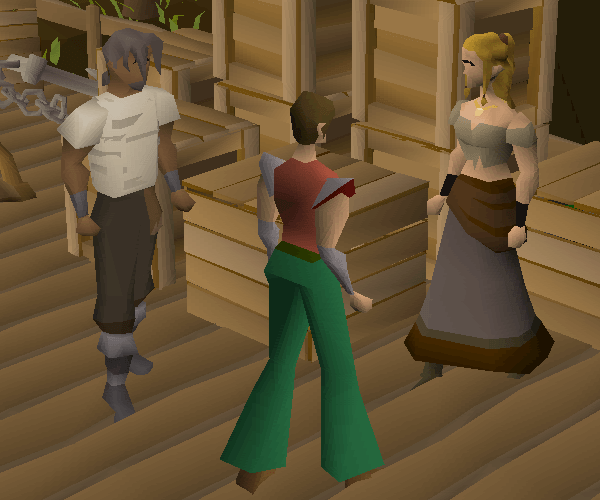
To own your own ship and start sailing the seas of Glienor, you must first complete the quest “Pandemonium”. This quest is a short one, teaching you basic ship functionalities. You can start this quest by talking to Will and Anne on the docks of Port Sarim. Keep in mind that Sailing is a utility skill that will benefit greatly from your other skills being high-level. The two main skills that interact directly with Sailing are:
Both of these skills allow you to smith and craft different ship parts to upgrade your ships. You can check out our skill training guides for both of these skills by clicking on them.
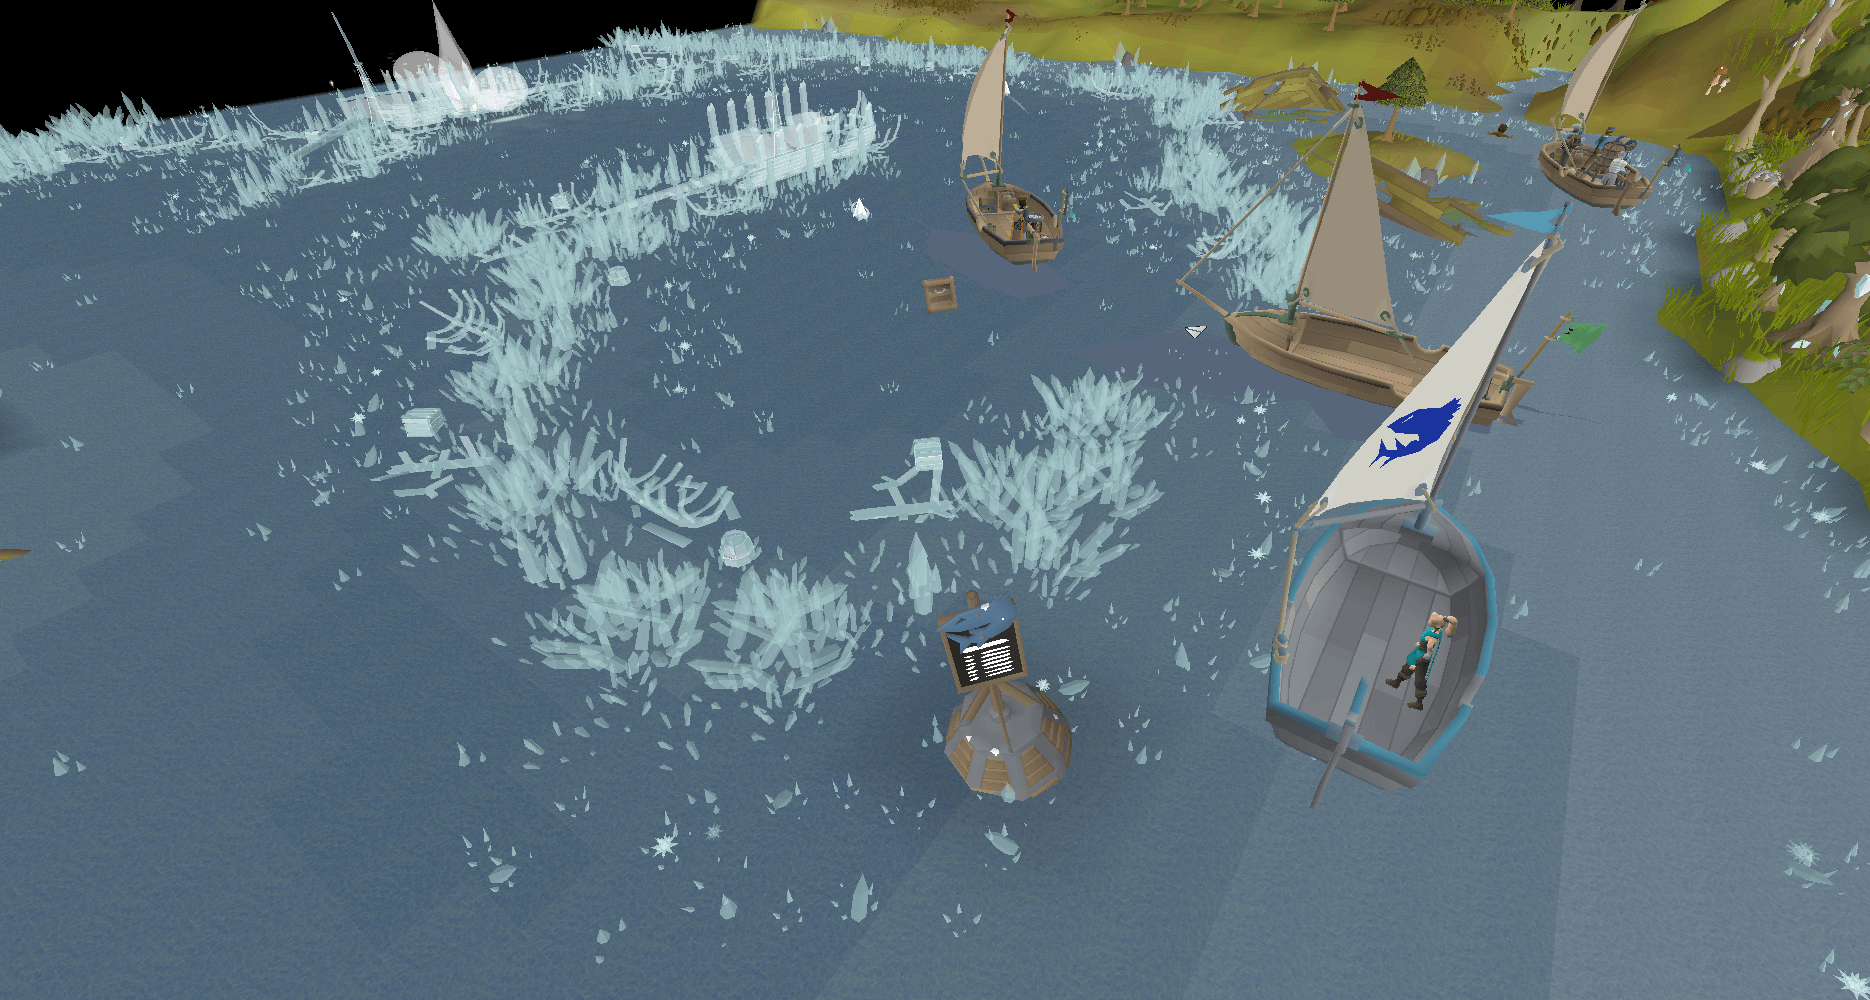
How to Use your Ship

Using your ship is pretty straightforward. You can hop onto your ship from any dock, given your ship is parked at that dock. You can teleport your ship to a dock via magic spells or by paying some gold to a shipwright to recover your ship. Once you hop on your ship, you can click on the helm to start using your ship. Once your character is on the helm, you can move the ship just like you would move your character.
On the sailing panel, you can increase or decrease your ship's speed and give orders to your crew if you have any. All the stations in your ship need to be used by either you or one of your crewmates to work.
Level 1-20: Unlocks
Once you start sailing, you can start engaging with the following activities to gain some early levels and unlocks:
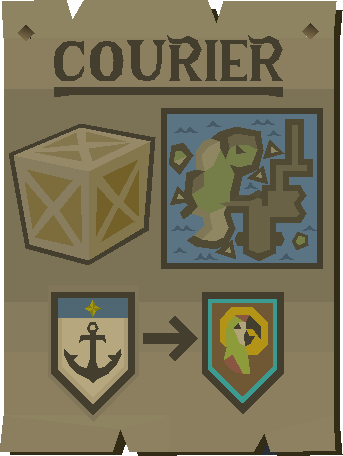
- Courier tasks: Taking cargo from one port and delivering it to another.
- Sea charting: Interacting with various locations on the sea to gain experience and various buffs. You can complete the “Prying Times” quest at level 12 to increase your interactive capabilities further.
- Shipwreck salvaging: At level 15, you can build your first salvaging hook and start salvaging some low-level shipwrecks.
- Ocean encounters: You can interact with various ocean encounters whilst travelling with your ship. These encounters are akin to random events and can be completed for rewards and Sailing experience.
The Shipyard: Essential Shipbuilding
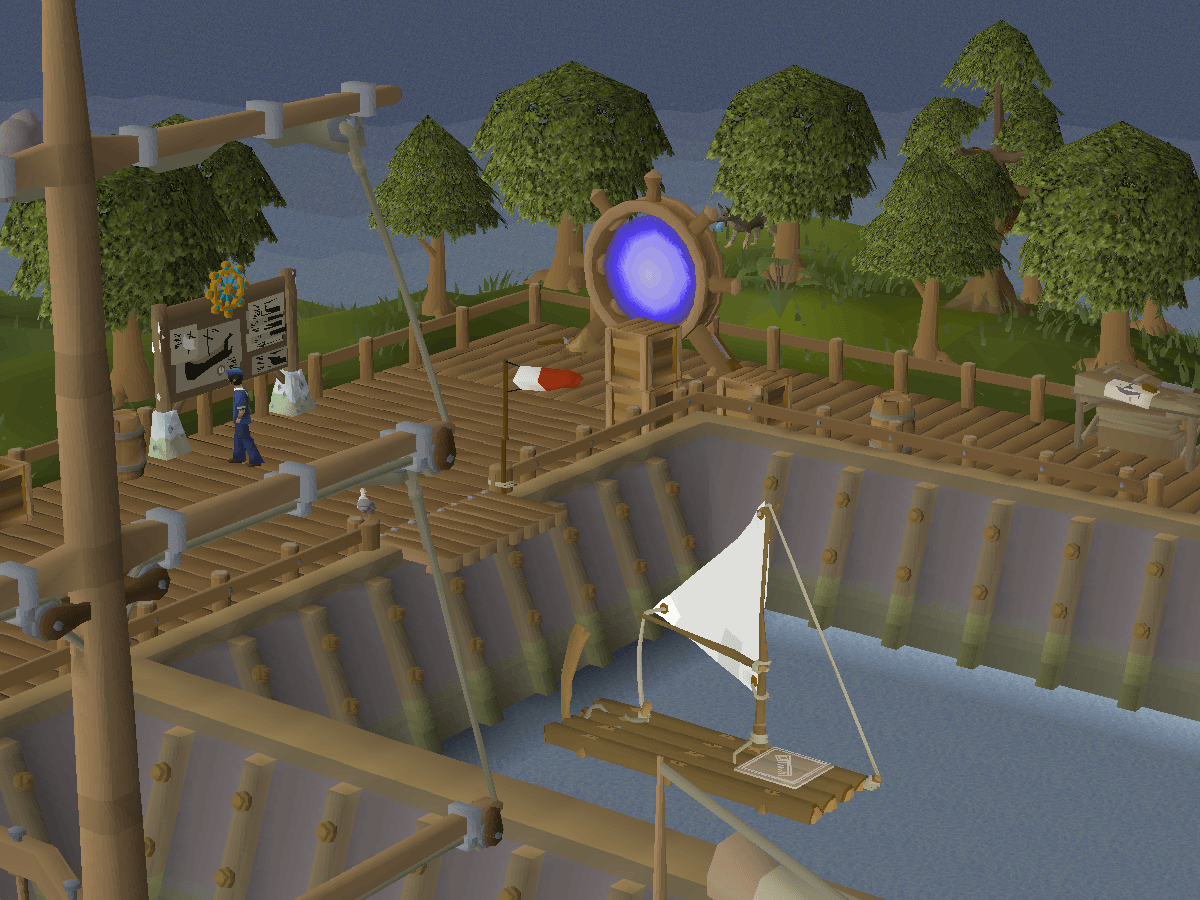
The shipyard is a location you can access from almost every dock in the game by talking to a Shipwright and selecting the “customise-boat” option. This location allows you to buy, upgrade, and edit your ships. Each ship serves a different purpose, so it is important to have at least one of each. The best shipwright to use is located in Port Khazard, due to how close he is to the bank. Here are all the shipwrights:
| Shipwright | Location | Distance to Bank | Required | Other Requirements |
| Junior Jim | The Pandemonium | 51 | 1 | N/A |
| Shipwright Sam | Port Sarim | 29 | 1 | N/A |
| Shipwright Sasha | Land's End | 13 | 5 | Must have visited Kourend at least once before docking |
| Shipwright Sally | Musa Point | 533 | 10 | N/A |
| Shipwright Spencer | Port Piscarilius | 124 | 15 | Must have visited Kourend at least once before docking |
| Shipwright Sophie | Catherby | 15 | 20 | N/A |
| Shipwright Steve | Brimhaven | 401 | 25 | N/A |
| Shipwright Sarah | Port Khazard | 5 | 30 | N/A |
| Shipwright Sennia | Civitas illa Fortis | 59 | 38 | Completion of Children of the Sun |
| Shipwright Soraya | Corsair Cove | 17 | 40 | Completion of The Corsair Curse |
| Shipwright Silas | Aldarin | 83 | 46 | Completion of Children of the Sun |
| Shipwright Scott | Port Roberts | 18 | 50 | N/A |
| Shipwright Sigrun | Rellekka | 224 | 62 | Completion of The Fremennik Trials |
| Shipwright Sornik | Deepfin Point | 7 | 67 | N/A |
| Shipwright Silrien | Prifddinas | 40 | 70 | Completion of Song of the Elves |
How to Build a Raft
Raft is everyone's starting ship, if we can call it that. It is basically some pieces of wood attached to one another, with a basic sail. You can only build one facility on a raft, which makes it useless for almost all Sailing activities; however, the raft's advantage is its speed since it is the fastest type of ship in the game.
Raft is great for charting sea locations, travelling from one island to another fast, and using it as a teleport hub by installing a teleport focus on it. It has a cheap recovery fee of 700 gold, so you can safely leave it at sea or wherever you please and just recall it whenever you need it. Here are all the upgrades you can have on a raft:
Hulls
| Type | Sailing Lvl | Con Lvl | Base Speed | Materials | Con XP | Cost | Shipwright Fee |
| Wooden base | 1 | 1 | 1.5 | Logs x10, Rope x6, Swamp tar x10 | 19 | 504 | N/A |
| Oak base | 20 | 8 | 1.5 | Oak logs x10, Rope x6, Swamp tar x10 | 27 | 564 | 560 |
| Teak base | 31 | 23 | 2 | Teak logs x10, Rope x6, Swamp tar x10, Lead bar x5 | 41 | 9,109 | 4,200 |
| Mahogany base | 48 | 41 | 2 | Mahogany logs x10, Rope x6, Swamp tar x10, Lead bar x5 | 46 | 9,979 | 27,000 |
| Camphor base | 67 | 59 | 2.5 | Camphor logs x10, Rope x6, Swamp tar x10, Lead bar x5 | 70 | 15,209 | N/A |
| Ironwood base | 81 | 75 | 2.5 | Ironwood logs x10, Rope x6, Swamp tar x10, Cupronickel bar x5 | 84 | 15,054 | N/A |
| Rosewood base | 93 | 84 | 3 | Rosewood logs x10, Rope x6, Swamp tar x10, Cupronickel bar x5 | 84 | 20,894 | N/A |
Helms
| Type | Sailing Lvl | Con Lvl | Rapids Resisted | Materials | Con XP | Cost | Shipwright Fee |
| Bronze | 1 | 1 | None | Plank x2, Bronze bar x4 | 76 | 520 | N/A |
| Iron | 17 | 14 | Gentle | Oak plank x2, Iron bar x4 | 160 | 1,618 | 1,400 |
| Steel | 38 | 30 | Gentle | Teak plank x2, Steel bar x4 | 260 | 3,980 | 8,900 |
| Mithril | 55 | 47 | Strong | Mahogany plank x2, Mithril bar x4 | 400 | 7,692 | 50,000 |
| Adamant | 72 | 59 | Strong | Camphor plank x2, Adamantite bar x4 | 480 | 14,428 | N/A |
| Rune | 87 | 81 | Powerful | Ironwood plank x2, Runite bar x4 | 650 | 56,684 | N/A |
| Dragon | 96 | 86 | Deadly | Rosewood plank x2, Dragon metal sheet x4 | 780 | 4,112,982 | N/A |
Masts and Sails
| Type | Sailing Lvl | Con Lvl | Boost Duration (ticks) | Materials | Con XP | Cost | Shipwright Fee |
| Wooden mast and linen sails | 1 | 1 | 20 | Logs x5, Bronze nails x20, Bolt of linen x5 | 20 | 3,080 | N/A |
| Oak mast and linen sails | 24 | 11 | 22 | Oak logs x5, Iron nails x20, Bolt of linen x5 | 28 | 3,170 | 920 |
| Teak mast and canvas sails | 36 | 26 | 24 | Teak logs x5, Steel nails x20, Bolt of canvas x5 | 41 | 12,135 | 5,800 |
| Mahogany mast and canvas sails | 52 | 45 | 26 | Mahogany logs x5, Mithril nails x20, Bolt of canvas x5 | 55 | 13,490 | 41,000 |
| Camphor mast and canvas sails | 68 | 60 | 30 | Camphor logs x5, Adamantite nails x20, Bolt of canvas x5 | 85 | 17,145 | N/A |
| Ironwood mast and cotton sails | 83 | 77 | 33 | Ironwood logs x5, Rune nails x20, Bolt of cotton x5 | 152 | 39,415 | N/A |
| Rosewood mast and cotton sails | 94 | 85 | 36 | Rosewood logs x5, Dragon nails x20, Bolt of cotton x5 | 175 | 1,008,975 | N/A |
Flags
| Flag | Sailing Lvl | Con Lvl | Materials | Con XP | Cost |
| Storm chaser's flag | 25 | 20 | Oak logs x4, Rope, Ralph's fabric roll | 34 | 145 |
| Swamp cruiser's flag | 25 | 20 | Oak logs x4, Rope, Gurtob's fabric roll | 34 | 145 |
| Crystal glider's flag | 25 | 20 | Oak logs x4, Rope, Gwyna's fabric roll | 34 | 145 |
Brazier
| Brazier | Sailing Lvl | Con Lvl | Materials | Con XP | Cost |
| Eternal brazier | 78 | 72 | Ironwood plank x4, Rune nails x16, Runite bar x6, Cupronickel bar x6, Te salt x250, Efh salt x250, Urt salt x250 | 1,373 | 191,762 |
A raft is also a requirement for some charting locations. Those locations are as follows:
| Level | Type | Task | Sea | Ocean |
| Sailing 12 | Crate | Find a Sealed crate in the Lum Lagoon and sample the contents. | Lumbridge Basin | Bonus charts |
| Sailing 22 | Current | Test the currents at the mouth of the River Varla. | Sunset Bay | Sunset Ocean |
| Sailing 12 | Crate | Find a Sealed crate near the Lunar Isle docks and sample the contents. | Lunar Bay | Northern Ocean |
| Sailing 22 | Current | Test the currents in the River Crannmor. | Grandroot Bay | Northern Ocean |
| Sailing 12 | Crate | Find a Sealed crate in the waters of the Fremennik Isles and sample the contents. | Kannski Tides | Northern Ocean |
How to Build a Skiff
Skiffs are the medium-sized boats that we can have. They are great at completing courier tasks and barracuda trials. They have 7 facility hotspots, which you can build ship facilities on, compared to 1 hotspot on a raft. This ship is also great at traversing dangerous seas as it can tank hits from aggressive monsters. Here are all the upgrades you can get for skiffs alongside their costs:
Hulls
| Sailing Level | Con Level | Hull and hull parts | Materials | Experience | Cost | Boat Speed | Boat hitpoints |
| 15 | 1 | Wooden skiff | Wooden hull parts x10 Bronze nails x300 Swamp tar x20 | 128 | 2,410 | 1.5 | +30 |
| 20 | 8 | Oak skiff | Oak hull parts x10 Iron nails x300 Swamp tar x20 | 238 | 6,860 | 1.5 | +45 |
| 31 | 23 | Teak skiff | Teak hull parts x10 Steel nails x300 Swamp tar x20 Lead bar x5 | 345 | 20,990 | 2 | +60 |
| 48 | 41 | Mahogany skiff | Mahogany hull parts x10 Mithril nails x300 Swamp tar x20 Lead bar x5 | 588 | 70,375 | 2 | +75 |
| 67 | 59 | Camphor skiff | Camphor hull parts x10 Adamantite nails x300 Swamp tar x20 Lead bar x5 | 881 | 132,185 | 2.5 | +120 |
| 81 | 75 | Ironwood skiff | Ironwood hull parts x10 Rune nails x300 Swamp tar x20 Cupronickel bar x5 | 1771 | 336,260 | 2.5 | +150 |
| 93 | 84 | Rosewood skiff | Rosewood hull parts x10 Dragon nails x300 Swamp tar x20 Cupronickel bar x5 | 2839 | 8,735,230 | 3 | +180 |
Keels
| Sailing Level | Con Level | Keels | Materials | Experience | Cost | Boat hitpoints | Boat Armour | Immunity |
| 15 | 1 | Bronze skiff keel | Bronze keel parts x10 | 100 | 4,520 | +50 | +100 | |
| 22 | 17 | Iron skiff keel | Iron keel parts x10 | 125 | 8,810 | +50 | +200 | |
| 39 | 32 | Steel skiff keel | Steel keel parts x10 Lead bar x5 | 311 | 27,915 | +60 | +300 | |
| 54 | 50 | Mithril skiff keel | Mithril keel parts x10 Lead bar x5 | 511 | 34,515 | +60 | +400 | |
| 66 | 62 | Adamant skiff keel | Adamant keel parts x10 Lead bar x5 | 761 | 67,105 | +70 | +600 | Crystal-flecked waters |
| 85 | 78 | Rune skiff keel | Rune keel parts x10 Cupronickel bar x5 | 1511 | 578,810 | +80 | +800 | Crystal-flecked waters |
| 97 | 87 | Dragon skiff keel | Dragon keel parts x10 Cupronickel bar x5 | 2511 | 10,612,640 | +80 | +1000 | Crystal-flecked waters |
Helms
| Sailing Level | Con Level | Helms | Materials | Experience | Cost | Rapid Resistance | Immunity |
| 15 | 1 | Bronze skiff helm | Plank x3 Bronze bar x6 | 114 | 804 | None | None |
| 17 | 14 | Iron skiff helm | Oak plank x3 Iron bar x6 | 240 | 2,457 | Gentle Rapids | None |
| 38 | 30 | Steel skiff helm | Teak plank x3 Steel bar x6 | 390 | 6,381 | Gentle Rapids | None |
| 55 | 47 | Mithril skiff helm | Mahogany plank x3 Mithril bar x6 | 600 | 12,528 | Strong Rapids | None |
| 72 | 59 | Adamant skiff helm | Camphor plank x3 Adamantite bar x6 | 720 | 21,372 | Strong Rapids | Tangled Kelp |
| 87 | 81 | Rune skiff helm | Ironwood plank x3 Runite bar x6 | 975 | 86,559 | Powerful Rapids | Tangled Kelp |
| 96 | 86 | Dragon skiff helm | Rosewood plank x3 Dragon metal sheet x6 | 1,410 | 3,083,700 | Deadly rapids | Tangled Kelp |
Masts and Sails
| Sailing Level | Con Level | Mast and Sails | Materials | Experience | Cost | Speed Boost Duration | Acceleration | Storm Resistance |
| 1 | 1 | Wooden mast and linen sails | Logs x10 Bronze nails x40 Bolt of linen x5 | 24 | 3,780 | 20 | 0.5 | None |
| 24 | 11 | Oak mast and linen sails | Oak logs x10 Iron nails x40 Bolt of linen x5 | 36 | 4,010 | 22 | 0.5 | Partial |
| 36 | 26 | Teak mast and canvas sails | Teak logs x10 Steel nails x40 Bolt of canvas x5 | 49 | 13,725 | 24 | 0.5 | Partial |
| 52 | 45 | Mahogany mast and canvas sails | Mahogany logs x10 Mithril nails x40 Bolt of canvas x5 | 70 | 17,575 | 27 | 0.5 | Partial |
| 68 | 60 | Camphor mast and canvas sails | Camphor logs x10 Adamantite nails x40 Bolt of canvas x5 | 110 | 24,235 | 30 | 1 | Full |
| 83 | 77 | Ironwood mast and cotton sails | Ironwood logs x10 Rune nails x40 Bolt of cotton x5 | 197 | 62,155 | 33 | 1 | Full |
| 94 | 85 | Rosewood mast and cotton sails | Rosewood logs x10 Dragon nails x40 Bolt of cotton x5 | 231 | 1,184,195 | 36 | 1 | Full |
Flags
| Flag | Sailing Lvl | Con Lvl | Materials | Con XP | Cost |
| Storm chaser's flag | 25 | 20 | Oak logs x4, Rope, Ralph's fabric roll | 34 | 145 |
| Swamp cruiser's flag | 25 | 20 | Oak logs x4, Rope, Gurtob's fabric roll | 34 | 145 |
| Crystal glider's flag | 25 | 20 | Oak logs x4, Rope, Gwyna's fabric roll | 34 | 145 |
Brazier
| Brazier | Sailing Lvl | Con Lvl | Materials | Con XP | Cost |
| Eternal brazier | 78 | 72 | Ironwood plank x4, Rune nails x16, Runite bar x6, Cupronickel bar x6, Te salt x250, Efh salt x250, Urt salt x250 | 1,373 | 191,762 |
Building the best ships in the game can take a lot of gold out of your pocket. As you will see later in the guide, to optimise your Sailing experience, you will need to own 3-4 ships, each unique and costing millions of gold. If you don’t have the required gold for these ships and you want to have the best time Sailing, you can check out our OSRS Gold Store to get unlimited safe and fast OSRS Gold delivered to your account.
How to Build a Sloop
Sloop is the biggest ship out of the three, housing 13 different facility hotspots for us to use. Sloops are the best when it comes to ship combat, salvaging ship wrecks, and trawler fishing. Here are all the upgrades you can have for your sloop and their costs:
Hulls
| Sailing Level | Con Level | Hull and hull parts | Materials | Experience | Speed | Hitpoints | Cost |
| 1 | 1 | Wooden sloop | Large wooden hull parts x16 Bronze nails x600 Swamp tar x25 | 199 | 1.5 | +40 | 42,348 |
| 20 | 8 | Oak sloop | Large oak hull parts x16 Iron nails x600 Swamp tar x25 | 373 | 1.5 | +60 | 69,964 |
| 31 | 23 | Teak sloop | Large teak hull parts x16 Steel nails x600 Swamp tar x25 Lead bar x5 | 538 | 2 | +80 | 170,817 |
| 48 | 41 | Mahogany sloop | Large mahogany hull parts x16 Mithril nails x600 Swamp tar x25 Lead bar x5 | 919 | 2 | +100 | 546,545 |
| 67 | 59 | Camphor sloop | Large camphor hull parts x16 Adamantite nails x600 Swamp tar x25 Lead bar x5 | 1380 | 2.5 | +160 | 985,553 |
| 81 | 75 | Ironwood sloop | Large ironwood hull parts x16 Rune nails x600 Swamp tar x25 Cupronickel bar x5 | 2779 | 2.5 | +200 | 1,365,246 |
| 93 | 84 | Rosewood sloop | Large rosewood hull parts x16 Dragon nails x600 Swamp tar x25 Cupronickel bar x5 | 4474 | 3 | +240 | 18,233,846 |
Keels
| Sailing Level | Con Level | Keels | Materials | Experience | Hitpoints | Armour | Immunity | Cost |
| 1 | 1 | Bronze sloop keel | Large bronze keel parts x16 | 152 | +70 | +100 | - | 170,368 |
| 22 | 17 | Iron sloop keel | Large iron keel parts x16 | 320 | +70 | +200 | - | 115,888 |
| 39 | 32 | Steel sloop keel | Large steel keel parts x16 Lead bar x5 | 491 | +90 | +300 | - | 273,821 |
| 54 | 50 | Mithril sloop keel | Large mithril keel parts x16 Lead bar x5 | 811 | +90 | +400 | - | 346,013 |
| 66 | 62 | Adamant sloop keel | Large adamant keel parts x16 Lead bar x5 | 1211 | +100 | +600 | Crystal-flecked waters | 667,005 |
| 85 | 78 | Rune sloop keel | Large rune keel parts x16 Cupronickel bar x5 | 2411 | +120 | +800 | Crystal-flecked waters | 5,111,242 |
| 97 | 87 | Dragon sloop keel | Large dragon keel parts x16 Cupronickel bar x5 | 4011 | +120 | +1000 | Crystal-flecked waters | 42,792,106 |
Helms
| Sailing Level | Con Level | Helms | Materials | Experience | Rapid resistance | Immunity | Cost |
| 1 | 1 | Bronze sloop helm | Plank x4 Bronze bar x8 | 76 | - | - | 1,072 |
| 17 | 14 | Iron sloop helm | Oak plank x4 Iron bar x8 | 320 | Gentle rapids | - | 3,276 |
| 38 | 30 | Steel sloop helm | Teak plank x4 Steel bar x8 | 520 | Gentle rapids | - | 8,508 |
| 55 | 47 | Mithril sloop helm | Mahogany plank x4 Mithril bar x8 | 800 | Strong rapids | - | 16,704 |
| 72 | 59 | Adamant sloop helm | Camphor plank x4 Adamantite bar x8 | 960 | Strong rapids | Tangled kelp | 28,496 |
| 87 | 81 | Rune sloop helm | Ironwood plank x4 Runite bar x8 | 1300 | Powerful rapids | Tangled kelp | 115,412 |
| 96 | 86 | Dragon sloop helm | Rosewood plank x4 Dragon metal sheet x8 | 1560 | Deadly rapids | Tangled kelp | 4,111,600 |
Masts and sails
| Sailing Level | Con Level | Mast and sails | Materials | Experience | Boost duration | Acceleration | Storm resistance | Cost |
| 1 | 1 | Wooden mast and linen sails | Logs x15 Bronze nails x60 Bolt of linen x10 | 31 | 20 | 0.5 | - | 7,360 |
| 24 | 11 | Oak mast and linen sails | Oak logs x15 Iron nails x60 Bolt of linen x10 | 46 | 22 | 0.5 | Partial | 7,705 |
| 36 | 26 | Teak mast and canvas sails | Teak logs x15 Steel nails x60 Bolt of canvas x10 | 65 | 24 | 0.5 | Partial | 27,945 |
| 52 | 45 | Mahogany mast and canvas sails | Mahogany logs x15 Mithril nails x60 Bolt of canvas x10 | 90 | 27 | 0.5 | Partial | 32,370 |
| 68 | 60 | Camphor mast and canvas sails | Camphor logs x15 Adamantite nails x60 Bolt of canvas x10 | 139 | 30 | 1 | Full | 42,360 |
| 83 | 77 | Ironwood mast and cotton sails | Ironwood logs x15 Rune nails x60 Bolt of cotton x10 | 250 | 33 | 1 | Full | 107,715 |
| 94 | 85 | Rosewood mast and cotton sails | Rosewood logs x15 Dragon nails x60 Bolt of cotton x10 | 291 | 36 | 1 | Full | 1,790,775 |
Flags
| Flag | Sailing Lvl | Con Lvl | Materials | Con XP | Cost |
| Storm chaser's flag | 25 | 20 | Oak logs x4, Rope, Ralph's fabric roll | 34 | 145 |
| Swamp cruiser's flag | 25 | 20 | Oak logs x4, Rope, Gurtob's fabric roll | 34 | 145 |
| Crystal glider's flag | 25 | 20 | Oak logs x4, Rope, Gwyna's fabric roll | 34 | 145 |
Brazier
| Brazier | Sailing Lvl | Con Lvl | Materials | Con XP | Cost |
| Eternal brazier | 78 | 72 | Ironwood plank x4, Rune nails x16, Runite bar x6, Cupronickel bar x6, Te salt x250, Efh salt x250, Urt salt x250 | 1,373 | 191,762 |
Important Ship Stations
The Inoculation Station
The innoculation station is a must-have in every ship if you want to access fetid waters. This station is always built next to the cargo hold and requires level 40 Sailing and 37 Construction to be built. To build it, you will need the following materials:
- Teak plank x8
- Steel nails x32
- Relicym’s balm (4) x6
Wind Catcher & Gale Catcher
A wind or gale catcher is another crucial part of any ship, allowing the player to store gusts of wind and use them whenever he sees fit. This is a must-have for both Jubbly Jive and Gwenith Glide. A wind catcher can store up to 2 speed boosts, while a gale catcher can store up to 3. Here is how you build them:
Wind Catcher
Requires level 53 Sailing and 47 Construction.
- Teak plank x4
- Steel nails x16
- Steel bar x8
- Lead bar x4
- Air rune x10K
- Captured wind mote
Gale Catcher
Requires level 79 Sailing and 70 Construction.
- Camphor plank x4
- Adamantitre nails x16
- Adamantite bar x8
- Cupronickel bar x4
- Air rune x25K
- Swift albatross feather x5
- Captured wind mote
Keg
A keg is yet another must-have in every ship. To build a keg, you must have a barrel stand, which can be acquired by completing the shark tier of Tampur Tentrum. This facility allows you to store special drinks in it for passive buffs. You can build multiple kegs in a ship, and here are the material requirements to build one:
- Oak plank x5
- Iron nails x20
- Barrel stand
Crystal Extractor
The crystal extractor is a facility that produces a wind mote every 63 seconds. This facility requires the quest “Song of the Elves” to be completed alongside Level 73 Sailing and 67 Construction. The item required to build this facility is the Heart of Ithell, which can be acquired by completing the Shark trial of Gwenith Glide. This facility increases your overall ship speed in the long term and produces a nice passive Sailing experience drop. Here are all the materials required to build this facility:
- Ironwood plank x6
- Cupronickel bar x5
- Magic stone x2
- Heart of Ithell
Fastest Sailing Training Methods
For the absolute fastest training methods, you have to do the following methods at the corresponding levels, but first, you must have the optimal skiff to do so. The methods below are all about courier tasks and barracuda trials, and here is how you optimise your ship for them:
- Always have the best available hull for speed.
- Always have the best available mast and sails for speed boosts.
- Always have the best helm to utilise rapids.
- Get at least the adamant keel to access the crystal waters.
- Build an innoculation station to access fetid waters.
- Build a gale catcher or wind catcher to store and release wind motes.
- Build a keg filled with Horizon’s lure for additional experience. If you don’t have this drink, fill it with Kraken Ink Stout instead for more strong wind spawns.
- Build a crystal extractor next to the helm to generate extra experience and wind motes.
Level 1 - 30 Courier Tasks
At early levels, you have no real option aside from doing courier tasks to train your Sailing level. Even though it can get boring, just stick with it for a little while until you reach level 30. Also, make sure to complete all quests that you unlock that are related to Sailing.
Level 30 - 55 The Tempor Tantrum
At level 30, build yourself the best skiff you can get your hands on, and upgrade it whenever you can:
- Teak hull: level 31 Sailing and 23 Construction
- Steel skiff keel: level 39 Sailing and 32 Construction
- Steel skiff helm: level 38 Sailing and 30 Construction
- Teak mast and canvas sails: level 36 Sailing and 26 Construction
The fastest experience per hour at this level is completing the Tempor Tantrum course over and over again. Always aim for the Marlin rank. This will not only give you 24,5K experience per hour, but it will also unlock the barrel stand, which is a must upgrade for Sailing. After building the barrel on your skiff, fill it with either Horizon’s Lure (best) or Kraken Ink Stout.
Level 55 - 72 The Jubbly Jive
At level 55, you can switch to the Jubbly Jive course. Once again, make sure you always keep your ship upgraded to have an easier time with the course. During this course, you will receive a “Captured Wind Mote”. Build a wind catcher with it as soon as you get it.
Once you have the wind catcher and once you are doing Marlin rank courses, you will be getting 88,9K Sailing experience per hour.
Level 72 - 99 The Gwenith Glide
At level 72 Sailing, make sure to get an adamant keel to access elven waters and make your way to the Gwenith Glide. Once you complete the shark rank of the trial, you get the Heart of Ithell and can use it to build a crystal extractor next to your helm. Do so as soon as you can to have an easier time in the trials while also getting some nice bonus experience.
Once you are consistent at doing the Marlin rank, you can expect to get 186K experience per hour.
How to Build Ships - Best Ship Builds
You must have a ship for all sorts of content, so here are the best ships to use for Sailing. All of these ships must be a sloop.
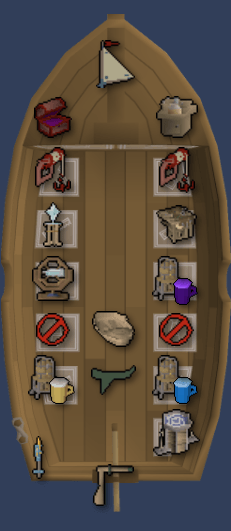
Trawling
To have the best trawling ship, you are going to need the following:
- Best available hull, keel, helm, mast, and sail alongside an eternal brazier.
- Highest level of cargo hold.
- Two kegs, one with Trawler’s trust for extra catch rate, and the other with Horizon’s Lure ore Kraken Ink Stout.
- Two best available trawling nets.
- A fathom pearl to quickly find the fishing spot.
- A chum spreader to spread bait.
- A crystal extractor next to a trawling net for extra experience.
- A gale or wind catcher to chase down shoals faster.
- Crew: Cabin boy Jenkins, and/or Jolly Jim for nets, and either Spotter Virginia or Sailor Jakob on helm.
Here is how the boat should look with all these stations in correct positions:
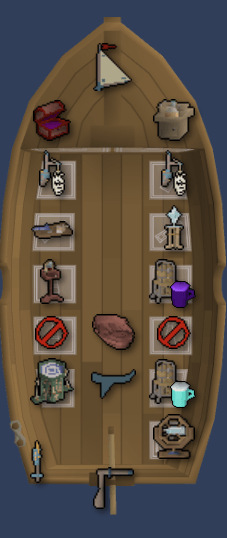
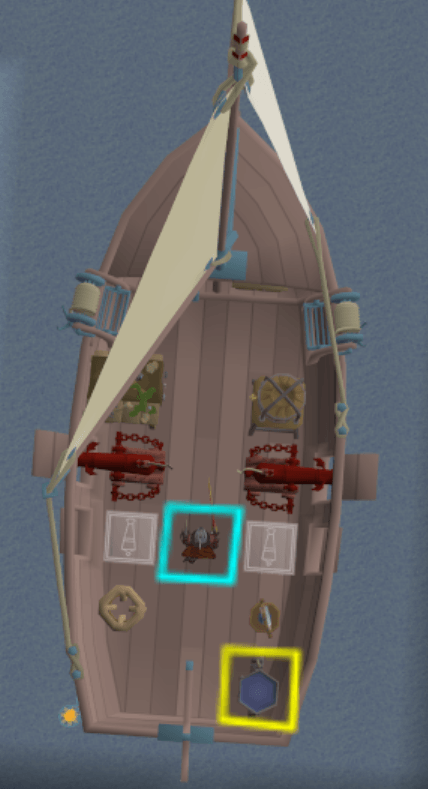
Salvaging
To have the best salvaging ship, you are going to need the following:
- Best available hull, keel, helm, mast, and sail alongside an eternal brazier.
- Highest level of cargo hold.
- Two salvaging hooks best available.
- One salvaging station.
- A crystal extractor near the hooks for more Sailing experience.
- Two kegs, one filled with Horizon’s Lure for extra experience and the other with Whirlpool Surprise for an invisible +2 Sailing level.
- Crew: Cabin boy Jekins and Jolly Jim.
Here is what your ship should look like with all of these stations:
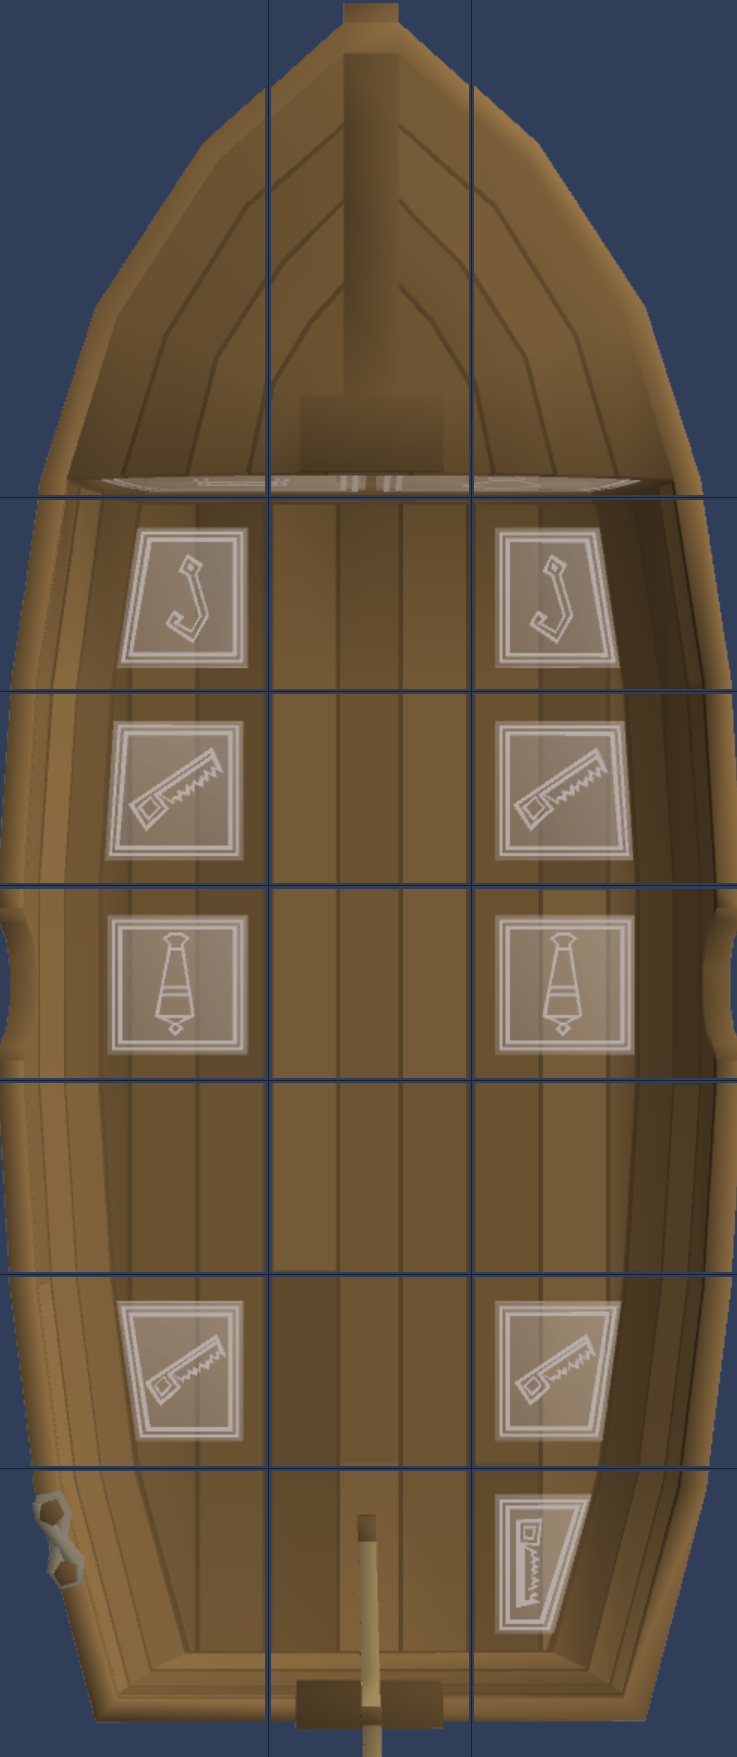
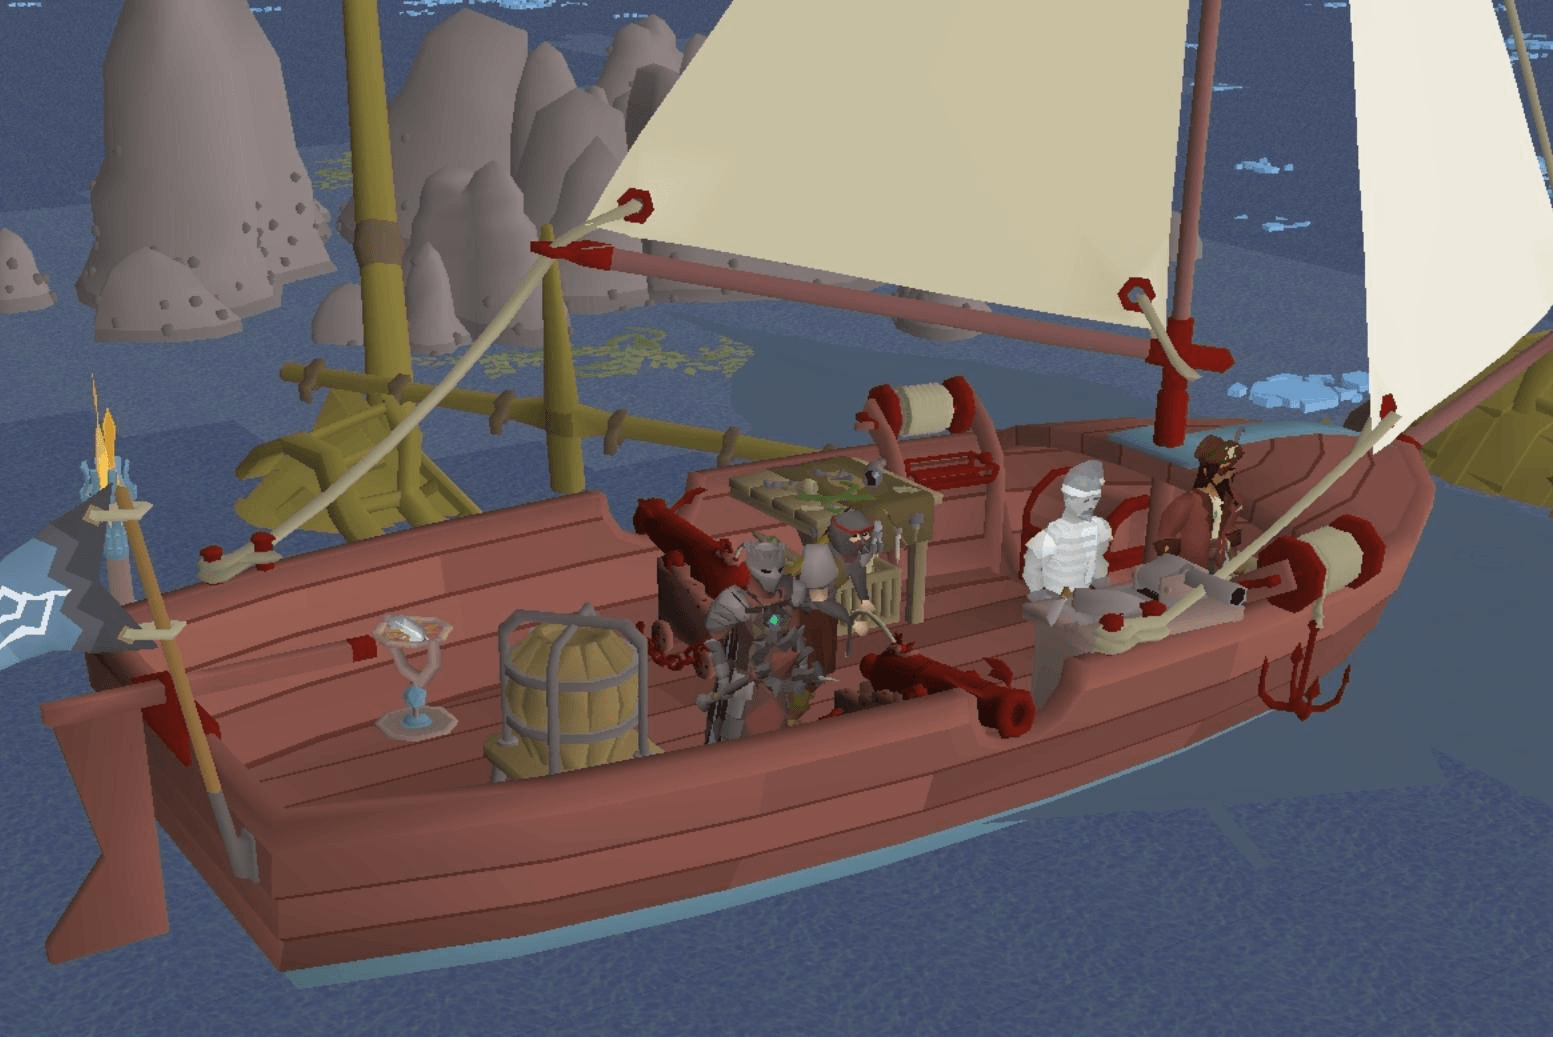
Combat
To have the best combat ship, you are going to need the following:
Best available hull, keel, helm, mast, and sail alongside an eternal brazier.
Decent cargo hold for repair kits.
A Keg filled with Perildance Bitter for extra damage.
2 best cannons.
A ballistic attractor.
Crew: Oarswoman Olga and Jittery Jim for cannons, Jolly Jim or Cabin boy Jenkins for repairs.
Here is how your ship should look:
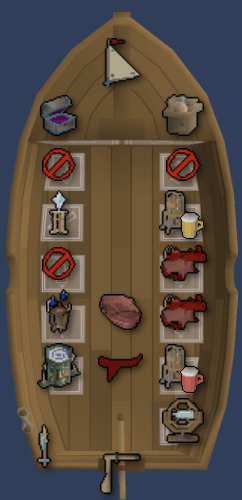
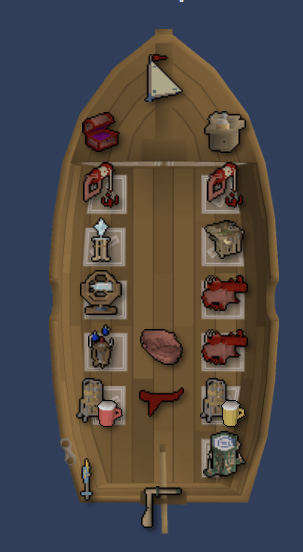
Salvaging + Combat
If you want to, you can combine trawling or salvaging ship with combat. Here is how that looks for salvaging:
Best available hull, keel, helm, mast, and sail alongside an eternal brazier.
Best cargo hold.
Two salvaging hooks.
Two cannons.
Gale or wind catcher.
Crystal extractor.
A salvaging station.
Two kegs filled with Perildance Bitter and Horizon’s Lure.
A teleport focus.
Here is how your ship should look: