


Path of Exile: Mirage - Shrapnel Ballista Hierophant Build Guide
07.04.2026 - 06:46:30
Game Guides , Path of Exile


There are tons of amazing things that are happening in Path of Exile: Mirage. This league provides you with multiple avenues to get PoE Currency by choosing the right mods inside Mirages. Furthermore, Breach 2.0 is here to stay, so Foulborn Uniques are still up for grabs.
Now, if you are looking for a build that can farm Mirages and T16.5 maps without breaking a sweat, then the Shrapnel Ballista Hierophant is an amazing contender. See what this build has to offer by reading this PoE guide to completion!
PoE: Mirage Shrapnel Ballista Hierophant Overview
The Shrapnel Ballista Hierophant is an amazing build in Path of Exile: Mirage that can obliterate enemies in T16.5 and even the new Nightmare Maps. The secret to this build’s success is that it can summon more than 18 ballista totems, with each one hitting enemies more than once.
If you are wondering why this build is capable of placing more than three totems at a time, that is largely due to the Replica Iron Commander. This is a unique bow that increases the maximum number of totems you can summon by one for every 200 points of STR that you have.
Ideally, you want to have at least 1,800 strength to summon 12 ballista totems. However, reaching 3,000+ STR is doable with the best PoE items, including two Split Personality jewels (with strength and accuracy), Bound by Destiny, and Emperor’s Mastery, among other things. This translates to being able to summon 24 ballista totems, allowing you to obliterate anything that dares to cross your path!
It is also worth noting that this build actually deals chaos damage rather than physical damage. This is due to the Replica Alberon’s Warpath, which is a pair of unique boots that grants chaos damage to attacks per 80 points of STR.
Playstyle
This is pretty much a totem build in PoE 3.28. As such, all you have to do is run around placing Shrapnel Ballista totems on the ground. It really helps to put the skill’s hotkey on the right mouse button so that it will be much easier to plant the totems as you’re moving about.
During boss fights, provide support to your totems by using Frenzy on the enemy. With Cast on Critical Strike linked to Frenzy, this build can cast Despair and summon an Ice Golem to increase your damage against the target.
Ascendancy Nodes
As is customary with any Hierophant build in Path of Exile: Mirage, the first ascendancy node you should take is Conviction of Power. This will already solve your damage and survivability problems until you can get your hands on the build’s essential gear.
Once you have accomplished the second and third Trials of Ascendancy, take Pursuit of Faith and Ritual of Awakening. Pursuit of Faith not only lets you summon one more totem on the ground, but it also increases your totem placement speed. Totem placement speed, in case you don’t know, has been made even better in Patch 3.28, allowing this build to feel smooth as you summon your totems on the battlefield.
On the other hand, Ritual of Awakening is awesome because it grants life regeneration and damage boost, especially if you have more than 18 totems on the ground at the same time. That is why you should aim for at least 1,800 STR when playing this build for the sake of dealing huge damage and improving survivability.
In a nutshell, here are the ideal ascendancy nodes for the Shrapnel Ballista Hierophant in PoE 3.28:
- Conviction of Power
- Pursuit of Faith
- Ritual of Awakening
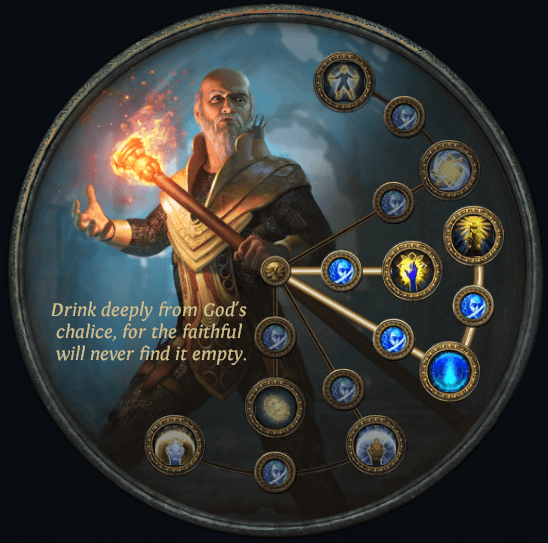
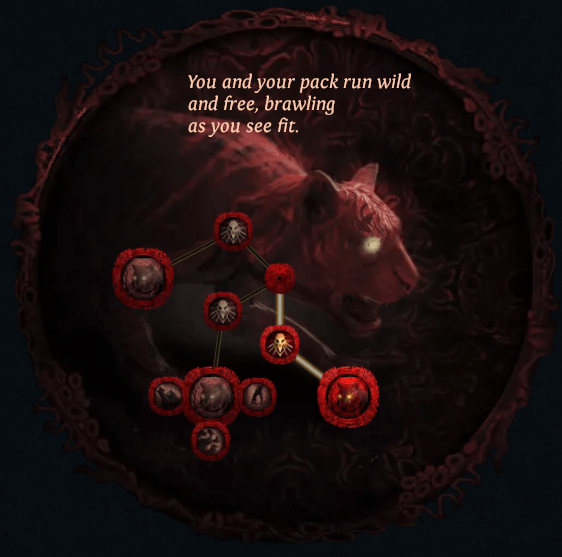
As you may have noticed, there are still two points left from your ascendancy. Well, those remaining points will be allocated to Farrul’s Bloodline, specifically to take “Huntleader.” This is essentially to increase your ballista totems’ critical strike chance, which should enable them to destroy all forms of content in Path of Exile: Mirage with relative ease.
Optimal Gear
It should go without saying that you buy or craft gear that has STR on it, since the Shrapnel Ballista Hierophant is a PoE build that excels the more strength it has. Remember that the total number of totems that you can summon at a time entirely depends on how much STR you actually have.
That said, here are the most optimal items you can use for the build:
| Gear | Best Affixes | Alternatives |
| Replica Iron Commander | N/A | Iron Commander Note: Improve DEX to summon more totems with this particular weapon equipped. |
| Synthesized Quiver | Best synthesized implicits: +to Strength 5% Increased Strength Arrows Pierce 3 Additional Targets Explicit Modifiers: +Bow Attacks Fire an Additional Arrow +Increased Damage with Bow Skills +to Strength +to Maximum Life | The Poised Prism |
| The Iron Fortress | N/A | Briskwrap Note: Improve DEX to increase your damage with this body armor equipped. |
| Crown of Eyes | N/A | Fractal Thoughts Note: Raise your DEX to increase your damage when this helmet is equipped. |
| Maligaro’s Virtuosity (Must have Warlord influence) | N/A | Hrimsorrow |
| Replica Alberon’s Warpath | N/A | Rare Boots with: +30% Increased Movement Speed +to Dexterity +Chance to Suppress Spell Damage +to Maximum Life |
| Simplex Amulet | +% Increased Attributes +% Increased Strength +2% Increased Damage per 15 Strength Note: Must have Warlord influence for Bound by Destiny Anoint: Watchtowers (Indigo, Silver, Silver Oils) | Hyrri’s Truth |
| Helical Ring | +to Attributes +to Strength +Grants Level 30 Aspect of the Crab Skill | Two-Stone Ring or Chaos Ring with: +to All Attributes +to Dexterity +to Maximum Life +Adds Fire/Cold Damage (Bench-craft) |
| Kalandra’s Touch | Same as the Helical Ring mentioned above. | Same Two-Stone/Chaos Ring mentioned above. |
| Mageblood | N/A | Any Synthesized belt with “% Increased Dexterity” and has the following explicit modifiers: +to Dexterity +to Maximum Life +Fire/Cold/Lightning Resistance |
| Jewels | Split Personality (Strength and Accuracy). Get two. Rain of Splinters Emperor’s Mastery Lethal Pride Bound by Destiny 12-Passive Large Cluster Jewel (Spell Damage): +% Increased Damage +to Strength + to All Elemental Resistances +35% Increased Effect Medium Cluster Jewel (Totem Damage): +Ancestral Reach +Sleepless Sentries +to Strength Medium Cluster Jewel (Projectile Damage): +Aerodynamics +Shrieking Bolts +to Strength Note: Must have at least two Warlord-influenced items for Bound of Destiny to work. In this case, you can have it on Maligaro’s Virtuosity and the Simplex Amulet. | Watcher’s Eye: +Chance to Evade Attacks While Affected by Grace +Chaos Resistance While Affected by Purity of Elements +Increased Movement Speed While Affected by Grace The Light of Meaning: +4% Chaos Resistance |
To get a Warlord-influenced Maligaro’s Virtuosity, you must acquire a pair of Deerskin Gloves that already have a Warlord influence on them. After that, head to your Crafting Bench and reroll the gloves using the “Reroll the rarity of a non-unique item” option until you get Maligaro’s Virtuosity.
Skill Gems
Body Armor
- Shrapnel Ballista
- Volatility Support
- Void Manipulation Support
- Greater Multiple Projectiles Support
- Increased Critical Strikes Support
- Lifetap Support
Weapon
- Frenzy
- Despair
- Faster Attacks Support
- Summon Ice Golem
- Cast on Critical Strike Support
- Lifetap Support
Helmet
- Precision (lvl 1)
- Grace
- Purity of Elements
- Enlighten Support
Boots
- Blood Rage
- Dash
- Second Wind Support
- Lifetap Support
Gloves
- Steelskin
- Automation
- Cast on Death Support
- Portal
- Note: The gloves must have a couple of two-linked sockets for Steelskin+Automation and Portal+Cast on Death Support.
Passive Tree
- Sanctity
- Discipline and Training
- Born to Fight
- Heart of the Warrior
- Warrior’s Blood
- Iron Will (keystone)
- Constitution
- Path of the Warrior
- Utmost Might
- Master of the Arena
- Bravery
- Art of the Gladiator
- Golem’s Blood
- Surveillance
- Point Blank (keystone)
- Sleepless Sentries (Cluster Node)
- Ancestral Reach (Cluster Node)
- Aerodynamics (Cluster Node)
- Shrieking Bolts (Cluster Node)
- Entrench
- Magebane (keystone)
- Reflexes
Note: You may allocate notable passive skills not mentioned above if they provide additional totem placement speed or strength, depending on the Lethal Pride jewel that you have.
POB
Shrapnel Ballista Hierophant PoE 3.28
FAQ
What Are the Common Mistakes to Avoid on the Shrapnel Ballista Hierophant?
- Not having strength and accuracy on the Split Personality jewels.
- Not equipping the Replica Iron Commander and Replica Alberon’s Warpath (these items contribute to a large portion of the damage of this build).
- Not having enough pierce from certain items. This can easily be addressed by the “Aerodynamics” node on the Medium Cluster Jewel and by equipping the right quiver (Synthesized or Penetrating Arrow Quiver).
- Not using a Large Cluster jewel that improves spell damage. Spell Damage is needed for the Crown of Eyes to do its thing.
- Not using Frenzy on tougher enemies and bosses.
- Not investing in items that have STR in them.
Can This Build Farm Solo Content Efficiently?
Of course! Simply place down the totems and watch as they destroy anything they see!
Are There Alternative Bloodline Ascendancy Choices?
Some people go for the Nameless Bloodline to get one more ring slot (via The Unseen Hand). This is even more expensive, since you have to spend more PoE Currency to get another mirror-tier ring for the endgame.
Why Go for Dexterity Early On?
This is primarily due to the items you have equipped. The regular Iron Commander, Fractal Thoughts, and Briskwrap allow you to summon more totems and deal increased damage the more Dexterity you have.
Of course, you have to switch to STR as soon as you have the Replica Iron Commander and Replica Alberon’s Warpath.