[3.27] Boneshatter Juggernaut Build - POE Keepers of the Flame
22.10.2025 - 22:21:52
Game Guides , Path of Exile , POE build guides
![[3.27] Boneshatter Juggernaut Build - POE Keepers of the Flame](/modules/prestablog/themes/default-1-5/up-img/slide_935.png "[3.27] Boneshatter Juggernaut Build - POE Keepers of the Flame")
When it comes to melee builds, slam skills like Earthshatter and Volcanic Fissure of Snaking are top contenders in Path of Exile 3.27 Keepers of the Flame. However, Boneshatter is still a tried and tested skill—one that you must not overlook.
If you are willing to go against the grain and kill enemies with more precise and methodical attacks, then you are in the right place! For today, I am going to talk about the Boneshatter Juggernaut build for the Keepers of the Flame League!
Getting Started with Boneshatter Juggernaut in Path of Exile 3.27
This build utilizes Boneshatter to a great extent. Boneshatter is a melee attack skill gem in Path of Exile: Keepers of the Flame that hits enemies hard with enormous amounts of physical damage. Although each hack of your weapon only hits one target, stunning an enemy using Boneshatter releases a damaging pulse that affects nearby monsters as well.
What makes Boneshatter interesting is that it scales its damage by way of Trauma stacks. Trauma is a buff in PoE that stacks infinitely. Each stack allows you to deal more physical damage but this comes at a heavy cost - you deal damage to yourself too.
Successfully landing an attack on the enemy will grant you one Trauma stack. With the ascendancy class that you will use for this build, you can gain a lot of attack speed in the process, which is a good thing and a bad thing.
It is a good thing because each subsequent hit on the enemy makes your attacks even more devastating. However, it can also be a bad thing if you do not have your defenses sorted out. So, how do you not kill yourself when using Boneshatter?
There are three things that you can achieve to help you survive. First, get your armor value up as high as you can and roll a Tier 1 “8% Additional Physical Damage Reduction” mod on your body armor. Aim for at least 50,000 armor to mitigate the damage you receive from Boneshatter’s self-damaging mechanic.
Second, roll as many “% Damage Recouped as Life” modifiers on your gear. You can get this particular mod from your rings and helmet. They are available for purchase on the trade website or you can craft them yourself. If you are going for the latter, visit our ultimate crafting guide to learn more information about crafting in PoE.
Third, you can take advantage of a unique pair of gloves that grant Fortification stacks. More on this later in our PoE 3.27 Boneshatter Juggernaut build guide.


Aside from the attack skill gem itself, what other mechanics are at play to maximize your damage potential using Boneshatter? Well, you have Precise Technique—a keystone passive that provides you with a hefty 40% “more” damage multiplier if your accuracy rating is higher than your maximum HP. Although you will never deal critical strikes when this keystone is allocated, it gives you a huge damage multiplier that is unlocked so long as you satisfy its requirement.
Accuracy is a major contributing factor to your overall damage, particularly when it is coupled with the “Undeniable” node from the Juggernaut’s ascendancy passive tree.
Other ways to improve your damage output on this build include:
- Added Physical Damage
- % Increased Physical Damage
- + to Accuracy Rating
- % Increased Global Accuracy Rating
- % Increased Attack Speed
- % Chance to Deal Double Damage
- % Increased Damage with Two-Handed Weapons
- % Increased AoE Damage
- % Increased Melee Damage
- % Increased Damage with Axes
Playstyle
Even though Boneshatter has some complex mechanics at play, this build is actually quite easy to use.
When you enter a new map or area, you simply use Leap Slam and search for thick packs of monsters. Once you encounter them, bash them with Boneshatter and see them die in almost an instant!
If you encounter tough monsters and bosses, cast Vulnerabilty to weaken them against your attacks. After that, hack them with your Boneshatter and they should be dealt with in a fast and efficient manner.
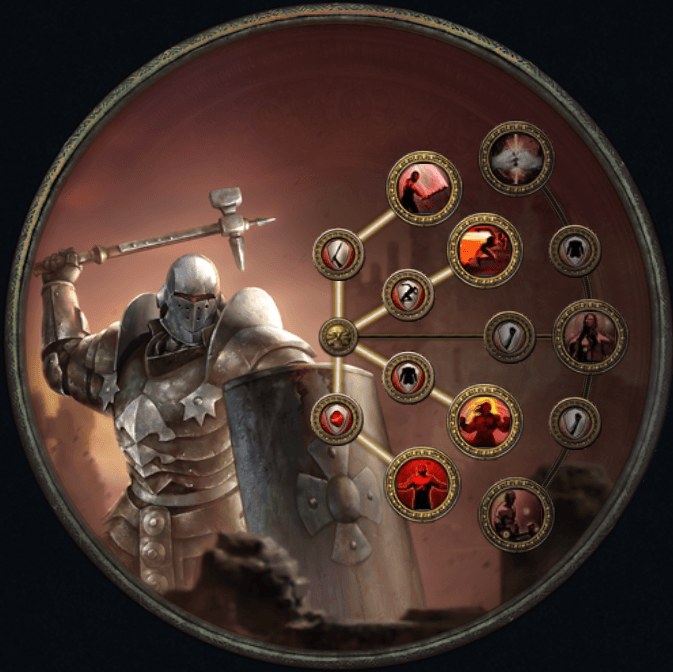
Ascendancy
The Juggernaut is an ascendancy class that is perfect for the Boneshatter attack skill gem in Path of Exile: Keepers of the Flame. The reason why we chose this over the Slayer is that it is capable of scaling really well into the endgame—both in terms of offense and defense.
Undeniable is the first node you should take for this build. This notable ascendancy passive skill increases your attack speed by 1% for every 150 points of accuracy. How do you scale that, you ask? You can get accuracy rolls from certain pieces of gear, including the helmet, gloves, and rings. Besides that, this node allows you to gain even more accuracy by raising your STR attribute (2 STR = 1 accuracy).
Unbreakable greatly boosts your survivability by doing a couple of things. For one, it doubles the armor value of your equipped body armor. This is amazing because you get additional physical damage reduction as a result of taking this node. Additionally, this notable ascendancy passive skill converts a small portion of your total armor and applies that to mitigate the chaos damage you receive from the enemy (specifically from hits, not damage over time).
Unstoppable is a great node to take, especially early on when you are still putting up all of the pieces of gear together. This node not only grants you a 10% boost to your movement speed, but it also ensures that your movement speed cannot be modified to below base value. What this means is that you cannot be hindered by any movement-reduction effects like Temporal Chains or Maim. On top of that, this node makes you immune to stuns, which is a negative status effect that is a pain to deal with no matter what build you are using in PoE.
Untiring is another notable passive skill that helps you survive the self-damaging component of Boneshatter. You see, this node allows you to regenerate life equal to 1.5% of the physical damage you took from hits that were prevented in the past 10 seconds. The “prevented damage,” in this context, is the difference between the damage you received before mitigation and the damage you took after all forms of mitigation have been calculated (i.e. armor and physical damage reduction). This node also boosts your life regeneration rate by a whopping 40%!
Once you have enough PoE currency, you can purchase the Forbidden Flame and Forbidden Flesh jewels with “Aspect of the Carnage” as the matching modifier. This node is from the Berserker ascendancy passive tree and what it does is it gives you 40% more damage at the cost of 10% increased damage taken. Although the downside of this node adds up to the damage you receive at higher Trauma stacks, the Juggernaut’s insane damage mitigation, along with the endgame gear, can address that without a problem!
If you do not want to deal with the 10% increased damage taken from Aspect of the Carnage, then Crave the Slaughter is a good alternative. This node enhances the effect of Rage by also granting increased attack speed. Additionally, Crave the Slaughter makes you lose Rage two seconds after not attacking an enemy, which allows you to keep Rage up for a longer period of time.
Notable Ascendancy Passive Skills for the Boneshatter Juggernaut
If you have searched for PoE builds that utilize the Boneshatter skill gem, you have probably come across some that go for the Slayer as the ascendancy class of choice. But, we strongly believe in the power of the Juggernaut and there are plenty of reasons why.
Let’s begin by stating what makes other players gravitate to the Slayer. First of all, the Slayer is more of an offensive class, so you can feel its power just by completing all of the Lord’s Labyrinth trials.
You have access to certain notable ascendancy passive skills, including life overleech, culling strike against rare/unique monsters, improved melee strike range, and higher Endurance/Frenzy Charges; the latter of which enables you to equip the Replica Farrul’s Fur and Ralakesh’s Impatience for even more damage.
Even though the Slayer has amazing ascendancy nodes, it really suffers from survivability, especially in the endgame. The life overleech, which is one of the main things that keeps the Slayer alive, is not able to address the self-damaging mechanic of Boneshatter. You will definitely notice this once you have reached 30 Trauma stacks.
Moreover, the attack speed of the Slayer does not scale with accuracy in the same way that the Juggernaut’s Undeniable notable passive skill.
All of this is to say that the Slayer is only great until the mid-game. If you want to take this build to the next level, then the Juggernaut is the way to go.
Leveling
Since you are going to choose the Marauder as your starting class, you do not have access to a lot of DEX nodes while taking your notable passive skills early on. Therefore, you will use Ground Slam rather than Splitting Steel as your main attack skill when you begin your journey in Wraeclast.
Ground Slam is an incredible attack skill for leveling physical melee builds in Path of Exile because it deals more damage the closer your enemies are to you. You link it with Chance to Bleed Support in order to increase your damage output by inflicting the bleeding status effect on monsters.
When you have reached The Cavern of Anger in Act 1, you can then switch to Sunder. This skill looks like Ground Slam, albeit it hits a lot more monsters per use. At this point during the campaign, you may have access to a three-linked axe, mace, or sceptre, so you can include Added Fire Damage Support to give more oomph to your attacks.
You do not have to think about accuracy in the first few acts, so might as well take the Unwavering Stance while you are in the early stages of the campaign. This is a keystone passive that essentially makes your attacks unavoidable. What’s more, this makes you immune to stuns, which is quite helpful if you do not have access to good gear just yet.
Now, you are probably wondering when you should transition to Boneshatter. Well, the answer is immediately after you complete the first labyrinth. When this happens, your next goal is to allocate a skill point to Precise Technique. After taking the said keystone passive, make sure to remove Unwavering Stance. You should have some points to do this, but if you don’t, use an Orb of Regret.
It is important to keep in mind that Precise Technique only grants you 40% more damage if your accuracy is higher than your maximum HP. That is why it is imperative that you look at your character sheet to see if that is indeed the case. Don’t worry, the Undeniable notable passive skill should give you a headstart.
At level 44, you should have the following skills and support gems already on your character:
MAIN ATTACK
- Boneshatter
- Ruthless Support
- Fortify Support
- Close Combat Support
AURAS
- Determination
- War Banner
- Herald of Ash/Herald of Purity or Vitality (if your survivability leaves much to be desired)
MOVEMENT
- Leap Slam
- Faster Attacks Support
- Frostblink/Flame Dash (to get out of harm’s way)
If you are already using Boneshatter, it is best that you equip a two-handed axe and take the “Rage on Hit” Axe Mastery to make your leveling journey a lot smoother.
To help make your leveling journey a lot easier, prioritize the following mods when looking at gear:
- Physical Damage
- Accuracy Rating
- Attack Speed
- Life (Must not be higher than accuracy)
- Physical Damage Leeched as Life
Some gems and equipment require you to have a certain amount of DEX and INT. You can address that by either looking for such modifiers on accessories or taking the appropriate nodes on the passive tree (ex. Proficiency and Hard Knocks).
Gear
One of the main selling points of the Boneshatter Juggernaut is that it can work on a minimal investment. Due to its incredible tankiness, it is often used by many people who play in Solo Self-Found or SSF. The build is also a viable league starter because you do not really need specific items to make it work. However, you do have to keep an eye on your accuracy rating and ensure that it is always above your maximum life.
If you want to up your game, you will need expensive pieces of gear. Do you want to take your Boneshatter Juggernaut to the next level? If so, you can buy PoE Currency from our online shop at any time!
Weapon
Once you have finished PoE’s main campaign, search the trade website for Sinvicta’s Mettle. This unique two-handed axe is a great way for you to get started in killing enemies more efficiently. It grants a huge increase in physical damage, as well as some attack speed to get you going.
That’s not all! Sinvicta’s Mettle also allows you to gain Rampage, which is a buff that incentivizes you to rack up the kills for even better bonuses. Rampage essentially provides you with a 1% increase in movement speed and a 2% boost in damage per 20 stacks. And oh, did we mention that you can achieve a total of 1,000 stacks of Rampage?
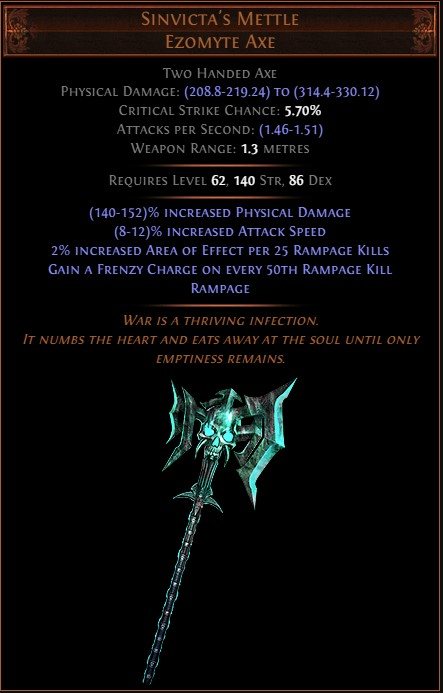
Sinvicta's Mettle
Sinvicta’s Mettle is enough for white maps and well into the early red maps. But, once you tackle T12 to T16 maps, you should definitely transition to a self-crafted Despot Axe for even more damage!
The reason why you are going to use a Despot Axe over any other axes in the game is that this particular weapon hits hard and has the highest base attack speed among its counterparts.
To craft this thing, grab an ilvl 85+ Despot Axe and spam it with Blacksmith’s Whetstones until you achieve a 20% quality. This makes it easier for you to get the mods that you want. Then, spam the weapon with the Deafening Essence of Contempt until you get all three physical damage mods, including:
- % Increased Physical Damage
- Adds # to # to Physical Damage
- % Increased Physical Damage, + to Accuracy Rating
Once you get all of the above-mentioned modifiers, go to the Crafting Bench and put “Prefixes Cannot Be Changed” and then use an Orb of Scouring. This should remove all of the unwanted suffixes.
Lock the prefixes again; only this time, you are going to use Harvest Reforge Speed to obtain the attack speed suffix. You might have to do this part of the crafting process a number of times to get the Tier 1 mod.
When you have the attack speed mod from the Horticrafting Station, lock the prefixes once more and then use a single Veiled Exalted Orb, which will give you a veiled suffix. Before you talk to Jun, bench-craft the mod: “6% Increased Damage per Endurance Charge.” This is to prevent similar mods from appearing on the list.
After unveiling, the mod you are looking for is either “14% Chance to Deal Double Damage” or “30% Increased Attack Speed While a Rare or Unique Enemy is Nearby.” If you get the former, bench-craft the attack speed modifier to finish the craft. Conversely, if you acquired the attack speed mod, add the double damage suffix using the Crafting Bench.
If you have some PoE currency to spare, purchase a Tempering Orb from the trade website and use it on the Despot Axe for a chance to get the “8% Increased Explicit Physical Modifier Magnitudes” weapon enchantment.
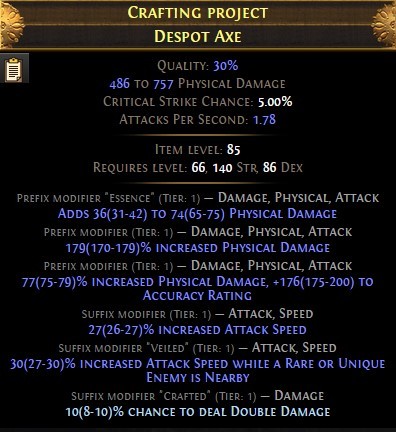
Self-crafted Despot Axe
Body Armor
The body armor that you are going to wear for this build is so vital, primarily because you want to maximize the effect of the Juggernaut’s Unbreakable ascendancy node. That said, you have a few viable options you can choose from.
The Brass Dome grants up to 40% increased armor and +5% to all of your maximum elemental resistances. However, these come at the cost of not getting any HP bonus from your STR attribute. In our opinion, this is a small price to pay for what this thing can give you.
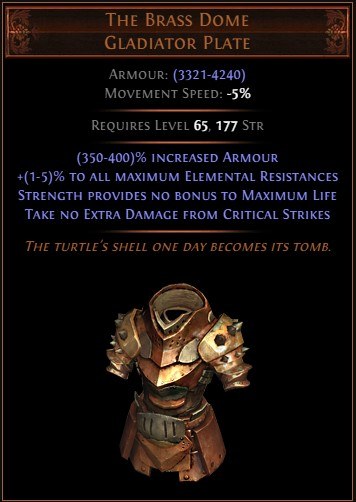
The Brass Dome
The Fourth Vow is another viable option. This body armor has a unique effect where armor also applies to chaos damage taken from hits. If you can recall, the Unbreakable node doubles the armor value of your equipped body armor, so when coupled with The Fourth Vow, the chaos damage you take is greatly reduced as a result!
If you will use The Fourth Vow, you should pair it with the Glorious Vanity (Xibaqua) Timeless Jewel because it synergizes really well with the said body armor. When placed on a jewel socket on your passive tree, it converts the nearest keystone into Divine Flesh. This makes it so that half of the elemental damage you receive from the enemy is taken as chaos damage.
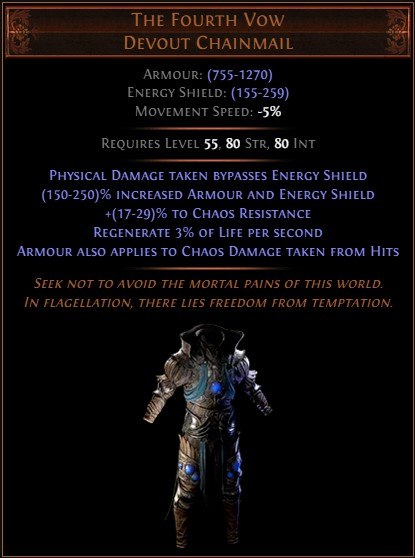
The Fourth Vow
Although your main auras only consist of Determination, Pride, and Precision, you can activate a few more by having enough mana reservation efficiency. This mod should leave some mana left in the tank for your active skills.
Now, if you are going for this approach, you can use an ilvl 86+ Royal Plate as the crafting base. This has the highest base armor among other STR-based body armor in PoE 3.27, which is why it is perfect for this build.
Increase the quality of the Royal Plate by spamming it with Armourer’s Scraps. Then, use the Deafening Essence of Loathing (Mana Reservation Efficiency) to obtain certain mods, such as additional physical damage reduction, chaos resistance, life, and armor. Leave a prefix open so that you can bench-craft the mod: “25% Chance to Avoid Elemental Ailments/25% Chance to Avoid Being Stunned.”
For the implicit modifiers, spam the crafted body armor with Grand Eldritch Ichors until you get “Pride Has 27% Increased Aura Effect” and Grand Eldritch Embers for “14% Increased Effect of Non-Curse Auras from Your Skills.”
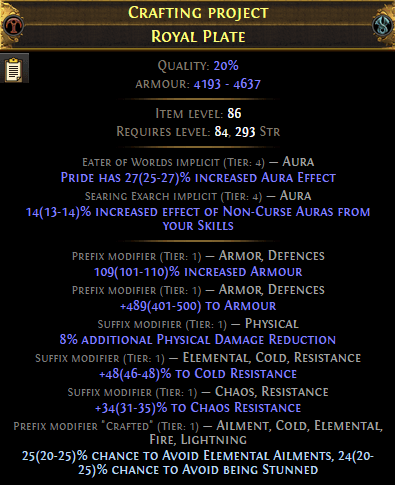
Self-crafted Royal Plate
Now, if you want to roll some spell suppression, you could opt for the Conquest Lamellar instead of the Royal Plate. The process of crafting this one is similar to the Royal Plate, albeit you go for “Chance to Suppress Spell Damage” over the elemental resistance modifier.
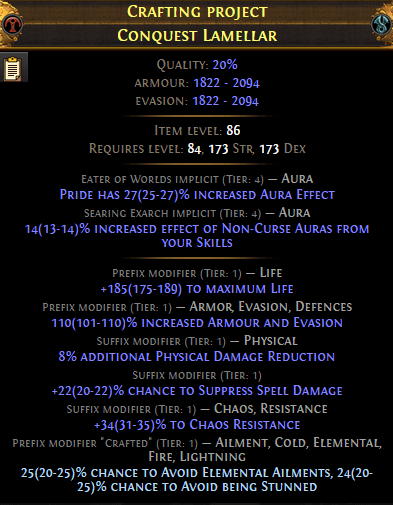
Self-crafted Conquest Lamellar
Helmet
The helmet is another slot where you can roll damage recouped as life, as well as mana reservation efficiency. To get things started, get an ilvl 85+ and use Armourer’s Scraps to achieve a 20% quality.
Next, spam a Giantslayer Helmet with the Deafening Essence of Loathing to guarantee the mana reservation efficiency suffix. Do this until you get INT, elemental resistance, and armor. Bench-craft “+ to Maximum Life” if you have a prefix open.
With your explicit modifiers sorted out, it is time to focus on the implicit mods. Use Grand Eldritch Ichors to obtain mana reservation efficiency. After that, spam Grand Eldritch Embers until you get “24% Reduced Mana Cost of Attacks.”
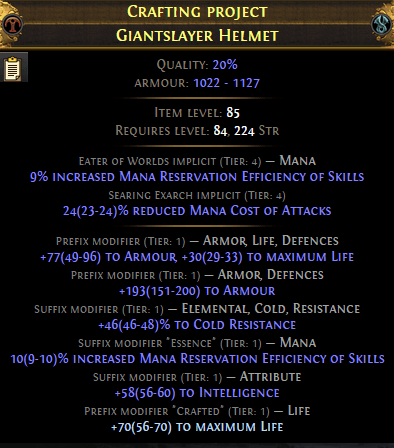
Self-crafted Giantslayer Helmet
Just like the body armor, you can use an armor/evasion-based helmet to roll spell suppression. We recommend that you use the Haunted Bascinet for that particular purpose. The process of crafting the helmet is the same as the Giantslayer Helmet above, except you are going for spell suppression instead of an elemental resistance mod.
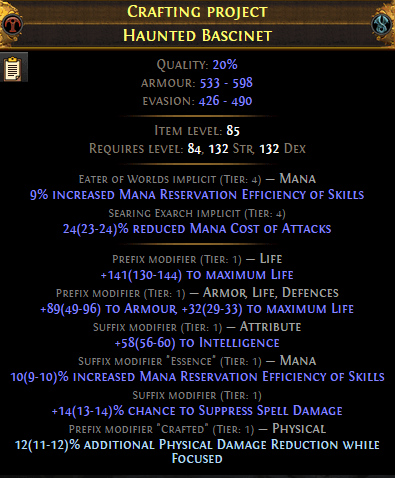
Self-crafted Haunted Bascinet
Gloves
The Tanu Ahi is an amazing pair of gloves that are usually sold at a cheap price on the trade website. When you wear these gloves, you will get increased attack speed, armor/evasion, and up to 3% of physical damage is leeched as life.
But more importantly, the Tanu Ahi allows you to gain Adrenaline and/or Onslaught when leech is removed by filling unreserved life. The former is a buff that significantly boosts your damage, attack speed, movement speed, and physical damage reduction. The latter, on the other hand, provides you with a 20% increase in attack speed and movement speed that lasts for several seconds.
Since these gloves are inexpensive, you can corrupt them with Vaal Orbs for a chance to get the "+2 to AoE Gems" or "% Increased Attack Speed" corrupted implicit modifiers.
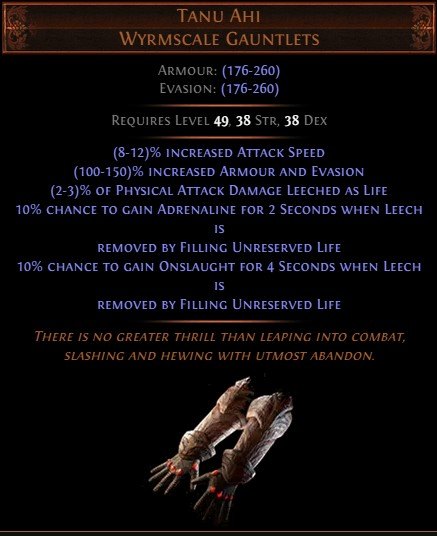
Tanu Ahi
If you do not mind crafting, you can craft your own pair of gloves using the Leviathan Gauntlets as the base. Spam it with the Deafening Essence of Zeal (Attack Speed) until you get accuracy, life, physical damage to attacks, and regenerate life per second. Don't forget to bench-craft "43% Increased Damage While Leeching" if you have an open prefix.
Once your explicit modifiers are sorted out, it is time to use some Eldritch Currencies. Spam the gloves with Grand Eldritch Ichors to obtain the mod: "14% Increased Global Accuracy Rating." Then, utilize some Grand Eldritch Embers for "Non-Vaal Strike Skills Target 1 Additional Nearby Enemy."
You can use some Orbs of Conflict in the hopes of elevating the Searing Exarch mod to hit two additional nearby enemies. However, doing so may cost you a lot of PoE currency, especially if you are not lucky. We are just stating this as an option that you can take later down the line.
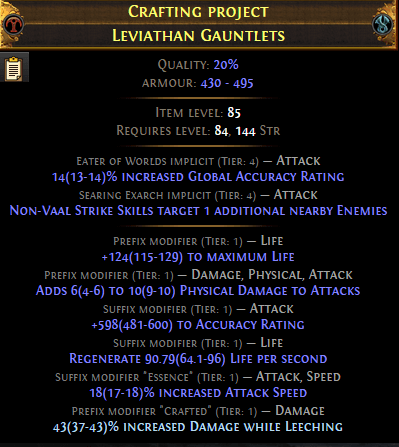
Self-crafted Leviathan Gauntlets
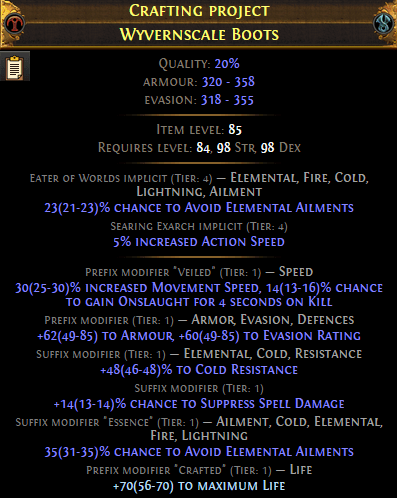
What if you want to include spell suppression? Which of these suffixes can you safely remove? Well, the life regeneration suffix can be swapped for spell suppression. Use the Wyvernscale Gauntlets (ilvl 85+) as the crafting base.
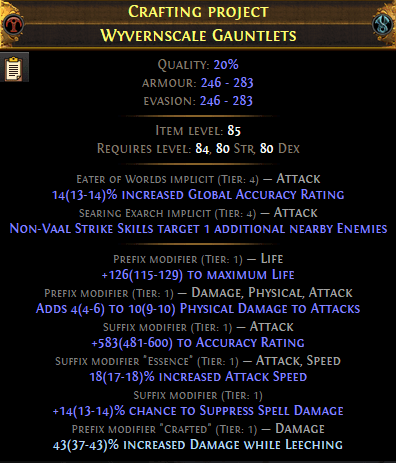
Self-crafted Wyvernscale Gauntlets
The Celestial Brace is a good option for the endgame as it allows you to gain Fortification stacks every time you hit enemies with Boneshatter. What's more, you gain 1% increased attack speed for every stack of Fortification, up to a maximum of 30%. This can drop from the Uber Exarch, so you might not get your hands on it a few days into a new league.
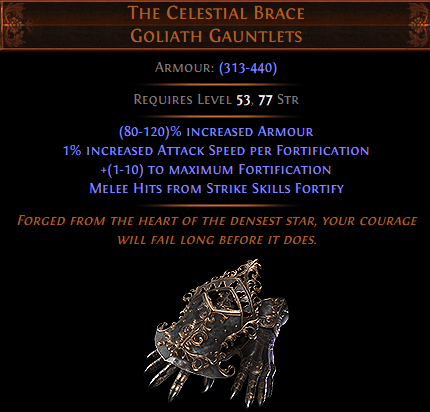
The Celestial Brace
Boots
The Boneshatter Juggernaut has a need for speed. And as such, you need to provide your character with a boost in this department wherever possible. That is why the best pair of boots for this build is one that comes with the Onslaught mod.
Aside from Onslaught, you want the boots to contain the suffix, "% Chance to Avoid Avoid Elemental Ailments." The reason why this is crucial is that you want to achieve full elemental ailment immunity by using a specific unique jewel, which will be discussed later in the build guide.
Anyway, to force the modifier to appear, you have to spam the boots with the Deafening Essence of Loathing. Do this until you get T1 chaos resistance or elemental resistance mods that you have not sorted out yet.
After that, put "Suffixes Cannot Be Changed" from the Crafting Bench and use Orb of Scouring. This will remove all of the prefix modifiers from the boots. After that, lock the suffixes again and then use a Veiled Exalted Orb.
The hybrid movement speed and Onslaught mod have a relatively high chance of appearing on the list. But, in the event that it doesn't, you simply have to lock the suffixes, remove the veiled prefix by utilizing a single Orb of Scouring, and then repeat the process mentioned above.
After securing the Onslaught mod, bench-craft "+70 to Maximum Life" and then fill the last remaining prefix with an Exalted Orb. Now that the explicit modifiers are done, you want to focus on the implicit mods next.
Spam the Onslaught Boots with Grand Eldritch Embers to obtain a "5% Increased Action Speed." For the Grand Eldritch Ichors, the mod that you want is "23% Chance to Avoid Elemental Ailments."
With the max-rolled explicit and implicit "% Chance to Avoid Being Shocked" modifiers, you will achieve 100% shock avoidance which, in turn, will apply to all other elemental ailments as well. This is possible with the unique jewel that is going to be discussed shortly.
I highly recommend that you use the Leviathan Greaves or Wyvernscale Boots as crafting bases for the Onslaught Boots if you want to improve your defense significantly.
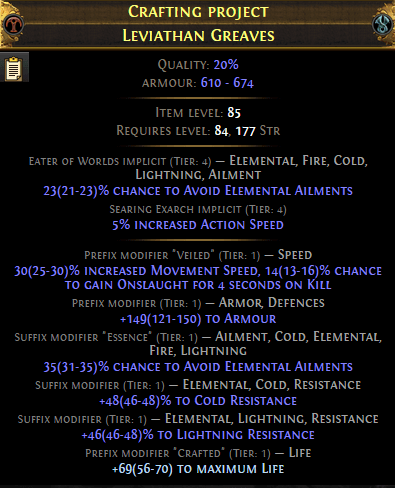
Self-crafted Leviathan Greaves
Self-crafted Wyvernscale Boots
Amulet
There are several incredible amulets that you can use for the Boneshatter Juggernaut. Let's start with the cheapest of the bunch: the Carnage Heart. This thing has some pretty awesome mods, including attributes, elemental resistances, life leech, and increased damage while leeching. The Carnage Heart allows you to rectify any issues with DEX or INT that you may experience early on, so scour the trade website for one if you have the PoE currency.
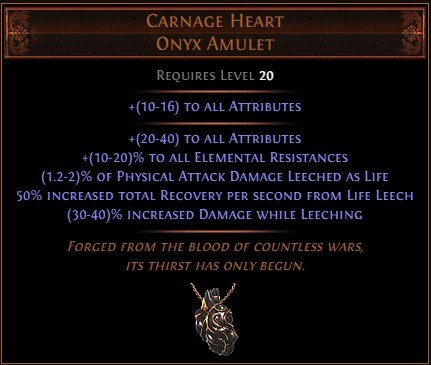
Carnage Heart
Aul's Uprising is another amulet that you might consider getting, especially if you are struggling to activate all of your primary auras. You see, this has a unique effect that makes one aura reserve no mana. So, if you are going to buy Aul's Uprising, make sure that you get the one with "Grace Has No Reservation" to gain 25% increased flask charges when killing enemies.
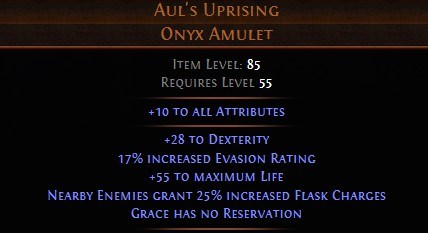
Aul's Uprising (Grace)
Defiance of Destiny has become a staple in tanky builds in PoE due to its unique effect, where you gain up to 20% of your missing unreserved life before you get hit by the enemy. In other words, this amulet heals you before you receive damage, which is definitely insane! Besides that, the Defiance of Destiny provides you with other useful modifiers, such as life, elemental resistance, and increased mana regeneration rate.
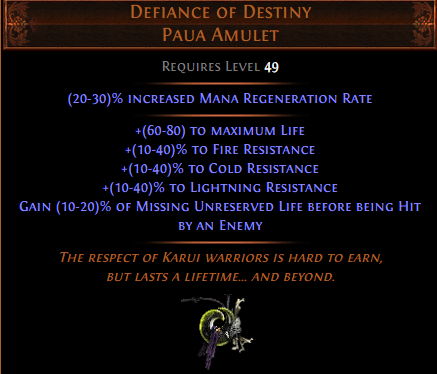
Defiance of Destiny
While the aforementioned amulets are great in their own way, the best amulet for this build, in our opinion, is Ashes of the Stars. The amulet not only raises the level of all of your skill gems by one, but it increases their gem quality by up to 30% as well. Why is this amazing, you ask? Well, if you increase the quality of Boneshatter, you will receive more damage per Trauma stack as a result. For example, wearing a perfectly rolled Ashes of the Stars grants you 6% more damage per Trauma stack!
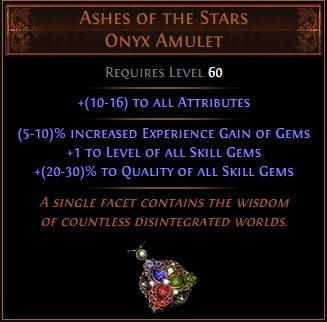
Ashes of the Stars
No matter which amulet you choose, anoint it with Charisma (Opalescent Oil, 2x Golden Oils) to gain some mana reservation efficiency.
Rings
You do not need any fancy unique rings here; just some that you can craft yourself. Use these slots to add some DEX, INT, and chaos resistance into the build. As to what rings you should use as the crafting base, we recommend the Amethyst Ring (Chaos Resistance) or a Two-Stone Ring (Elemental Resistance).
Once you have the rings and are ready for crafting, use either the Deafening Essence of Sorrow (DEX) or the Deafening Essence of Spite (INT) depending on which attribute you need for your character. Spam your chosen Essence until you get chaos resistance and elemental resistance.
After that, put “Suffixes Cannot Be Changed” and use an Orb of Scouring. Then, lock the suffixes again and then go for a Veiled Exalted Orb. Before you unveil, bench-craft “Adds # to # Fire Damage to Attacks, Adds # to # Cold Damage to Attacks.” Talk to Jun and unveil. The mod you are looking for is any of the mana or life mods that may appear on the list.
When you have the desired veiled modifier, go back to the Crafting Bench and put “Non-Channeling Skills Have -7 to Total Mana Cost.” Fill the remaining prefix slot by using an Exalted Orb.
When crafting any accessory in Path of Exile: Keepers of the Flame, you always finish the project by spamming Catalysts until you achieve 20%. As to what Catalysts you should use, we recommend either Fertile (Life) or Prismatic (Resistances). These will enhance certain modifiers that are on the ring for maximum benefit.
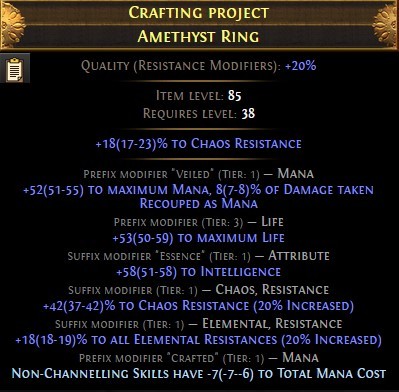
Self-crafted Amethyst Ring
Belt
So, what is the best belt for the Boneshatter Juggernaut in the Keepers of the Flame League? Well, we will reveal that in a bit. But first, let’s talk about some viable options that do not require a ton of PoE currency to pull off.
The Magnate is a unique belt that provides a ton of value to the build. When you wear this belt, you have a small chance to deal either double or triple damage depending on the amount of STR that you have. Since you are using mostly armor-based equipment, getting at least 400 STR is not a problem.
Now, you might think that a 5% chance to deal triple damage is quite small, but keep in mind that you whack enemies rapidly with Boneshatter thanks to your insanely high attack speed. Trust us when we say that the unique effect of The Magnate is very noticeable on this build.
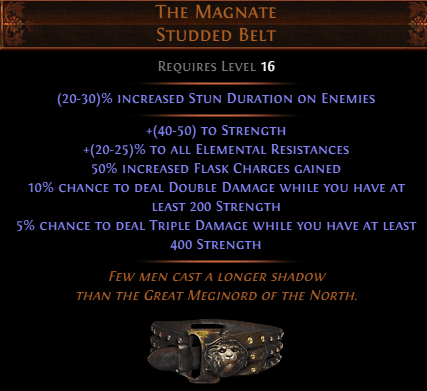
The Magnate
If you want to use a belt that has a more consistent damage modifier that you can rely on, then you might be interested in the alternative, Ryslatha's Coil. The Ryslatha's Coil works similarly to Volatility Support in that it increases the damage range of your attacks, making them hit hard like a truck. This belt grants you other stats as well, including physical damage, life, and STR.
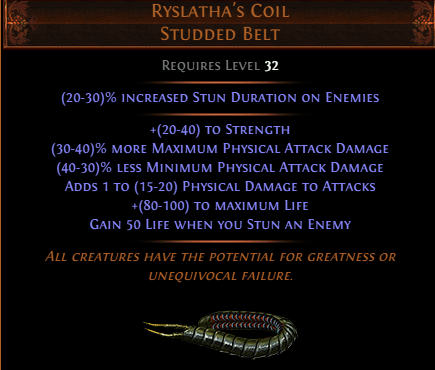
Ryslatha's Coil
The beauty of crafting items in Path of Exile is that you can force specific mods to appear, enabling you to address any issues you may have with any build that you play. Having said that, you can use an ilvl 85+ Stygian Vise and spam it with the Deafening Essence of Sorrow (DEX) until you get life, armor, STR, elemental resistance, or chaos resistance.
If you have an open suffix, you can use a Warlord’s Exalted Orb for a chance to acquire the mod: “% Increased Melee Damage During any Flask Effect.” Don’t forget to use Catalysts to finish the crafting project.
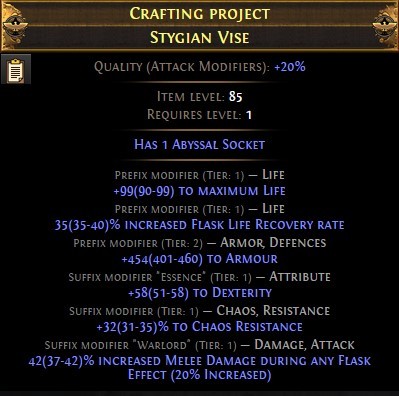
Self-crafted Stygian Vise (with Warlord Mod)
In the endgame, you have the option of purchasing the Mageblood. This is one of the most popular chase items in Path of Exile: Keepers of the Flame, mainly because it gives you the effects of up to four magic utility flasks at all times. Of course, with such an amazing utility, you should expect this to cost an exorbitant amount of PoE currency. Hence, only switch to this if you are willing to invest more into the build.
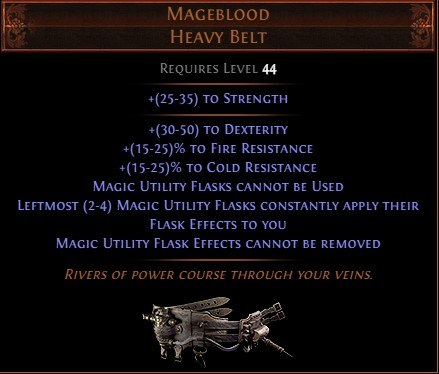
Mageblood
Flasks
- Granite Flask
- Basalt Flask
- Jade Flask
- Quicksilver Flask
- Divine Life Flask/Taste of Hate/Progenesis
A huge part of your damage mitigation comes from armor, which is why you will use the combo of the Granite Flask and Basalt Flask. This greatly boosts your armor value, making you able to take on enemy hits, as well as the damage you receive from Boneshatter Trauma stacks.
You might be puzzled as to why we have included the Jade Flask in the setup. Well, even though a 90% chance to evade attacks is not possible on this build, being able to dodge some damage can contribute to your overall survivability. If you wear some armor/evasion-based gear, the Jade Flask provides even more value!
The Quicksilver Flask is just there to help you move around the map as quickly as possible. This flask is mainly to improve quality of life.
For the fifth and final flask, you can go for a Divine Life Flask early on. Use this until you get the hang of the Boneshatter’s self-damaging mechanic.
Taste of Hate is good for both offense and defense. When used, you gain extra cold damage based on a small portion of your physical damage. On top of that, a portion of the fire and lightning damage you receive from enemy attacks is taken as cold damage, thus making you incredibly tanky during the flask’s effect.
When you have amassed wealth and PoE currency is not an issue, then we highly recommend that you go for Progenesis. This is a unique flask that works a bit like Petrified Blood, where 25% of life loss from damage taken occurs over several seconds rather than in an instant. When you activate the Progenesis, you are less likely to die unless of course you are hit by a highly devastating attack.
Flask Mods
- 60% Increased Armour (of the Armadillo)
- 60% Increased Evasion (of the Impala)
- 14% Increased Movement Speed (of the Cheetah) OR 65% Reduced Effect of Curses (of the Owl)
- Gain 3 Charges When You Are Hit by the Enemy (Flagellant) (Prefix)
- 25% Increased Effect (Abecedarian/Alchemist/Dabbler) (Prefix)
You can roll the flasks by using the combination of Orb of Alteration and Orb of Augmentation until you get the mods that are outlined above.
If you are wearing The Magnate, Ryslatha's Coil, or Stygian Vise, make sure to go for the “Flagellant” prefix so that you have no problems gaining flask charges when attacking with Boneshatter. However, you should opt for the “25% Increased Effect” prefix if you are wearing the Mageblood.
To get the Tier 1 mods, the flasks must have an item level of 84+.
Jewels
We are happy to say that the Boneshatter Juggernaut does not have any mandatory jewels for the build to work. However, there are certainly some that you can obtain that will enhance the build in various ways.
Begin by purchasing a Watcher's Eye jewel with any two (or three) of these modifiers:
- Pride
- % Chance to Impale Enemies on Hit with Attacks
- % Increased Physical Damage
- % Chance to Deal Double Damage
- Determination
- + to Armour
- % Additional Physical Damage Reduction
- You Take % Reduced Extra Damage from Critical Strikes
- Grace
- % Chance to Evade Attack Hits
- % Chance to Suppress Spell Damage
- % Increased Movement Speed
- Precision
- % Increased Attack Speed
- % Increased Attack Damage
To turn the Boneshatter Juggernaut into an effective killing machine, you must obtain a Lethal Pride Timeless Jewel with as many "5% Chance to Deal Double Damage" mods as possible. You can use the nifty Timeless Jewel Calculator to help you with that. Just select the jewel socket that is directly below the "Stamina" node, which is on the left side of the passive tree.
Large Cluster Jewels are always nice additions to any build in Path of Exile 3.27 Keepers of the Flame. That is because they give you access to notable passive skills that are not normally found in any part of the passive tree. With that said, get a couple of Large Cluster Jewels that have the line that says: "Added Small Passive Skills Grant: 12% Increased Physical Damage."
On the first Large Cluster Jewel, use Harvest Reforge Defence until you get Battle-Hardened, Iron Breaker, and Furious Assault. For the other cluster jewel, use Harvest Reforge Physical to obtain Master the Fundamentals, in addition to Battle-Hardened and Furious Assault.
If you are wondering what these notable passive skills provide, here is a rundown:
- Battle-Hardened
- 30% Increased Evasion Rating and Armour
- 35% Increased Physical Damage
- Furious Assault
- 8% Increased Attack and Cast Speed
- 25% Increased Physical Damage
- Iron Breaker
- Overwhelm 10% Physical Damage Reduction
- 35% Increased Physical Damage
- Master the Fundamentals
- +10% to All Elemental Resistances
- 35% Reduced Elemental Damage
- 35% Increased Physical Damage
The Fourth Vow is already an incredible body armor on its own. However, to truly unlock its full potential, you must pair it with a Glorious Vanity Time Jewel with the line that says: "Bathed in the Blood of (100-8000) Sacrificed in the Name of Xibaqua."
Putting this into a jewel socket transforms the nearest keystone passive into Divine Flesh. To recap, Divine Flesh converts half of the elemental damage you receive from monster attacks and you take that as chaos damage instead. On top of that, your maximum chaos resistance is increased by 5%, making the combo of The Fourth Vow and Divine Flesh amazing from a survival standpoint.
Take note that you only need the Glorious Vanity jewel if you have The Fourth Vow equipped. Besides that, you can only use one timeless jewel at a time, which means that you have to choose between Lethal Pride or Glorious Vanity (and not both).
There are a ton of passive skills you can take that will benefit the build. However, in PoE, you only have a finite number of skill points to use. So, to help save some precious points, you can purchase an Impossible Escape jewel with the line: "Passives in Radius of Imbalanced Guard Can Be Allocated Without Being Connected to Your Tree."
With the Impossible Escape inserted into any of the jewel sockets you have available, you can take these notable passive skills without spending a ton of points:
- Kinetic Impacts
- 25% Increased Physical Damage with Two-handed Melee Weapons
- Attacks with Two-Handed Melee Weapons Deal 25% increased Damage with Ailments
- 10% Chance to Double Stun Duration
- 5% Chance to Deal Double Damage
- Prismatic Skin
- +2% to All Maximum Elemental Resistances
- Soul of Steel
- +150 to Armour
- 30% Increased Armour
- +1% to All Maximum Elemental Resistances
Now, if you still have some jewel sockets left, you can populate them with base/abyss jewels with any of the following modifiers:
- % Increased Attack Speed
- % Increased Attack Speed with Axes
- % Increased Attack and Cast Speed
- % Increased Maximum Life
- % of Damage Taken Recouped as Life
- % Increased Damage
- % Increased Melee Damage
- % Increased Global Physical Damage
- % Increased Damage with Two-Handed Weapons
- Added Physical Damage with Axe Attacks
- % Chance to Impale Enemies on Hit with Attacks
- + to Accuracy Rating
- % Increased Global Accuracy Rating
- + to Armour
- + to Maximum Life
- % Increased Armour if You Haven't Killed Recently
Gems
Welcome to the gems section of our 3.27 Boneshatter Juggernaut build guide! The Boneshatter Juggernaut is pretty tight on the gems that you can use, especially with the limited number of gem sockets available on gear.
Weapon
- Boneshatter
- Awakened Brutality Support
- Awakened Melee Physical Damage
- Ruthless Support
- Impale Support
- Close Combat Support
Boneshatter is your primary attack skill on this build. Every time you hit an enemy with Boneshatter, you gain a stack of Trauma that makes your subsequent attacks even more devastating than the last. Although the damage scaling of this skill gem is infinite, you are only limited to the amount of physical damage you can take from the self-damaging component of Trauma. That is why we advise you to leave the gem level to 20 to make things more manageable. Only raise the gem level to 21 (by corrupting it with a Vaal Orb) if you can handle the damage.
Awakened Brutality Support and Awakened Melee Physical Damage Support increase the physical damage of Boneshatter by a massive amount. Ruthless Support piles on that by enabling you to hit much harder on every third attack.
Impale Support increases your overall DPS against enemies. When you use Boneshatter, you inflict impale stacks as well.
Close Combat Support allows you to deal even more damage the closer the monsters are to you. In addition, your travel skill gains a "% More Attack Speed" multiplier, making it less clunky to use.
Body Armor
- Pride
- Determination
- Precision
- Flesh and Stone
- Arctic Armour
- Enlighten Support (Lvl 4)
Pride and Determination are your primary auras for the Boneshatter Juggernaut. The former causes nearby enemies to take more physical damage. The latter, on the other hand, mitigates the physical damage you receive; may it be from Boneshatter or monster hits, by increasing your total armor value.
Precision is also nice in helping improve your damage. This is by granting a huge boost in accuracy rating, which will be utilized by the Undeniable ascendancy node from the Juggernaut to increase your attack speed.
Flesh and Stone allows you to switch stances at any time. You only have to think about the Flesh (Blood) Stance so that you gain the ability to maim enemies on hit. Enemies you have maimed with Boneshatter take increased physical damage as a result.
Arctic Armour reduces the physical and fire damage you take while you are stationary. This works for both pure armor and armor/evasion variants of the Boneshatter Juggernaut in Patch 3.27.
Enlighten Support aids in reducing the mana required to activate all of these buffs. A level 3 Enlighten Support should suffice. Take note that if you use Grace, you have to complement that by also wearing the Aul's Uprising unique amulet. Otherwise, you won't be able to use the aura since Grace reserves 50% of mana compared to Arctic Armour's 25%.
Helmet
- Blood Rage
- Autoexertion
- Ancestral Cry
- Enhance Support
Blood Rage is a buff that also gives you a sizable boost to your attack speed. It grants the power to leech life off of your enemies with every hit as well. But, bear in mind that you lose a small portion of your HP while the buff is active, so it is best that you continuously put pressure on your enemies to regain some life back.
Ancestral Cry is a warcry skill in Path of Exile that grants a sizable boost to your armor and melee strike range. However, you only really need it so that you can hit two additional enemies with every swing of your axe. This is automated by Autoexertion, alleviating the need to manually press the button every time it becomes available.
Enhance Support is just there to increase the quality of both Blood Rage and Ancestral Cry.
Gloves
- Vulnerability
- Lifetap Support
- Molten Shell (lvl 10)
- Cast When Damage Taken (lvl 6)
Vulnerability is a curse that you must apply to bosses and rare monsters to make them easier to kill. This is supported by Lifetap to ensure that mana is not going to be a hindrance that prevents you from casting it.
Molten Shell grants additional armor when activated. It is cast automatically by Cast When Damage Taken when you receive enough damage from hits. Make sure to leave Molten Shell at level 10 and Cast When Damage Taken at level 6 to make them proc more consistently.
Boots
- Leap Slam
- Faster Attacks
- War Banner
- Lifetap
Move around the map using Leap Slam. This is boosted by Faster Attacks Support so that this movement ability does not feel clunky to use.
War Banner must be planted on the ground to gain a boost in damage and accuracy for up to 15 seconds. Take a look at the Valour stacks that you have and make sure you have sufficient Valour before putting down the War Banner for maximum effect.
Do you want to play the Boneshatter Juggernaut in Path of Exile: Keepers of the Flame? Then here is a rundown of the skills and support gems that you need:
Skills/Equipment | Support Gems |
| Boneshatter (Weapon) | +Awakened Brutality Support +Awakened Melee Physical Damage +Ruthless Support +Impale Support +Close Combat Support |
| Pride (Body Armor) | +Determination +Precision +Flesh and Stone +Arctic Armour +Enlighten Support (Lvl 4) |
| Blood Rage (Helmet) | +Autoexertion +Ancestral Cry +Enhance Support |
| Vulnerability (Gloves) | +Lifetap Support +Molten Shell (Lvl 10) +Cast When Damage Taken (Lvl 6) |
| Leap Slam (Boots) | +Faster Attacks +War Banner +Lifetap |
Pantheon
So, what Pantheon Powers should you use for the Boneshatter Juggernaut in PoE 3.27? If you still have not achieved full elemental ailment immunity, stick to a fully upgraded Soul of the Brine King. Then, switch to Soul of Lunaris when you have that sorted out.
Soul of Lunaris is incredible as it provides you with additional physical damage reduction (up to 8%) and increased movement speed for each nearby monster.
For the Minor Gods, Soul of Abberath is non-negotiable, especially when taking on maps with Searing Exarch Altars.
When playing on maps with Eater of Worlds Altars, you can either use Soul of Tukohama or Soul of Gruthkul. Both of them give you more physical damage mitigation, which is always welcome for a self-damaging build like the Boneshatter Juggernaut.
If you are new to Path of Exile, you can upgrade the Pantheon powers by putting a Divine Vessel into your Map Device and killing the bosses specified on the Pantheon UI (press Y).
Tattoos
Do you want to get the most out of this PoE 2 melee build? If so, here are the Tattoos that we can recommend for the Boneshatter Juggernaut in the Keepers of the Flame League:
- Tattoo of the Kitava Warrior
- 5% Increased Global Physical Damage
- Tattoo of the Tukohama Warmonger
- 5% Increased Melee Damage
- Tattoo of the Kitava Blood Drinker
- 0.5% of Attack Damage Leeched as Life
- Tattoo of the Tukohama Shaman
- 0.3% Life Regeneration per Second
- Tattoo of the Rongokurai Warrior
- 6% Increased Armour
- Tattoo of the Rongokurai Turtle
- 5% Reduced Extra Damage from Critical Strikes
- Tattoo of the Kitava Heart Eater
- Killing Blows Have a 4% Chance to Consume Corpses to Recover 10% of Maximum Life
Passive Tree

Passive Skills for the Boneshatter Juggernaut in PoE 3.27
POB
PoE 3.27 Wrap-Up: How Good is the Boneshatter Juggernaut Now?
Not a lot has changed for the Boneshatter Juggernaut in Path of Exile: Keepers of the Flame. This is considered a good thing since this melee build performed admirably well in the previous league.
Although Boneshatter can certainly be utilized by the Slayer, we feel that the Juggernaut is the perfect ascendancy class for the said attack skill gem. That is because the Juggernaut has access to notable passive skills that allow you to infinitely scale Boneshatter’s damage to new heights!
In addition, the Juggernaut is an incredibly tanky class on its own, which you can further amplify by wearing the right equipment.
What’s cool about this build is that you can use it as a league starter and take it well into the endgame just by investing enough PoE currency.
So, if you are looking for a build that can handle any content in the game, then we can strongly recommend the Boneshatter Juggernaut for sure!
With all of that said, good luck on your adventures in Wraeclast, Exile!
PROS
+Can be used as a league starter
+Able to work with a minimal investment
+Capable of clearing maps quickly and efficiently
+Scales so much better in terms of offense and defense than the Slayer
+Uses certain unique pieces of gear that can elevate the build to new heights
+Still pretty awesome in Patch 3.27
CONS
-Players must be comfortable crafting certain equipment
-Despite its power, this is still a melee build, which requires you to be up close and personal with the enemy to deal damage
-Average single-target damage compared to other “endgame” builds
![Divine Orbs PC [⏱️ 10-15 Min via Hideout Trade]](/img/tmp/product_mini_2_51212.jpg?time=1784668004)

![75x Divine Orbs + 5x FREE [Special Bulk Offer]](/img/tmp/product_mini_2_51251.jpg?time=1784668004)
![Sinvicta's Mettle 6L [POE Items]](/img/tmp/product_mini_2_48756.jpg?time=1784668004)