[3.27] Tectonic Slam of Cataclysm Build - POE Keepers of the Flame
31.10.2025 - 22:26:39
Game Guides , Path of Exile , POE build guides
![[3.27] Tectonic Slam of Cataclysm Build - POE Keepers of the Flame](/modules/prestablog/themes/default-1-5/up-img/slide_874.png "[3.27] Tectonic Slam of Cataclysm Build - POE Keepers of the Flame")
The Tectonic Slam of Cataclysm is a Transfigured Gem in Path of Exile: Keepers of the Flame that is, in our opinion, so much better than its base counterpart. When used on its own, it is quite clunky and slow. However, when you use it along with General’s Cry (GC), then you have a build that can destroy things with ease – quickly and effectively!
Although General’s Cry is a warcry skill often associated with the Berserker class, the build we are going to talk about today actually utilizes its brethren – the Juggernaut. Why? Because this build scales really well with the notable ascendancy passive skills that the Juggernaut has access to!
So, if you are interested in learning how to create this character, do not hesitate to read this guide to completion. This is our comprehensive build guide for the GC Tectonic Slam of Cataclysm Juggernaut in Path of Exile 3.27 Keepers of the Flame League!
Basics
Your main damaging skill for this build is the Transfigured Gem: Tectonic Slam of Cataclysm. Unlike the base version, this has lower damage effectiveness and area of effect from the start. However, the attack gets so much better if you have Endurance Charges.
Every time you use this skill, you spend all of the Endurance Charges you have. In turn, the resulting slam becomes more devastating, covers a much wider area, and has a considerable chance of branching out to attack more monsters.
Tectonic Slam of Cataclysm did not receive anything in Patch 3.27, which means that it still has 257%-472% effectiveness of base and added damage (up from 160%-240%), similar to the previous PoE leagueo.
As mentioned earlier, using the Tectonic Slam of Cataclysm by itself is slow and clunky. That is why you are going to circumvent that by using General’s Cry as well!
GC is a hybrid gem in Path of Exile: Keepers of the Flame because it can be used as an active skill or a support gem. Either way, you will summon mirage warriors from nearby corpses or from the ones spawned by Desecrate.
The reason why General’s Cry is an important part of the build is that the mirage warriors will actually use the linked attack skill gem; in this case, the Tectonic Slam of Cataclysm!
What’s interesting about this interaction is that GC actually got buffed in the past couple of leagues. Instead of summoning only five mirage warriors, you can now call forth a total of six! Why is this cool? Because each one of them is going to use the Tectonic Slam of Cataclysm to deal huge amounts of damage!
Now, where do you get some corpses to spawn the mirage warriors from General’s Cry? That is where Cyclone comes in. Cyclone, in this build, is linked with Cast While Channelling Support (CwC) and Desecrate. What this does is every time you spin with Cyclone, you will cast Desecrate automatically, which will then create some usable corpses for your GC. After that, the fun begins!
Once you see the green clouds that signify that Desecrate has been triggered, you will then use GC to call your allies. After summoning the mirage warriors, you simply watch as they deal with nearby monsters, slamming the ground to cause deadly fissures!
Although General’s Cry got nerfed a bit in this league wherein the Mirage Warriors now only deal slightly less damage than before, the massive damage buff to Tectonic Slam of Cataclysm pretty much makes up for it.
This build is capable of dispatching even the hardest bosses in PoE 3.27. Do you like to slay Uber Sirus without a problem? Yes, you can! How about defeating the bosses from “The Feared” Maven Invitation? They are not going to be an issue for you at all!
The GC Tectonic Slam of Cataclysm Juggernaut is so overpowered that you can take on whatever content there is available in PoE!
If you want to elevate the damage of this build, here are the mods you should look for on your gear:
- Added Physical Damage
- Increased Damage
- Increased Physical Damage
- Physical Damage as Extra Fire Damage
- Increased Elemental Damage
- Increased Fire Damage
- Melee Critical Strike Multiplier
- + to Global Critical Strike Multiplier
- +1 to Maximum Endurance Charges
Playstyle
When you enter a new area, use Leap Slam to traverse the map and search for monsters. Once you see thick packs of enemies on the screen, press and hold Cyclone, then activate General’s Cry shortly after. After that, watch as the mirage warriors do the heavy lifting!
Ascendancy
Because Endurance Charges are an important part of this build in PoE 3.27, there is no better ascendancy class suited for that purpose other than the Juggernaut. The Juggernaut is a pretty tanky class, but it does have nodes that will strike fear in the hearts of your enemies.
Undeniable sorts out all of the accuracy issues you have early on. This notable ascendancy passive skill does two things. First, you get a huge amount of accuracy just by taking this node. Second, you get more attack speed based on your total accuracy as well.
Unbreakable doubles the armor value of your equipped body armor. But more importantly, a portion of your armor mitages the elemental damage you take from monster hits, thus improving your survivability.
Unflinching increases your Maximum Endurance Charges by one. This also gives you a comfortable and reliable way of generating Endurance Charges. Since you get hit a lot, you can gain the maximum number of charges quite easily!
Unyielding further improves the effects of Endurance Charges. For each Endurance Charge you have, you gain 8% increased damage, 6% increased area of effect, and 10% increased stun duration. This ascendancy node perfectly synergizes with the inherent properties of the Tectonic Slam of Cataclysm.
To make the GC Tectonic Slam of Cataclysm Juggernaut truly powerful, get the Forbidden Flame and Forbidden Flesh jewels with “Sione, Sun’s Roar” as the matching modifier. This is a new ascendancy node from the Chieftain, which ensures that Warcries have infinite power when used, as well as provides a 30% increased Warcry buff effect.
General’s Cry actually utilizes the “Power” when creating mirage warriors. This is a mechanic in Path of Exile that takes into account the type of monsters you are surrounded with and gives you bonuses based on that. With the new Sione, Sun’s Roar notable ascendancy passive, you always get enough mirage warriors on a single cast of General’s Cry.
The Forbidden Jewels are a worthy upgrade, especially considering how they can impact the effectiveness of the build. Be sure to save up some PoE currency to get the set as soon as possible!

Notable Ascendancy Passive Skills for GC Tectonic Slam of Cataclysm Juggernaut
Gear
The GC Tectonic Slam of Cataclysm Juggernaut is not a league starter in Path of Exile: Keepers of the Flame. That is because the build requires certain items for it to work as effectively as it can be. You also need quite a lot of PoE currency since some of the endgame pieces of gear are pretty expensive to obtain.
Weapon
Your main weapon here is a self-crafted warstaff with the Eventuality Rod as the crafting base. This particular two-handed warstaff has an implicit modifier that grants plus one to your maximum Power Charges and Endurance Charges.
That said, you can craft the weapon by spamming it with a ton of Deafening Essence of Contempt. Refer to our ultimate crafting guide to get step-by-step instructions on how to craft this endgame weapon.
It is important to note that the Perfect Fossil (now known as Opulent Fossil) no longer grants improved quality in Path of Exile: Keepers of the Flame. This means that you can only increase the quality of your gear up to 20% unless you corrupt them with a Vaal Orb (which we do not recommend on crafted items).
The good news is that quality bonuses on gear are now calculated multiplicatively. To put it simply, a 20% quality on a weapon now grants 20% more damage.
Now, although this is optional, use a Tempering Orb to apply the enchantment: “8% Increased Explicit Physical Modifier Magnitudes” and get the most out of the self-crafted Eventuality Rod.

Self-crafted Eventuality Rod
Body Armor
There are a couple of amazing body armors that you can use for the GC Tectonic Slam of Cataclysm Juggernaut. If you do not want to dabble in crafting, you can simply wear Utula’s Hunger. This unique body armor gives a huge boost to your HP, though you have to make sure that there are no life modifiers on your other equipped items.

Utula's Hunger
However, if you want to go for pure offense, you have to equip the double-influenced Astral Plate with reduced mana cost of skills and critical strike chance modifiers. The process of crafting this body armor is lengthy. Luckily for you, we have the full instructions outlined in our ultimate crafting guide, so be sure to visit the page to learn more.

Self-crafted Body Armor
If you have the PoE currency, we highly advise that you craft the double-influenced body armor. This is to help you sustain mana, especially since this build can be a resource hog in the endgame.
Helmet
The Abyssus is the best helmet for the GC Tectonic Slam of Cataclysm Juggernaut in PoE 3.27. This thing gives you some flat physical damage, melee critical strike multiplier, armor, and some additional attributes. Although it does have a notable downside in that you take increased physical damage from enemies, there are enough safeguards on this build to ensure your survivability.

Abyssus
If you are feeling lucky, you can corrupt a Cowl of the Thermophile with a Vaal Orb in the hopes of turning it into a corrupted rare Ezomyte Burgonet. Then, you use a Tainted Mythic Orb for a chance to upgrade it into an enchanted Abyssus.
The reason why getting the Abyssus this way is highly desirable is that the resulting helmet allows you to put anointments on it just like you would an amulet!

Abyssus (from Corrupted Cowl of the Thermophile)
If you need to sort out your resistances, you can equip a crafted Giantslayer Helmet with resistance mods, life, and rarity of items found. For the implicits, you can go for fire penetration and increased area of effect.
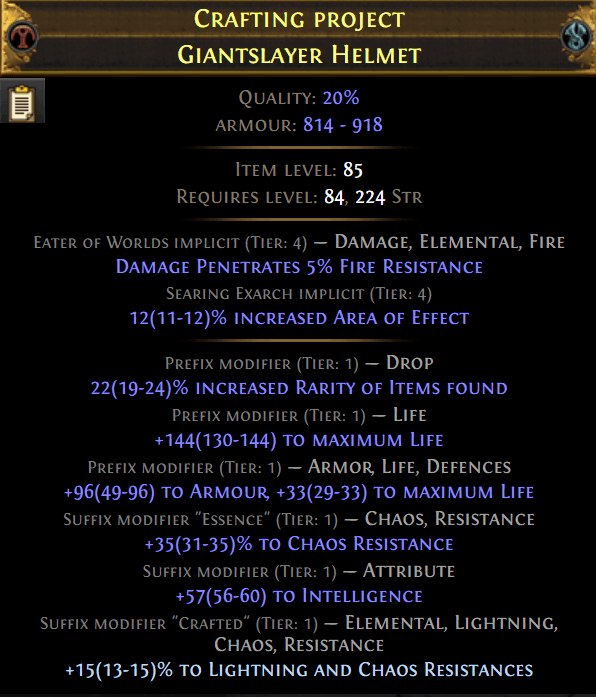
Crafted Giantslayer Helmet
Gloves
You will need some INT on your character because you are going to use Automation Support as one of your support gems for this build.
That said, grab a pair of ilvl 85+ Titan Gauntlets (or better) and spam the Deafening Essence of Spite (INT) until you get accuracy, life regen, life, and added physical damage. The last prefix is reserved for the “43% Increased Damage While Leeching,” which you can add from the Crafting Bench.
For the implicit modifiers, use Grand Eldritch Ichors to obtain fire exposure and Grand Eldritch Embers for a chance to intimidate enemies on hit. You can take things up a notch by using an Orb of Conflict to elevate either of them.

Self-crafted Titan Gauntlets
Alternatively, you can spam the gloves with Grand Eldritch Embers to get Rage gain on hit. Rage has been reworked a couple of leagues ago and it still performs the same way in Patch 3.27. Basically, Rage grants 30% more damage at maximum stacks. Furthermore, Rage as a resource can now be gained more reliably, particularly when you allocate certain nodes on the passive tree.
Boots
Ralakesh’s Impatience can now be replaced in the PoE 3.27 version of this build, though wearing it is not bad at all. When you equip these boots, you count as having the maximum number of Endurance Charges at all times. This means that you always have increased survivability so long as you have Ralakesh’s Impatience equipped.
Take note that you still need to gain Endurance Charges for the damage calculation of the Tectonic Slam of Cataclysm Juggernaut. But, this is not going to be an issue thanks to the Unflinching node from the Juggernaut’s ascendancy tree.
Despite being in a nerfed state like in the previous league, Ralakesh’s Impatience is still quite valuable to the build. Don’t worry about the removal of the movement speed mod since you have Leap Slam to help you traverse the map quickly anyway.
If you have enough PoE currency, purchase one from the trade website that has the “+1 to Maximum Endurance Charges” corrupted implicit mod.

Ralakesh's Impatience
The latest version of the Tectonic Slam of Cataclysm Juggernaut can now utilize the Legacy of Fury. The Legacy of Fury is there to scorch nearby enemies at an increased effect, thereby reducing their resistance to fire damage, making your mirage warriors hit harder.
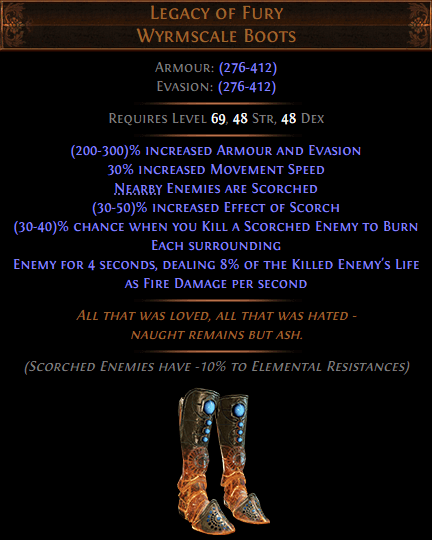
Legacy of Fury
Amulet
Both Tectonic Slam of Cataclysm and General’s Cry benefit from gem quality, which is why you are going to wear the Ashes of the Stars.
Sure, this unique amulet got nerfed in the previous leagues. However, its effect guarantees that you get the most out of your active skill gems!
If you purchase this from the trade website, look for one that has 30% quality of all skill gems to get the maximum benefit!
Once you have acquired the Ashes of the Stars, anoint it with Charisma (Opalescent Oil, 2x Golden Oils). This is to give you enough reservation efficiency to activate all of your skills.

Ashes of the Stars
Rings
To increase your damage output, you want to obtain a couple of synthesized rings with the “+1 to Maximum Endurance Charges” and “Curse Enemies with Elemental Weakness on Hit” implicit modifiers from the trade website.
After acquiring the rings, you can craft them using Essence of Hysteria. This particular Essence guarantees the mod: “Gain 10% of Physical Damage as Extra Fire Damage” each and every time.
Spam Essence of Hysteria until you get “+% to All Elemental Resistances” and “+% to Chaos Resistance.” Then, add “Can Have Up to 3 Crafted Modifiers” from the Crafting Bench, followed by “+42 to Maximum Life, Regenerate 4 Mana per Second” and “Non-Channelling Skills Have -7 to Total Mana Cost.”
Be sure to use Turbulent Catalysts to enhance the Essence of Hysteria mod from 10% to 12%.

Self-crafted Synthesized Ring (Using the Essence of Hysteria)
Belt
Since the GC Tectonic Slam of Cataclysm Juggernaut is an endgame build, you also have to wear a belt that is befitting its status. Therefore, get yourself a Mageblood so that you will gain the effects of several magic utility flasks at all times.

Mageblood
Flasks
- Granite Flask
- Basalt Flask
- Diamond Flask
- Quicksilver Flask
- Bottled Faith
Your main defensive layer for the GC Tectonic Slam of Cataclysm Juggernaut is armor. That is the reason why you will use the combo of Granite Flask and Basalt Flask to significantly boost your total armor, which helps you last longer on the battlefield.
The Diamond Flask is a great way to boost your critical strike chance. The Quicksilver Flask is just there to help make your mapping experience a lot smoother.
Bottled Faith is just an amazing unique flask to use here simply because enemies that are on the Consecrated Ground take increased damage. Furthermore, you get a significant boost to your crit chance against monsters that are on Consecrated Ground.
Flask Mods
- 60% Increased Armour (of the Armadillo)
- 20% Additional Elemental Resistance (of the Rainbow)
- 55% Chance to Avoid Being Shocked (of Bog Moss)
- Regenerate 3% of Life per Second (Bench-craft)
Jewels
Unlike most builds in Path of Exile, the GC Tectonic Slam of Cataclysm Juggernaut only utilizes one aura skill and that is Determination. This is because you want to increase the number of Endurance Charges you have and one way to do that is by putting the Sublime Vision on your passive tree, specifically one that affects Determination. You see, the Sublime Vision has a unique effect where your other auras are disabled. In turn, one aura gets an increased effect and an added bonus to boot.
The Lethal Pride is another excellent unique jewel that you can get your hands on. Purchase one that has many double damage and melee critical strike multiplier mods when placed inside the jewel socket near the “Overcharge” node on the passive tree. The added STR bonuses from Lethal Pride can also improve your accuracy via the Undeniable ascendancy node.
You want to be incredibly tanky so that you can take on whatever content there is in Path of Exile: Keepers of the Flame without worrying about dying. If you recall, one of the flasks that you are going to use for this build has the mod, “55% Chance to Avoid Being Shocked.” Well, there is a reason for that.
The Stormshroud has a unique effect where modifiers to shock avoidance apply to other elemental ailments as well. With this jewel, achieving full elemental ailment immunity is quite possible!
Impossible Escape is a unique jewel in Path of Exile that lets you allocate passive skills within the radius of a keystone without being connected to the tree. That said, acquire the Impossible Escape (Zealot’s Oath) so that you can take the notable passive skills, “One with the River” and “Blunt Trauma.”
Cluster Jewels are a great way to boost the damage output of this build. So, to begin, get yourself a couple of Large Cluster Jewels – one with Mace and Staff damage and the other for two-handed weapons.
On the one with the Mace and Staff damage, use the combination of Serrated, Dense, and Metallic Fossils to obtain the following notable passive skills:
- Weight Advantage
- Mace, Sceptre, or Staff Attacks Deal 30% Increased Damage with Hits and Ailments
- +20 Strength
- Martial Prowess
- 20% Increased Attack Damage
- 6% Increased Attack Speed
- 15% Increased Global Accuracy Rating
- 20% Increased Damage with Ailments from Attack Skills
- Overlord
- 30% Increased Damage with Maces, Sceptres, or Staves
- Melee Hits with Maces, Sceptres, or Staves Fortify for 6 Seconds
For the other Large Cluster Jewel (Two-handed Weapon), use Harvest Reforge Attack from the Horticrafting Station until you get Martial Prowess and Titanic Swings. Again, the third notable passive skill can be anything as long as it is in the middle.
If you are having a hard time sustaining your mana, you can still use Harvest Reforge Attack; only this time, you will go for Martial Prowess, as well as Feed the Fury and Fuel the Fight.
You can use several Medium Cluster Jewels (Exerted Attacks) if you want to. One of them should have the notables Lead by Example and Warning Call. Use the combo of Dense and Fundamental Fossils to have a higher chance of getting these passive skills.
How about the rest of the Medium Cluster Jewels? Well, you can simply use Harvest Reforge Attack until you get Cry Wolf and Rattling Bellow. If you are wondering what these notable passive skills do, here are their effects:
- Lead by Example
- When You Warcry, You and Nearby Allies Gain Onslaught for 4 Seconds
- +10 to Strength and Dexterity
- Warning Call
- Gain 25% Increased Armour per 5 Power for 8 Seconds When You Warcry, up to a Maximum of 100%
- Cry Wolf
- Exerted Attacks Deal 30% Increased Damage
- 20% Increased Total Power Counted by Warcries
- Rattling Bellow
- Exerted Attacks Have 8% Chance to Deal Double Damage
- +20 to Strength
Chaos resistance is hard to obtain on this build. This is due to the fact that there are certain modifiers that you need in order to maximize the GC Tectonic Slam of Cataclysm Juggernaut potential.
Fortunately, GGG has re-introduced The Perandus Pact in Path of Exile: Keepers of the Flame, but with a new name in “The Light of Meaning” unique jewel. This grants bonus stats to the passive skills in its radius. If you are purchasing one from the trade website, get The Light of Meaning with the line: “Passive Skills in Radius Also Grant +4% to Chaos Resistance.”
Once you have gotten your hands on it, place the jewel into the socket right next to “Vigour” on the passive tree.
Do not be confused with the new The Light of Meaning unique jewel in Patch 3.27 because it has the same item art as that of a previous item, That Which Was Taken.
Gems
The gems that you are going to see here are the most optimal to use for the GC Tectonic Slam of Cataclysm Juggernaut. In other words, you do not have to change a thing since these have been carefully selected to bring out the best of what this build can do.
Body Armor
- Tectonic Slam of Cataclysm
- Awakened Melee Physical Damage
- General’s Cry
- Pulverise Support
- Endurance Charge on Melee Stun Support
- Autoexertion
The build’s bread and butter is the Tectonic Slam of Cataclysm. With the help of General’s Cry, your mirage warriors will be the ones to cast the Tectonic Slam for you. Since you have a total of seven mirage warriors at a time (six from GC, one from Ashes of the Stars improved quality), you can expect total chaos as you see the minions do your bidding!
Part of the damage of the Tectonic Slam of Cataclysm comes from physical damage. Hence, you use Awakened Melee Physical Damage to gain a significant boost.
Pulverise Support not only increases the area of effect of the Tectonic Slam of Cataclysm but it also enhances the skill to deal more area damage!
Endurance Charge on Melee Stun is only included in this setup to provide a bit more oomph in the damage department.
Autoexertion in Patch 3.27 is still crucial for the build to function optimally. This activates General's Cry without having to spam its hotkey, making it a mandatory inclusion. Just make sure to enable Autoexertion before mapping.
Anyway, Autoexertion triggers General’s Cry whenever it is off cooldown. Make sure to raise the quality of the gem itself with Gemcutter’s Prisms to increase the cooldown recovery rate of GC. Thanks to this support gem, you do not have to worry about using the said warcry skill manually! Just focus on spinning with Cyclone to spawn usable corpses via Desecrate.
Weapon
- Cyclone of Tumult
- Infused Channeling Support
- Lifetap Support
- Endurance Charge on Melee Stun Support
- Awakened Elemental Damage with Attacks Support
- Awakened Melee Physical Damage
In this version of our Tectonic Slam of Cataclysm Juggernaut, Cyclone is used here to actually decimate map monsters and bosses. As you can see from the support gems, Cyclone means business here because it can deal tremedous damage to nearby enemies. If you're not comfortable self-casting Desecrate, you could use Awakened Cast While Channeling Support and replace Endurance Charge on Melee Stun and Awakened Elemental Damage with Attacks.
Helmet
- Molten Shell
- Cast When Damage Taken
- Lifetap
- Desecrate (lvl 1)
Desecrate in this setup is now self-cast. Some people would play this build with Tectonic Slam of Cataclysm as a means of killing bosses in a matter of seconds. However, you can easily use Desecrate any time you want, and the mirage warriors will be summoned to aid you in battle.
So, to answer the question of why our build now has a more active playstyle, it is because it's just fun to be able to attack enemies and actually kill them on your own (with your minions helping you in the process).
Gloves
- Herald of Ash
- Blood Rage
- Herald of Purity
- Determination
Due to the Sublime Vision unique jewel, you can only have one aura active at a time. For this reason, you have Determination as your only aura for this build.
To complement that, you will use both the Herald of Purity and the Herald of Ash. The former enhances your physical damage, which factors into the damage calculation of the Tectonic Slam of Cataclysm. The latter, on the other hand, grants extra fire damage.
It is worth noting that Determination is still decent enough in Patch 3.27, despite the nerfs it received a coupel of leagues ago. In case you didn't know, Determination now only gives 1,026 armor at gem level 20 rather than 2,051 armor previously. Not to worry, the multiplicative bonus provided by the 20% item quality on armor should help address this, making Determination an invaluable aura for the GC Tectonic Slam of Cataclysm Juggernaut despite the nerf.
Boots
- Assassin's Mark
- Mark on Hit Support
- Frostblink
- Lifetap Support
Assassin's Mark is a great way to boost your critical strike chance against bosses and rare monsters. It also helps your mirage warriors dispose of enemies pretty quickly because of the increased critical strike chance and critical damage.
As for the movement ability, many people do not like Leap Slam because of how clunky it feels. Therefore, I have elected to use Frostblink this time around as it's much smoother in comparison.
Tattoos
While it is sad to see that the Wildwood ascendancies have still not returned in Patch 3.27, you can still take solace in the fact that GGG has added the Tattoos from several leagues ago back into the game. That said, here are the Tattoos that we recommend for the GC Tectonic Slam of Cataclysm Juggernaut in PoE Keepers of the Flame:
- Tattoo of the Tukohama Warcaller
- 8% Increased Warcry Cooldown Recovery Rate
- Tattoo of the Kitava Warrior
- 5% Increased Physical Damage
- Tattoo of the Ngamahu Warrior
- 5% Increased Fire Damage
- Tattoo of the Tukohama Warmonger
- 5% Increased Melee Damage
- Tattoo of the Rongokurai Warrior
- 6% Increased Armour
Passive Tree

Passive Tree for GC Tectonic Slam of Cataclysm Juggernaut
POB
Tectonic Slam of Cataclysm Juggernaut
Tectonic Slam of Cataclysm Juggernaut in PoE 3.27: Final Thoughts
The GC Tectonic Slam of Cataclysm Juggernaut is possible thanks to the said Transfigured Gem. This build utilizes General’s Cry in a new and refreshing way; summoning mirage warriors to activate the Tectonic Slam of Cataclysm for you.
This build is capable of demolishing even the hardest bosses in PoE 3.27, and this version is now more dynamic because Cyclone is being utilized as a bona fide damage dealer as well.
Although this build is quite expensive considering the items it needs to function, it is fun to use and provides an amazing experience without a doubt!
So, if you are looking for a unique build in Path of Exile 3.27 Keepers of the Flame League, be sure to give the GC Tectonic Slam of Cataclysm Juggernaut a spin!
With that said, good luck on your adventures in Wraeclast, Exile!
PROS
+Utilizes General’s Cry in a more fun way
+The mirage warriors can destroy anything with Tectonic Slam of Cataclysm>
+Juggernaut ascendancy class offers impressive survivability and incredible offense to boot
+Able to survive even the most devastating hits from the enemy
+Huge damage even in Patch 3.27
CONS
-Requires expensive items to work
-Not a league starter
![Divine Orbs PSN/Xbox [⏱️ 10-15 Min via Hideout Trade]](/img/tmp/product_mini_2_62210.jpg?time=1784651426)

![75x Divine Orbs + 5x FREE [Special Bulk Offer]](/img/tmp/product_mini_2_51251.jpg?time=1784651426)
![Ralakesh's Impatience [POE Items]](/img/tmp/product_mini_2_48215.jpg?time=1784651426)