[3.27] Wardloop Ice Spear Build - POE Keepers of the Flame
23.10.2025 - 03:28:05
Game Guides , Path of Exile , POE build guides
![[3.27] Wardloop Ice Spear Build - POE Keepers of the Flame](/modules/prestablog/themes/default-1-5/up-img/slide_818.png "[3.27] Wardloop Ice Spear Build - POE Keepers of the Flame")
Path of Exile is a complicated yet fun ARPG that allows you to create interesting build combinations, so long as you are able to make certain mechanics work.
One such build is the Wardloop Ice Spear Ascendant, which is deemed by many as a "walking simulator" simply because you just walk to a huge mob, and watch them die due to the icy projectiles that spew out of you
This is one of the most complicated builds in the game because you have to take so many things into account. But here in RPGStash, you do not have to worry because we will tell you all about its inner machinations!
If you are interested in creating this character for yourself, read this article to its completion. This is our comprehensive build guide for the Wardloop Ice Spear Ascendant in Path of Exile 3.27 Keepers of the Flame League!
Basics
So how does the Wardloop Ice Spear Ascendant work? Well, this build utilizes multiple Cast When Damage Taken Supports (aka CWDT) in order to trigger spells that deal huge amounts of damage. Now, you might be wondering where the damaging component necessary for CWDT to get triggered comes from. Well, you have the Heartbound Loop for that.
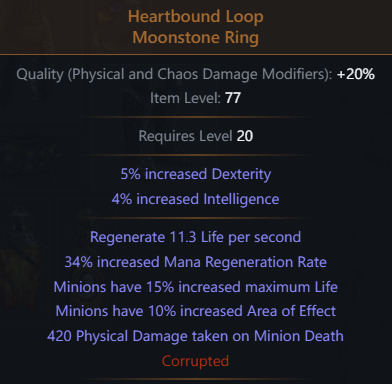
The Heartbound Loop is a unique Moonstone Ring in Path of Exile where you take physical damage upon minion death. The minions that you are going to use are Summon Skeletons because they are the perfect match for CWDT.
When you combine a couple of Heartbound Loops and Summon Skeletons, you take damage that will trigger the spells linked to your CWDT.
How often CWDT is triggered is also affected by your cooldown recovery rate. Aim to achieve 27% CDR to align it with Summon Skeleton's cooldown at 0.198 seconds.
Since you need to take damage in order for the build to work, how do you address survivability? You are going to take advantage of a couple of defensive layers, with the Ward being the first one. If you do not know, the Ward comes from "Runic" items found in the Expedition mechanic.
Ward is awesome because it absorbs all types of damage in Path of Exile, preventing the most devastating blows from killing you. Besides that, you will do certain things that will give you near permanent uptime of Olroth's Resolve — a flask that restores Ward when used.
The Olroth's Resolve did get a huge nerf in Path of Exile: Keepers of the Flame. More specifically, you now have 85% less ward during the flask's effect instead of 70%. Yes, that is a pretty big difference since you only have a tiny amount of Ward to work with. But, this build is more of a mapper than a boss-killer anyway, so in that regard, it should still work admirably well.
While the Ward is pretty useful, you will also take the keystone passive, Mind Over Matter, to mitigate the damage you receive. More specifically, 40% of the damage you get is taken from mana before life. Since this build has plenty of mana to work with, the Ward coupled with Mind Over Matter should keep you alive.
When you look at the Wardloop Ice Spear Ascendant's POB that is provided later in the build guide, you will find that this character's HP is not even that high. But, trust us when we say that this build is deceptively tanky due to the defensive mechanics mentioned earlier.


With all of that being said, you are probably wondering why this build is called "Wardloop" Ice Spear Ascendant. Thanks to all of the gem, item, and passive skill interactions at play here, you will enter a "loop" that causes you to cast spells at a rate of five per second for incredible amounts of damage! The Ward, in this context, just means that you are able to survive the loop, so you do not have to worry about survivability at all.
It is important to note that you need to follow our instructions to the tee if you ever want this build to work as intended. That is because the Wardloop Ice Spear Ascendant requires careful utilization of cooldown recovery, flask uptime, and skeleton duration, among many others. If even one of the crucial components of this build is out of whack, you will not be able to maximize the Wardloop Ice Spear Ascendant's true potential.
Now, some people would use a slightly different tech with the Transfigured Gem Raise Zombie of Falling and Summon Raging Spirit. The SRS gem is also linked to Less Duration Support to keep the duration of SRS at an optimal level.
So, how does this work? Basically, every time the zombie falls from the sky, you will receive damage due to the Heartbound Loop rings. How the SRS factors into the equation is that it spawns additional zombies after the duration of the flaming skulls has elapsed.
The reason why we are not going to talk about that specific version of the build here is that we felt that it was more inconsistent compared to the original tech. Although you do not have to use several To Dust jewels with the Raise Zombie of Falling, you will end up with a less optimal version of the Wardloop Ice Spear Ascendant.
However, we will still place the alternate version in the POB section of the guide if you want to go with that. Just make sure to follow the gems and items used because this build requires a lot of care and attention to pull off.
Playstyle
The playstyle for the Wardloop Ice Spear Ascendant is not that complicated at all, though you will need to swap weapons in order for the loop to begin. For this reason, you will equip a one-handed weapon that was crafted using Essence of Insanity so that you can summon some wisps.
That said, when you enter a new map or area, press "X" twice to quickly swap from your main weapon to the one-handed weapon and then back again. Doing so will kill the wisps, causing you to take damage from the Heartbound Loop unique ring.
Once the projectiles start getting fired at random directions, all you have to do at this point is to just walk past monsters and see them die shortly after!
If you ever want to stop the loop for some reason, you can just swap to the one-handed weapon until you are ready to go killing again.
Ascendancy
The main ascendancy class for this build is none other than the Ascendant. The Ascendant is the only class in PoE that offers a lot of flexibility in terms of passive skills. That is because you are able to select a "second" starting point on the tree, giving you access to passives that you normally wouldn't be able to reach without spending a ton of points.
Having said that, you will take the Ranger Ascendancy first then specialize in Pathfinder. The Pathfinder lets you gain three flask charges every few seconds, which is huge for the Wardloop Ice Spear Ascendant.
Next, you will take the Witch Ascendancy specializing in the Elementalist. This allows your cold exposure to further reduce the cold resistance of affected enemies.
Lastly, you are going for Path of the Witch to allow you to allocate passives from the Witch's starting point on the tree.
In the endgame, you will invest some PoE currency to purchase Forbidden Flame and Forbidden Flesh jewels with "Deadeye" as the matching modifier. This ascendancy node provides a ton of damage via permanent Tailwind and additional projectiles.
Take note that you no longer gain the effect of Far Shot from the Deadeye notable passive skill. Instead, you now gain a Frenzy Charge every few seconds while moving, which is not bad at all.

Notable Ascendancy Passives for the Wardloop Ice Spear Ascendant
Gear
Because certain things are at play to make the Wardloop Ice Spear Ascendant work, you have to follow everything we say in the gear and gem sections of the build guide. Do not deviate from the things that are going to be outlined in the subsections unless you know what you are doing.
Weapon
Since you will be dealing elemental damage to the enemy, there is no better weapon for the Wardloop Ice Spear Ascendant than The Annihilating Light. This unique Quarterstaff lets you deal triple damage all the time, thus enabling you to eliminate foes within seconds!
You can take things a step further by using the enchantment, "Quality does not increase Physical Damage, Grants 1% Increased Elemental Damage per 2% Quality" from the Horticrafting Station.
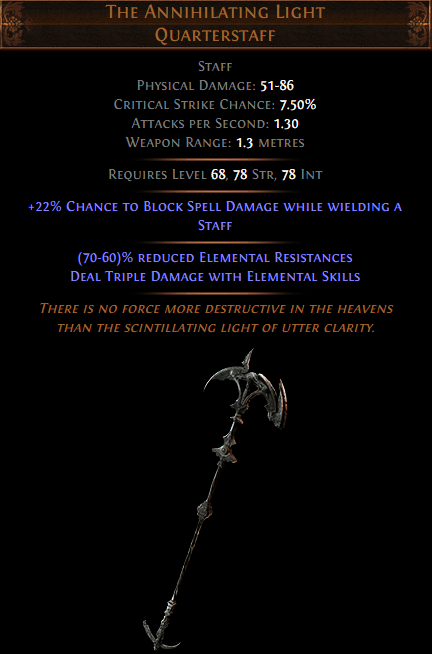
The Annihilating Light
Aside from The Annihilating Light, you need to equip a couple of one-handed weapons on the second weapon slots for the loop to begin. These weapons should be crafted using Essence of Insanity to guarantee the mod, "Triggers Level 20 Spectral Spirits When Equipped." The other modifiers do not matter, so you can just use a single Essence of Insanity for each weapon.
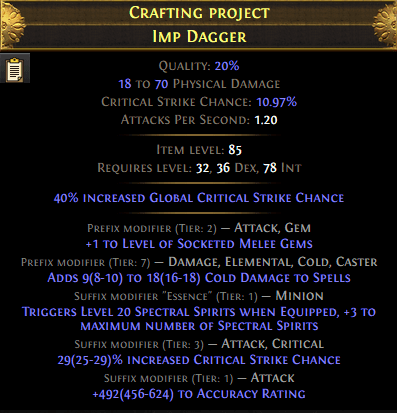
One-handed Weapon (Crafted Using Essence of Insanity)
Both The Annihilating Light and Imp Dagger have received a slightly higher base critical strike chance in Patch 3.27. This is actually pretty useful because it factors into your overall critical strike chance with all things considered. In other words, it is now much easier to achieve a 100% crit chance in Path of Exile: Keepers of the Flame!
Body Armor
To ensure that you get the most out of Ward as a defensive layer, you will equip the Skin of the Lords unique Simple Robe. This grants you 100% increased global defenses, which include the Ward, of course.
Now, there are a couple of things to keep in mind when wearing the Skin of the Lords. First, all of the gems you are going to insert into it must be corrupted gems, so use Vaal Orbs to corrupt them if you haven't already.
Second, the Skin of the Lords comes with a keystone passive. Make sure that you choose one that does not brick the build. Some of the keystones we recommend are Iron Will, Pain Attunement, and Magebane.
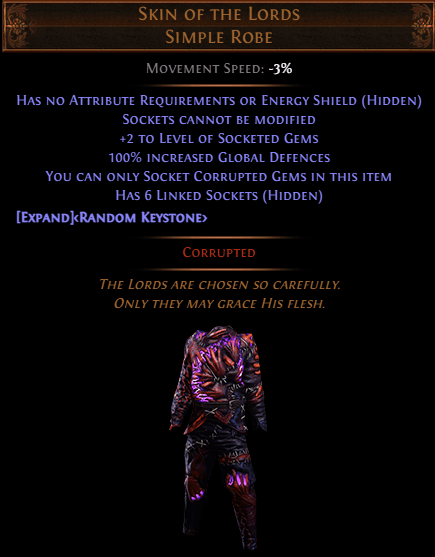
Skin of the Lords
Helmet
Remember the "Runic" items mentioned earlier? These provide you with some Ward to help you survive. You will equip three pieces of Runic equipment, starting with the Helmet.
Get an ilvl 85+ Runic Crown and use Dense Fossils until you get at least 550 Ward. If you have an open suffix, use the Crafting Bench to add elemental resistances to help you reach the 75 cap.
In terms of the Eldritch implicits, use Eldritch Ichors to get "% Increased Spell Damage" and Eldritch Embers to obtain "% of Physical Damage Taken Recouped as Life."
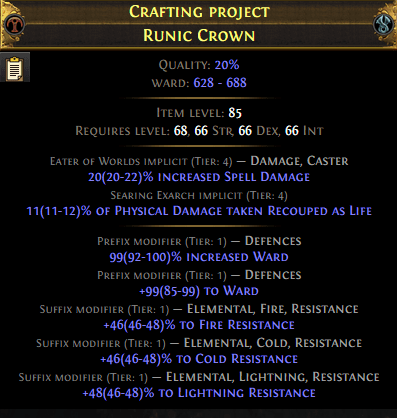
Crafted Runic Crown
A good alternative to a crafted Runic Crown is the Faithguard. This helmet has a unique effect where any increase in maximum energy shield also applies to Ward. Besides that, it grants up to 60% faster restoration of Ward, which is great from a survival standpoint.
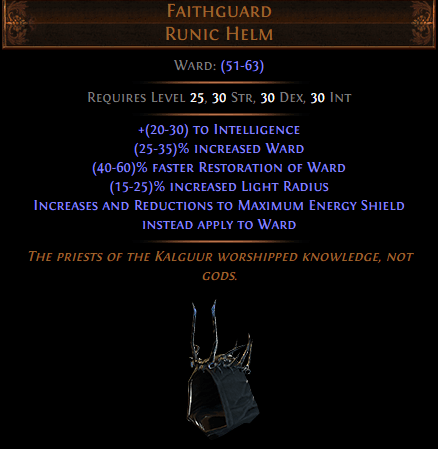
Faithguard
Gloves
To increase the amount of Ward you have, you will craft a pair of gloves using Runic Gauntlets as the base. Spam the gloves with Dense Fossils until you get at least 450 Ward. Utilize the Crafting Bench to insert hybrid elemental resistances, whichever needs a boost.
You want the Wardloop Ice Spear Ascendant to deal huge amounts of damage at all times. For this reason, use Grand Eldritch Ichors until you get "Inflict Cold Exposure on Hit, applying -13% to Cold Resistance." After that, spam the gloves with Grand Eldritch Embers to acquire "25% Chance to Unnerve Enemies for 4 Seconds on Hit."

Crafted Runic Gauntlets
Boots
The boots are the last piece of Runic gear you equip for the build. Spam Dense Fossils on some Runic Sabatons until the boots have at least 400 Ward. Again, use the Crafting Bench to add any elemental resistance mods that will help you reach the 75% cap.
For the Eldritch currencies, you want to achieve a "9% Increased Cooldown Recovery Rate" to help you maximize CWDT. In order to do that, use one Grand Eldritch Ember and then spam the boots with Grand Eldritch Ichors until you get the cooldown recovery implicit modifier.
After that, use a couple of Orbs of Conflict to get to that coveted 9%. If you are unsuccessful, just repeat the process. Once you have the Eater of Worlds implicit mod sorted out, spam the boots with Grand Eldritch Embers to add any implicit mod that can benefit your character.
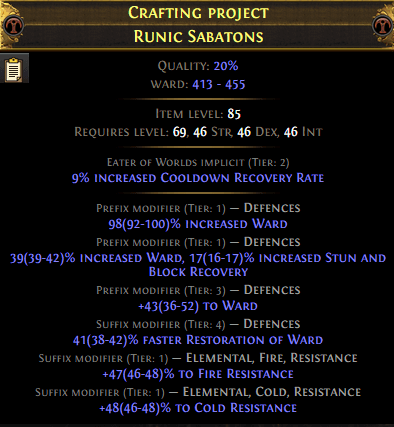
Crafted Runic Sabatons
Amulet
For the amulet, you are going to use a self-crafted one with "+1 to Level of All Cold Skill Gems" fractured to make things a lot easier. Use the Orb of Alteration method of crafting until you get "+1 to Level of All Skill Gems," then follow that up with a Regal Orb.
Go to the Crafting Bench and lock prefixes. After that, use Harvest Augment Critical to get either global critical strike multiplier or global crit chance.
Put elemental resistances using the Crafting Bench. At this point, if you still have an open suffix, fill that up with an Exalted Orb.
Finish the amulet by anointing it with Whispers of Doom (3x Golden Oils) to enable you to apply an additional curse upon your enemies.
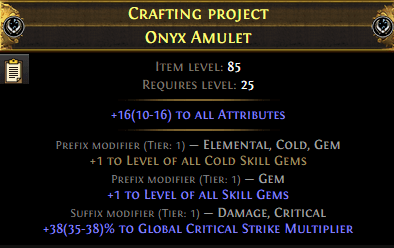
Self-crafted Amulet
Once you have enough PoE Currency, you could invest in Eyes of the Greatwolf with the following corrupted implicit modifiers:
- +% to Global Critical Strike Multiplier
- 40% Increased Global Defenses
The increased global defenses mod is quite incredible on this build because it also increases the amount of Ward that you have. This is helpful in addressing the nerf to Olroth's Resolve in Path of Exile 3.27 Keepers of the Flame.
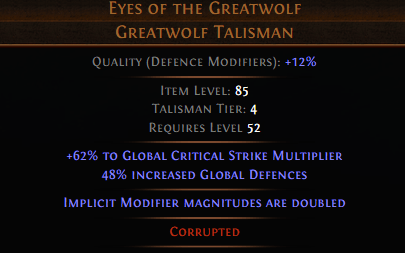
Eyes of the Greatwolf
Do not forget to anoint Whispers of Doom (3x Golden Oils) on the amulet of your choice so that you gain the ability to apply an additional curse.
Rings
Two Heartbound Loops are pretty much mandatory for the build to work. These rings are responsible for triggering the CWDT and summon skeletons loop in perpetuity.
That said, the main thing that you need to do here is to obtain a couple of Heartbound Loops that are able to reach "420 Physical Damage Taken on Minion Death" after spamming Noxious Catalysts on them.
In addition, if you are struggling with stats, you can obtain some corrupted ones that provide percentage attributes.
Heartbound Loop (Corrupted)
Belt
To make CWDT trigger as often as it can, you will have to ensure that you have your cooldown recovery rate taken care of. One way to add more cooldown recovery rate into the build is by equipping a crafted Shaper-influenced Stygian Vise.
Use the Orb of Alteration method of crafting outlined in our dedicated crafting guide until you get T1 "% Increased Cooldown Recovery Rate" and "% Reduced Flask Charges Used."
The reason why you should use Stygian Vise as the crafting base is so that you can add an abyss jewel that has at least a 2% increased cooldown recovery rate.
Anyway, for the third suffix, add "(11-15)% Increased Flask Effect Duration" from the Crafting Bench. Fill the prefixes using Exalted Orbs and that's it!
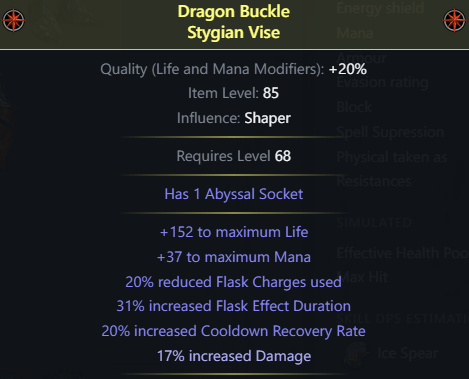
Self-crafted Stygian Vise
Flasks
- Olroth's Resolve (mandatory)
- Quicksilver Flask (of the Rainbow)
- Dying Sun
As you can see, you will only use three flasks for this build. This is primarily to maximize the effect of "The Traitor" keystone passive. This will be discussed in greater detail in the next section of the build guide.
Olroth's Resolve, as mentioned earlier, has been nerfed significantly in Path of Exile: Keepers of the Flame. When used, you now only have 15% of your total Ward, which is a measly amount.
However, since you are practically immortal with Ward, the adjustment that GGG made in Patch 3.27 to this particular flask is fine. If you want, you could use a Vaal Orb to corrupt Olroth's Resolve in the hopes of getting its quality up to +30% for increased flask duration.
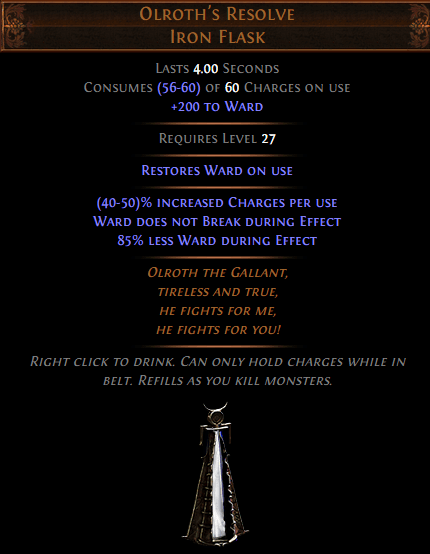
Olroth's Resolve
Jewels
The Wardloop Ice Spear Ascendant uses quite a lot of unique jewels to make everything work. First of all, get several "To Dust" unique Cobalt Jewels and make sure that the "% Reduced Skeleton Duration" does not exceed 99% (aim for 74% if you can). Factor in any reduced skill effect duration mods from your other items and passives when calculating that percentage. You can refer to the POB that will be provided later on for more information about this.
Next, purchase a Brutal Restraint (Balbala) to turn the nearest keystone passive in its radius into "The Traitor." This allows you to gain four flask charges per empty flask slot every five seconds. That is why you only put three flasks on your action bar so that you will gain a considerable amount of flask charges at a set interval, which helps you get near-permanent uptime of Olroth's Resolve.
Don't forget to purchase a Watcher's Eye jewel with "+% to Critical Strike Chance" and "% Increased Cold Damage" while you're affected by Hatred.
Now, because alternate-quality gems in Path of Exile have been removed since the past couple of leagues, you will need to add at least one Medium Cluster Jewel (minion life) with Blessed Rebirth as the notable passive skill. This makes your recently summoned skeletons immune to damage for a brief period; just long enough to be on par with CWDT's cooldown. To craft this, just use Harvest Reforge Life.
As is customary with high-end builds in PoE 3.27, you can also put a Large Cluster Jewel (cold damage) with the following notable passives:
- Blanketed Snow
- Damage Penetrates 10% Cold Resistance Against Chilled Enemies
- Prismatic Heart
- +10% to All Elemental Resistances
- 30% increased Elemental Damage
- Widespread Destruction
- 6% Increased Area of Effect
- 20% increased Elemental Damage
To give you a higher chance of obtaining the above-mentioned passives, you can use Harvest Reforge Cold.
Gems
The bread and butter of the Wardloop Ice Spear Ascendant is the Cast When Damage Taken Support. In this section, you will find multiple setups that include the said support gem. Now, if there is a level that is indicated on a specific gem, make sure to follow that. Otherwise, you run the risk of the build not dealing damage as effectively as it could.
Body Armor
- Ice Spear (lvl 21)
- Awakened Greater Multiple Projectiles
- Returning Projectiles Support
- Awakened Added Cold Damage Support/Awakened Elemental Focus
- Cast When Damage Taken (lvl 19)
- Empower Support (lvl 4)
Ice Spear is one of your main damaging skills for this build. Because this is a spell skill gem, you want to level it up as high as you possibly can for maximum damage. That is why a level 4 Empower Support is included in this setup to raise Ice Spear's level by five (thanks, in part, to Skin of the Lords).
Since Ice Spear hurls icy projectiles when used, you want them to populate the screen to delete any monster you see. That is why you put Awakened Greater Multiple Projectiles. There is a catch, though, because this support gem reduces projectile damage in favor of more projectiles fired per cast. To address this, Ice Spear is supported by Awakened Added Cold Damage or Awakened Elemental Focus.
Cast When Damage Taken Support should only be leveled to 19. That is because Skin of the Lords increases the level of all socketed gems by two, resulting in a lvl 21 CWDT in this case. Level it any higher and you will find that Ice Spear won't be triggered as often as it should.
Weapon
- Freezing Pulse
- Creeping Frost
- Bonechill Support
- Greater Multiple Projectiles
- Awakened Fork
- Cast When Damage Taken (lvl 20)
Freezing Pulse and Creeping Frost are both complementary spells to Ice Spear. The former fires a bevy of projectiles that pierce through targets, while the latter leaves "chilling areas" that deal cold damage over time to enemies within the affected zones.
Greater Multiple Projectiles and Awakened Fork significantly increase the map-clearing ability of both Freezing Pulse and Creeping Frost. Do not mind the reduction in projectile damage here because this duo of support gems spawns a boatload of projectiles on the screen to compensate.
Bonechill support makes enemies take more cold damage as a result, especially if they are in the chilling areas created by its supported skills.
Cast When Damage Taken can be leveled up to the max, but do not go beyond level 20.
Gloves
- Summon Skeletons
- Summon Raging Spirit
- Cast When Damage Taken (lvl 21)
- Phase Run
Summon Skeletons is a skill gem that makes the Wardloop Ice Spear Ascendant possible. With careful utilization of the Heartbound Loop and Summon Skeletons, you can activate multiple CWDT setups that cast various spells to destroy the enemy; all without spamming a lot of buttons!
The Patch 3.27 version of this build now includes Summon Raging Spirit as part of its overall damage. Although these are considered minions, the flaming skulls deal a considerable amount of damage, particularly when they start populating the screen.
Phase Run is a nice movement skill to have because it not only gives you a boost in movement speed, it also allows you to move through enemies due to phasing.
Boots
- Hatred/Zealotry
- Eternal Blessing Support
- Vaal Righteous Fire
- Flame Dash
Hatred is the only aura that you use on this build. It actually got rebalanced in Path of Exile: Keepers of the Flame in that it no longer grants more cold damage. Instead, you gain extra cold damage based on a percentage of your physical damage.
If you are not okay with the change, you could replace Hatred with Zealotry. Zealotry is nice because it increases your spell critical strike chance and spell damage by a considerable amount. Moreover, you have a chance to create a Consecrated Ground when hitting a rare or unique enemy, which boosts your life regeneration rate.
Whichever aura you end up using, always link them with Eternal Blessing Support. This makes it so that you do not reserve any mana when the aura it is linked to is enabled.
Vaal Righteous Fire is included in the setup mainly to improve your damage output. Whenever you encounter tougher enemies, activate both Righteous Fire and its Vaal Skill to gain a huge amount of spell damage for a brief period.
Do not worry about the self-damaging component or Righteous Fire because Olroth’s Resolve should keep you alive when RF is active.
Helmet
- Sigil of Power
- Frostbite
- Sniper's Mark
- Cast When Damage Taken (lvl 20)
Sigil of Power is great for survivability. Enemies that are within its area of effect deal less damage to you, especially when you have reached the sigil’s maximum stages.
Frostbite and Sniper's Mark just make monsters take increased damage from your projectiles.
All of these aforementioned gems are activated automatically thanks to Cast When Damage Taken.
Tattoos
- Tattoo of the Tawhoa Herbalist
- 4% Increased Flask Duration
- Tattoo of the Arohongui Warrior
- 5% Increased Cold Damage
- Tattoo of the Tasalio Scout
- 4% Increased Effect of Your Marks
Passive Tree

Passive Tree for the Wardloop Ice Spear Ascendant
POB
Alternate Setup (with Raise Zombie of Falling)
Wardloop Ice Spear Ascendant Build in PoE 3.27: Final Thoughts
The Wardloop Ice Spear Ascendant is definitely one of the most complex builds to put up in PoE 3.27. It requires careful planning to execute to perfection. When you are going to try this build out, make sure that your cooldown recovery rate, reduced skill effect durations, and gem/item interactions are all sorted out.
This build is regarded as an "auto bomber" or "walking simulator" mainly because you can destroy enemies as you move around the map.
Despite its relatively low HP, the Wardloop Ice Spear Ascendant is deceptively tanky due to its precise utilization of the Ward from Runic items as the main defensive layer, as well as the Mind Over Matter keystone passive to mitigate damage taken by a considerable degree.
All in all, the Wardloop Ice Spear Ascendant is definitely a fun build to use in Path of Exile: Keepers of the Flame. You just have to be patient and dedicated enough to make sure that every mechanic explained in this build guide is followed down to the last letter.
With that said, good luck, Exile!
PROS
+Multiple CWDT setups trigger several damaging spells, making quick work of the enemy
+Destroys multiple screens of monsters without a hitch
+Deceptively tanky due to Ward and MoM
+Pretty laid-back playstyle
CONS
-Expensive to put up
-Requires careful planning, particularly when it comes to CDR breakpoints for CWDT
-Olroth Resolve's nerf may put off some people
![Divine Orbs PSN/Xbox [⏱️ 10-15 Min via Hideout Trade]](/img/tmp/product_mini_2_62210.jpg?time=1784668063)

![75x Divine Orbs + 5x FREE [Special Bulk Offer]](/img/tmp/product_mini_2_51251.jpg?time=1784668063)
![Heartbound Loop [POE Items]](/img/tmp/product_mini_2_47942.jpg?time=1784668063)