Berserk Barbarian Build Guide D2R 2.8
14.07.2024 - 12:00:41
Character Builds , Diablo 2: Resurrected , Game Guides

Berserk Barbs are among the OG builds in Diablo II: Resurrected. Berserk is an amazing skill because it actually does not deal physical damage. When used, it fully converts all your physical damage to magic damage, allowing you to obliterate enemies with ease. Because of this, the Zerk Barb (aka Zerker or Pitzerker) is capable of killing bosses even on player 8 Hell Difficulty.
The build mainly excels at boss farming, Travincal clears, and seal-popping Diablo runs. For higher monster density areas, there are more optimal build choices. The Pit is also the Berserk Barbarian’s favorite farming spot, which is why this build is deemed the “Pitzerker” as well.
For Travincal runs and short-distance bosses, you can rely on running. However, if you want to farm Bosses such as Mephisto, Diablo, Andariel, or the Countess, you should wear body armor with the Enigma runeword so you can use teleport. Achieving a 105% Faster Cast Rate breakpoint is a must for smoother teleports, though. More on this later in the build guide.
The build has great magic-finding potential. In fact, it can have a 500% MF without compromising damage. Immunes will not cause you any trouble, since there are barely any magic-immune monsters in the game (except for Baal Wave 2). The survivability of the build is great, especially in elemental damage absorption gear. The downside is that you might need to rely on potions to recover life and mana.
It is important to note that because of the MF items that this build requires, the Berserk Barbarian is not cheap to put up. Only think of building this as a second character or if you have the funds to get all of the necessary pieces of gear.
With that said, we invite you to read further. This is our comprehensive build guide for the D2R Berserk Barbarian in Diablo II: Resurrected!


Gameplay
Attacking skills
The build entirely relies on the Berserk skill for attacking. You will be able to deal immense amounts of magic damage (1000%+ from Berserk). On the downside, you won’t be able to leech life or mana due to the fact that all of your physical damage is converted by the skill, so you have to rely on other sources for regeneration, such as potions, or a Phoenix shield’s redemption aura.
While the skill excels at dealing with single targets, Berserk is not a particularly good skill when clearing areas that are densely populated by monsters. If you really want to farm the Secret Cow Level, for example, you should use Teleport only to find the head honcho and nothing more.
Now, there are only a handful of monsters that are immune to magic damage. But, if you are to encounter one, you can use Concentrate to eliminate them. This skill is perfect for such scenarios because Concentrate cannot be interrupted by any means. Besides that, every time you use this skill, it improves your attack and defense rating in the process.
Movement
The best way to move around with the Pitzerker is to actually use Teleport from the Enigma or the Naj’s Puzzler. This is the most ideal because this build is not really great at clearing mobs efficiently.
If you do not have access to any of the items just mentioned, you can use Leap to aid you. However, it is best that you invest in either Enigma or Naj’s Puzzler as soon as you are able because nothing can come close.
Survivability
There are two main setups for the Berserk Barbarian build in Diablo II: Resurrected. The most optimal in terms of huge MF chance is using a weapon with the Grief runeword on it on the main hand and a Crystal Sword or Phase Blade with six Ist runes in the off-hand. The problem with this is that it has very poor survivability because Berserk itself reduces your defense to zero. Sure, you get insane amounts of Magic Find chance with this particular setup, but you are making a heavy sacrifice. Think of this as a “go big or go home” type of scenario, where you get insane ROI by sacrificing a lot.
The second setup is a more balanced one, where you still use a Grief weapon on the main hand but with a shield equipped on the other. As you can’t leech life, the best option is to prevent significant life loss by having at least 75% all resistance (Can go up to 90% with Guardian Angel), 50% physical damage reduction (with Stormshield), and 75% chance to block. In addition, you can wear elemental damage absorption items, and use a potion once in a while.
Take note that if you want to wear a shield, you need to use items with Faster Block Recovery (FBR) as well. This is to ensure that the frames needed to complete the blocking animation are reduced significantly. Moreover, you need to invest even more DEX here since you want to achieve a 75% block chance.
In case you do not know, having zero defense in Diablo II: Resurrected makes you block attacks more often, therefore, slowing you down. Unless you are ok with this trade-off, you’re better off going for the all-offense, all-MF setup.
That said, if you opt for the former “go big or go home” setup, you could wear items with “Defense vs. Melee” or “Defense vs. Missile” because these modifiers are taken into account before the defense penalty of Berserk kicks in.
Party and Solo play
Everyone appreciates a Barbarian in their party. You will buff all members with Battle Orders, Battle Command, and Shout, more than doubling the party’s survivability. You might also be able to help out with bosses that are difficult to kill, such as Uber Diablo and Uber Mephisto.
Magic Find
The Zerker is touted as the best Magic Find character in D2R by a large margin. The biggest reason for that is the Barb’s Find Item skill, which essentially allows you to loot the corpse of a fallen enemy to find extra treasures that were not dropped previously.
In terms of gearing, this build can enjoy upwards of 500% MF Chance, so you’re definitely getting your money’s worth, especially considering that this requires a huge investment to pull off.
Stats
Strength: Have 156 strength in total to be able to wear a Monarch Shield.
Dexterity: Put enough points on it to reach a 75% chance to block.
Vitality: Put all the rest of your available points on it.
Energy: Don’t put any points on it
Stat allocation for the Berserk Barbarian really depends on the setup you are going for. Basically, your STR and DEX are only to satisfy gear requirements, though major emphasis is placed on the latter if you want to wear shields.
That is because you’d want to increase your dexterity by quite a lot to achieve a 75% chance to block attacks, as well as get a high enough attack rating to land Berserk hits successfully. And, since you do not have access to Holy Shield (which is a Paladin-exclusive skill), you have to be willing to put more than 200 points on DEX, which sacrifices the total HP you can get as a result.
Whichever Zerker build you want to use, the rest of your stat points should be allocated toward VIT for more HP and survivability.
Skill Points
20 points on Berserk
20 points on Blade Mastery
20 points on Howl
20 points on Battle Orders
11 points on Find Potion
10 points on Find Item
Spend 1 point on the following:
Bash
Stun
Concentrate
Increased Stamina
Iron Skin
Increased Speed
Natural Resistance
Shout
Battle Command
Your primary skill for this build is, of course, Berserk. This is a rather unique skill in that it completely converts all of your physical damage to magic damage, thus enabling you to eliminate any monster you encounter in D2R.
Although Berserk can be seen as a very powerful skill, you also have to take into account that it has a rather huge downside. Whenever you use it, your defense is reduced to zero, meaning the high armor value and “% Enhanced Defense” mods of your gear become useless for a brief period. At level 25, this defense penalty only lasts for 1.2 seconds, but that could be more than enough for some monsters to kill you. So be very careful out there, especially when you are playing in Hell Difficulty.
If Berserk has a huge disadvantage, how can you deal with it then? Well, you have Howl for that. Howl is a Barbarian skill that scares lesser monsters for a considerable amount of time. On top of that, Howl synergizes with Berserk, giving it 10% more damage per level.
After using Howl, all of the lesser minions should cower in fear, leaving only the elite monsters and bosses to kill. Berserk does pretty decent damage, so slaying them shouldn’t last longer than several seconds (that is if you have good gear).
Speaking of synergies, Shout used to be a skill that provides more oomph to Berserk. But that has changed in Patch 2.4, where Blizzard decided to replace Shout with Battle Orders, which makes sense. Battle Orders, at least when compared to Shout, is more useful because it boosts your life, mana, and stamina for a long time.
For masteries, we recommend that you max out Blade Mastery since you’ll be using a Phase Blade or Crystal Sword in the endgame. You could go for Axe Mastery if you want to use a Berserker Axe as the base weapon for Grief, but we’ve found that the aforementioned swords provide more value, particularly because they have significantly faster attack speeds compared to the said axe.
If you are wondering why Find Potion has more points allocated to it than Find Item, that is because the former gives a huge bonus to the latter if we are talking about points and bonuses. We find this to be the most optimal given that you only have a limited number of skill points to work with.
The rest of your skill points are just a means to get to the main skills for the Zerker Barb. Use Concentrate whenever you come across enemies that are immune to magic damage. For everything else, use them only for utility.
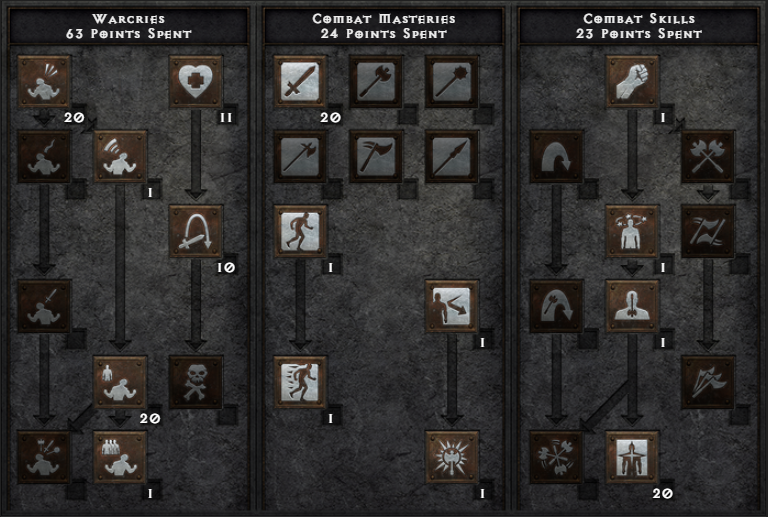
Berserk Barbarian Skill Build
Breakpoints
In Diablo II: Resurrected, you can achieve certain breakpoints to reduce the time it takes to complete a certain animation. Here is a rundown of the important breakpoints that are specific to the Berserk Barbarian:
Faster Cast Rate (FCR): 105%
Faster Hit Recovery (FHR): 48%
Faster Block Rate (FBR): 20% or 42%
Faster Cast Rate, commonly referred to as FCR, is an important breakpoint for this build mainly because it makes casting Teleport a lot smoother. Aim to achieve a 105% FCR to significantly reduce Teleport’s frame animation to just 8 (instead of 13).
Faster Hit Recovery is a measure of how fast you can get out of the stun animation. You do not have to focus on this particular breakpoint at all, but if you still want to feel it somehow, you can go for 48% FHR, which is quite doable.
Faster Block Rate (FBR) is only applicable if you equip a shield. Since you are not a Paladin, achieving a 1-frame FBR is impossible because you do not have access to Holy Shield. And, it does not make sense to fully invest in this breakpoint because this is not the focal point of the build.
Although increased attack speed (IAS) is essential for the Pitzerker, you do not have to worry about breakpoints; you simply get your attack speed as high as you can.
Playstyle
Believe it or not, the style of play for the Berserk Barbarian is a bit different compared to typical D2R builds.
When you enter a new area, you buff yourself and your Mercenary by using Shout, Battle Command, and Battle Orders.
Then, with Enigma or Naj’s Puzzler equipped, use Teleport until you find a boss or an elite monster. Once you’ve found a suitable target, use Howl to scare the normal monsters away. After that, simply spam Berserk until the target is dead.
Your skill rotation does not end there! After successfully defeating the enemy, you will use Find Item on its corpse to see if they will drop even more loot. This is almost always guaranteed to work if you have a relatively high Magic Find Chance.
It is important to note that you should not have any form of added cold damage on your gear. That is because any cold damage has a chance of shattering enemies, leaving no corpses behind.
Moreover, the same principle applies to your Mercenary. If you are going to get an Act 2 desert hireling, make sure that you opt for the Might aura variant instead of those who have Holy Freeze Aura (assuming that you’ll get an offensive mercenary, that is).
Berserk Barbarian Gearing Options
The Berserk Barbarian is not a cheap build to put up. This build requires plenty of expensive items, most notably the Enigma runeword on body armor. With that out of the way, here are the best items you can wear for the Zerker Barb:
Helmets
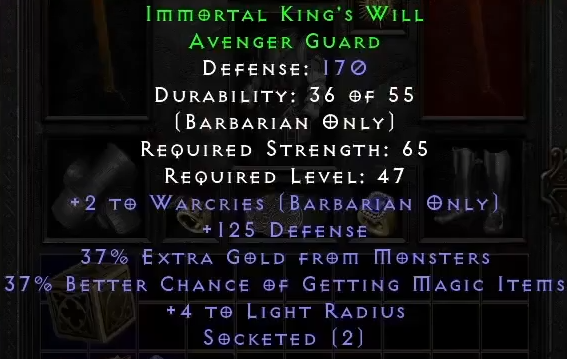
Immortal King’s Will
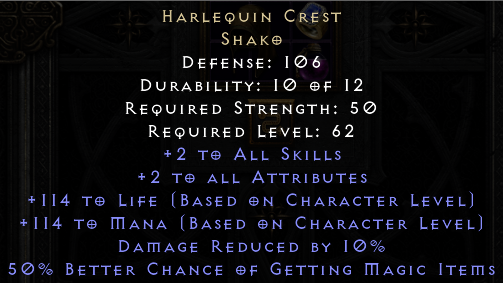
Harlequin’s Crest
We have mentioned before that the Pitzerker is not a cheap build to make, but it does not mean that you do not have options. The helmet slot is a perfect example of this because if you do not have the means to purchase the endgame helmet, you can opt for the alternative.
Having said that, Immortal King’s Will is a great helmet that you can get for a relatively affordable price. It has both Magic Find chance and extra gold from monsters, making it a solid substitute, at least, until you can get your hands on the Harlequin Crest.
Also known as the Shako, Harlequin Crest is definitely the best-in-slot helm for this build. This thing just has plenty of incredible mods that work really well with the Zerker Barb, including increased life/mana, 50% Magic Find chance, and a 10% damage reduction. And oh, you have the ever-useful +2 to skills as well.
If you’re able to get your hands on a Harlequin Crest with a socket, make sure to insert either a Cham Rune (for freeze immunity) or Ist Rune (for more magic find).
Body Armors
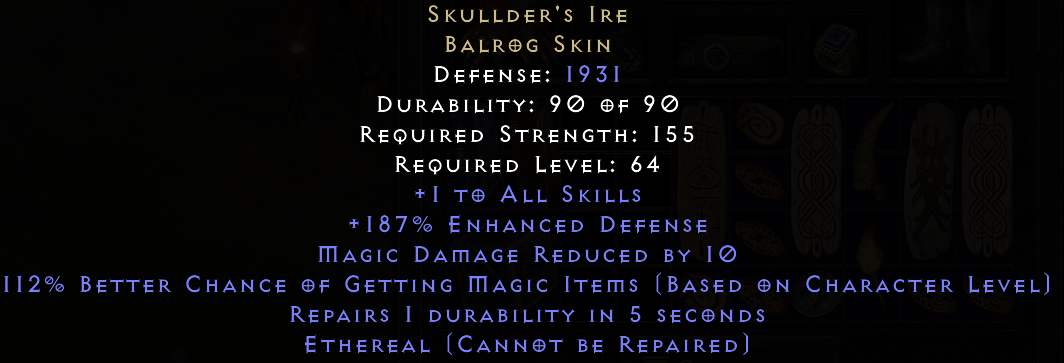
Skullder’s Ire (with Ist Runes)
Guardian Angel
Enigma
The Zerker Barb has a couple of good options for the body armor. If you do not have the means to purchase the Enigma, you can wear Skullder’s Ire for the time being. This body armor grants a huge MF chance by itself. Since this is a unique body armor, you can actually insert Ist Runes into it for a higher MF chance! That said, you can complete Larzuk’s quest in Act 5 if you wish to add more sockets.
If you’d like to go for the more balanced setup, you can use Guardian Angel as well. Although this body armor is more suited for Zeal Paladins, its defensive modifiers are actually useful for any D2R build, including the Berserk Barbarian.
For starters, you have a 20% increased chance of blocking, which is quite helpful in alleviating the amount of DEX needed to achieve a 75% block chance. Besides that, this body armor provides you with a 30% Faster Block Rate, allowing you to recover quickly from blocking an attack.

The best body armor for this build, however, is one that has the Enigma runeword on it. Enigma is primarily used for its Teleport ability, allowing you to move around the map in a jiffy. This is also the reason why you need to achieve a 105% FCR breakpoint to ensure that you teleport very smoothly with each cast.
Enigma is not only known for that because this runeword gives you a hefty Magic Find bonus as well, which increases as you level up.
The said runeword is not a slouch on the defensive side of things because it increases your maximum life by 5% and reduces your damage taken by 8%.
In addition, it restores a bit of your life every time you kill an enemy. That’s right! Even though Berserk does not benefit from Life Leech, Enigma gives you life per kill, which is not at all affected by the said skill’s downside.
Body armor with Enigma is good and all, but there is just one huge problem: its price. This particular runeword needs three specific runes, such as Jah, Ith, Ber. These are quite expensive due to the fact that they are used in other popular runewords as well.
But, if you are able to get your hands on the runes just mentioned, Enigma is definitely the best for the Berserk Barbarian!

Weapons
Oath Phase Blade
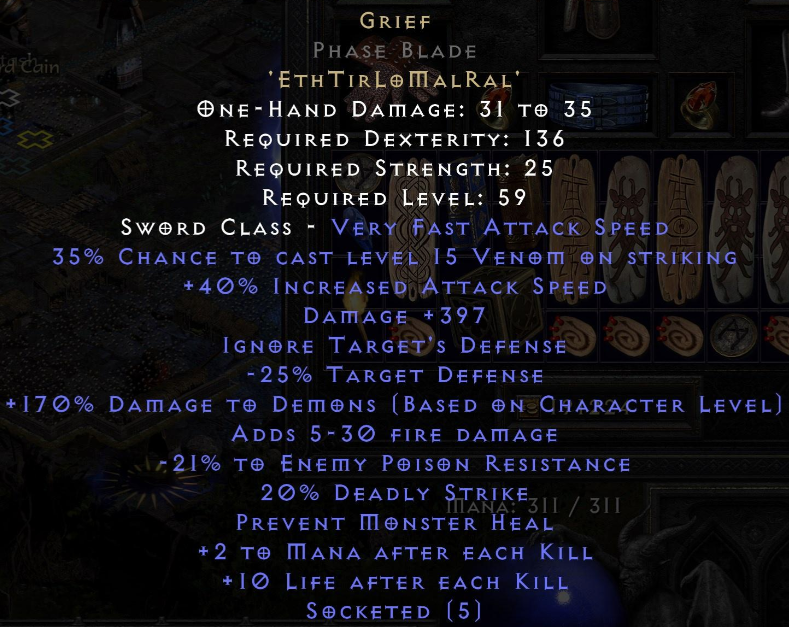
Grief Phase Blade
Crystal Sword or Phase Blade with 6 Ist Runes (offhand)
Oath is a great weapon runeword that works really well for Berserk Barbs on a budget. This is best known for granting up to 340% Enhanced Damage and an insane 50% increased attack speed. If you put the Shael, Pul, Mal, and Lum runes onto a Phase Blade, your Zerker will attack incredibly fast! This is due to the Phase Blade’s really fast attack speed, which is further boosted by Oath’s IAS. This is relatively cheap to create, which is why you can use it until you can get your hands on the runes required for the BiS weapon.

Grief is basically your endgame runeword. It does require you to put five runes onto a Phase Blade, namely Eth, Tir, Lo, Mal, and Ral. They are affordable, though you will need a five-socketed weapon just to fit them in.
Having said that, what makes Grief an incredible runeword for the Berserk Barbarian? To answer that, let us reiterate how Berserk’s damage is calculated.
As mentioned before, the skill converts all of your physical damage to magic damage. But, how exactly is the physical damage part calculated anyway? Well, the base damage of the weapon plays a huge role in that. That is where Grief shines.
You see, Grief gives a whopping 400-point increase in added damage. This factors into the equation before physical damage is converted to magic damage. So if you have huge physical damage to begin with, you will deal magic damage equal to that as a result.
Another important thing worth noting here is that this particular runeword gives you a chance to deal a Deadly Strike. If you don’t know, Deadly Strike is basically D2R’s version of double damage.
Since you attack like an ungodly beast that is unleashed, you are pretty much guaranteed to land at least a couple of deadly strikes in the process.
Other noteworthy mods on a Grief Phase Blade include ignore target’s defense, -25% target defense, and prevent monster heal.
For your offhand, you can equip either a Crystal Sword or a Phase Blade with six Ist Runes socketed inside. This results in a weapon that boosts your Magic Find chance by 180%, which is the highest you can find on a single item in the entire game!
Shields
Phoenix Runeword
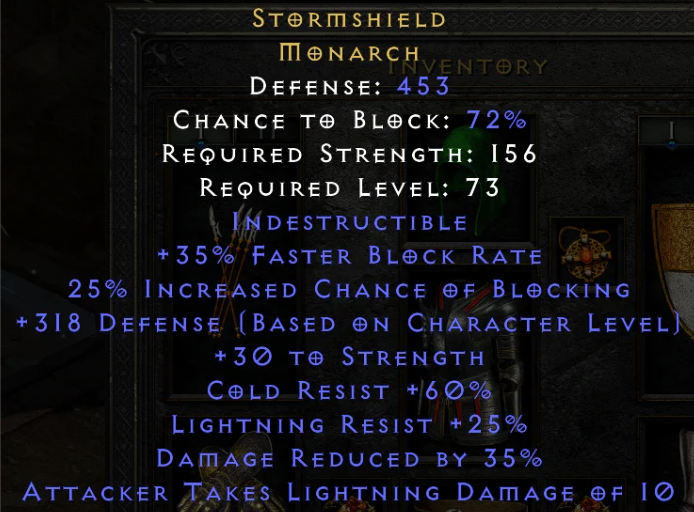
Stormshield
While we do not recommend that you wear a shield for this build due to the fact that having zero defense greatly increases the frequency of blocking attacks, there are a couple of shields you could use if you really want to go for the more defensive route.
Phoenix is the one you pick if you want to improve your damage. This runeword can roll up to 400% Enhanced Damage. Additionally, it gives you a chance to cast level 22 Firestorm just by using Berserk, thus enabling you to deal with the enemy in a more efficient way!
Having said that, you need to get the Monarch Shield for this one. Why? The Monarch Shield is the only shield in the game that has the lowest STR requirement among those that can roll with four sockets.
You need four sockets to be able to insert the following runes in the exact order: Vex, Vex, Lo, Jah. Yes, that last rune is a bit expensive, but Phoenix is worth it if you are adamant about wearing a shield for the Pitzerker.

Despite its lack of offensive modifiers, we would advise you to use the Stormshield over a shield with the Phoenix runeword on it. The reason is that this shield has amazing defensive mods on it, including a 25% increased chance to block, 35% FBR, and a huge 35% damage reduction.
Stormshield also sorts out your cold resistance and lightning resistance. As an added bonus, this thing is indestructible, so you do not have to worry about repairs and such.
Switch Weapons (aka Weapon Swap)
Naj’s Puzzler
Suicide Branch
Wizardspike
The idea of a weapon swap in D2R is to equip something that provides utility on your “secondary weapons.” In the case of the Berserk Barbarian, you have a few options to choose from depending on your current budget.
If you are still starting out, we definitely recommend using Naj’s Puzzler. This elder staff is mainly used to cast Teleport. It also has a 30% Faster Cast Rate, which factors into your FCR breakpoint. That +1 to all skills improves the effect and duration of your buffs too! Only use Naj’s Puzzler if you cannot afford the Enigma body armor just yet.
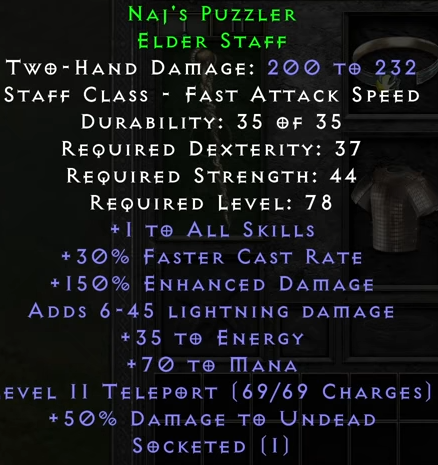
Even though Naj’s Puzzler is incredibly useful early on, there is one glaring issue: it is a two-handed weapon. This prevents you from wearing a shield or another one-handed weapon with FCR. Fortunately, the next two weapons address that.
The Suicide Branch is a very inexpensive one-handed wand that has a 50% FCR and +1 to all skills. It adds a small chunk of life to help improve your survivability as well. What makes this a better choice over Naj’s Puzzler is that you can equip a Stormshield as part of your weapon swap, thereby improving your defense manifold.

If you want to easily achieve that 105% FCR breakpoint, then look no further than the Wizardspike. What separates this from the previously-mentioned Suicide Branch is that you can dual-wield this unique dagger for that huge 100% increase in Faster Cast Rate!
Although the Wizardspike does not reduce the damage you take, it does give you a 75-point increase in all of your resistances. Equipping two of these at the same time, therefore, provides you with an insane amount of resistances!
Now, do not get too excited. Equipping the Suicide Branch and Wizardspike is only viable if you have the Enigma runeword on your body armor already. Otherwise, you’d have to stick with Naj’s Puzzler in the meantime.

Gloves
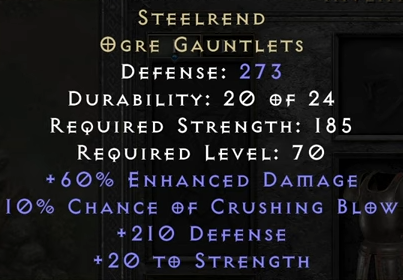
Steelrend
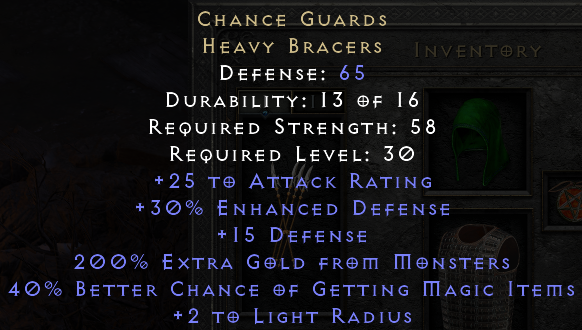
Chance Guards
Considered one of the rarest items in Diablo II: Resurrected, Steelrend is highly regarded for improving your damage. It not only provides you with a considerable amount of STR, but it also grants up to 60% Enhanced Damage.
More importantly, this thing grants a 10% chance of Crushing Blow, which is quite helpful when fighting elites and bosses. Crushing Blow, for the uninitiated, deals damage to the enemy equal to 12.5% of their current health.
That said, even if you are dealing with enemies that have huge amounts of defense, that won’t be a problem at all! This is because you are taking away a set percentage of their life whenever you deal a Crushing Blow.
The only problem with Steelrend (aside from its price) is that it does not have any resistances whatsoever. Other than that, these gloves are a viable choice if you want to go more on the offensive rather than the defensive.
If you absolutely want to maximize your Magic Find chance, then look no further than the Chance Guards. These gloves grant 40% MF and 200% extra gold from monsters. Plus, it is exponentially cheaper than the Steelrend!
Boots
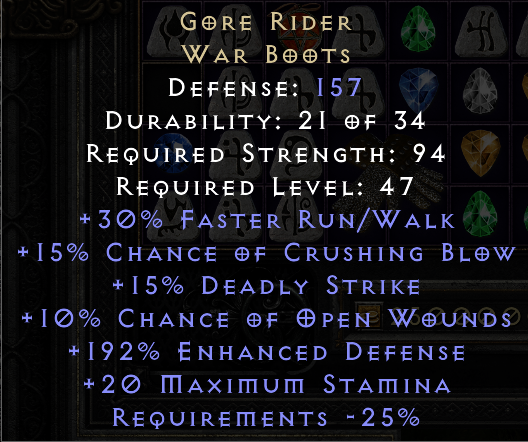
Gore Rider
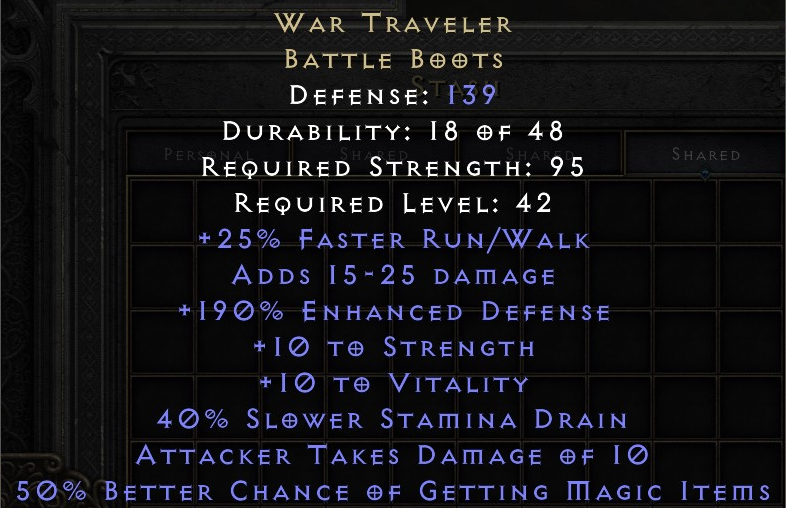
War Traveler
For pure MF Zerkers, it is imperative that you eliminate the enemy as quickly as possible. Otherwise, they will have no problems killing you as a consequence.
Fortunately, there is a pair of boots that can help you with eliminating any monster in D2R and that is the Gore Rider.
The Gore Rider has a potent combination of modifiers that can help you make quick work of the enemy, including Crushing Blow, Deadly Strike, and Open Wounds.
You already know the first two, but what does the last one do? In Diablo II: Resurrected, Open Wounds is a special magic property that makes enemies bleed profusely, thus dealing damage over time.
With the percentage damage of Crushing Blow, the double damage of Deadly Strike, and the damage over time inflicted by Open Wounds, you will have no problems dealing with any enemy at all!
While the Gore Rider does deserve to be a viable alternative for the boots slot, the War Traveler is still the BiS boots for the Berserk Barbarian.
First of all, these boots grant you up to 50% better chance of finding magic items – a pretty huge amount in this slot among other boots in the game.
Aside from that, these unique boots provide you with +10 Strength, +10 Vitality, and up to 25 damage, which makes the War Traveler for this build even more enticing.
Amulets
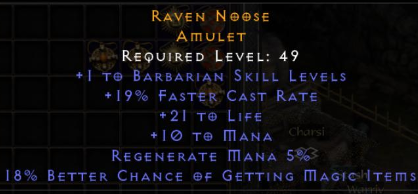
Rare Amulet with FCR and + to Barb Skills
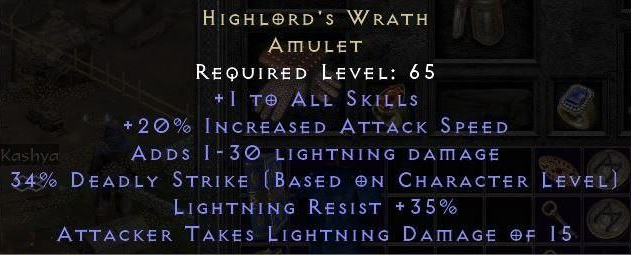
Highlord’s Wrath
The amulet is one of the equipment slots that can help you achieve a higher Faster Cast Rate breakpoint. Having said that, a rare amulet (crafted or otherwise) is a good budget option, especially if it contains FCR and + to Barb skills.
If you want to raise your attack speed, however, then the Highlord’s Wrath is the optimal choice. This amulet has 20% IAS. Coupled with the Phase Blade, you will see your character attack like a madman as a result!
On top of that, the Highlord’s Wrath raises the level of all of your skills by one. This includes the Teleport skill from Enigma as well.
Rings
Rare Ring with FCR and MF
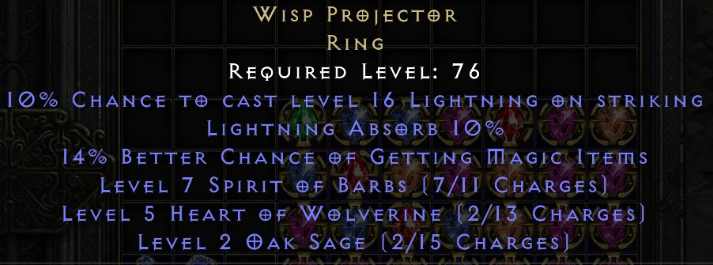
Wisp Projector
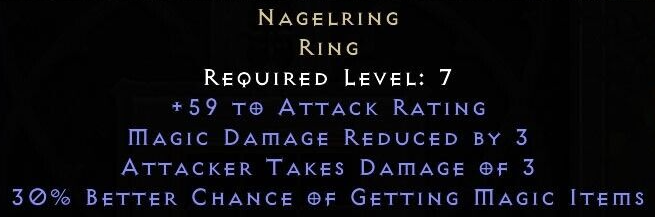
Nagelring
If you are still struggling to reach that coveted 105% FCR breakpoint, then we recommend that you get at least one rare ring with Faster Cast Rate and Magic Find. While you’re at it, you might as well include some resistances too!
Remember your primary skill for this build? You do huge amounts of magic damage at the cost of zero defense. Well, the good thing about that is it doesn’t take into account your resistances or any type of damage absorption, such as the one that is found on the Wisp Projector.
The Wisp Projector is famous for its 20% lightning absorb mod. This allows you to mitigate lightning damage and heal your life equivalent to that. By equipping two of these, you will essentially recoup a huge chunk of your HP whenever you receive lightning damage from your enemies!
Arguably, the best ring for the Pitzerker is the Nagelring. This ring has incredibly useful mods for this build, including + to attack rating, magic damage reduction, and magic find.
Belt
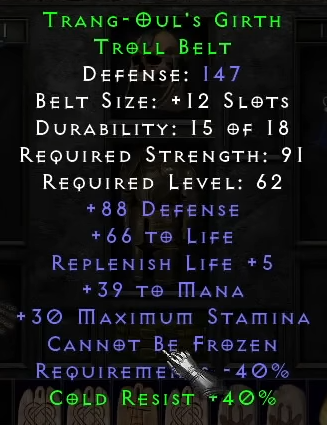
Trang-Oul’s Girth
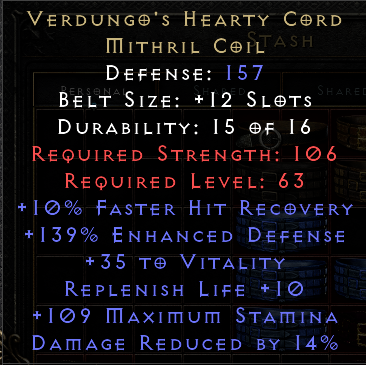
Verdungo’s Hearty Cord
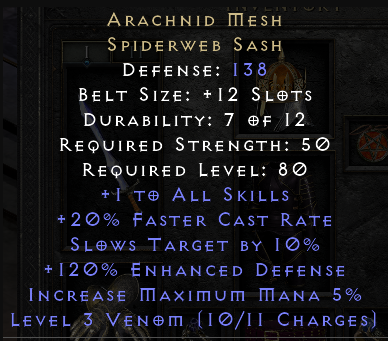
Arachnid Mesh
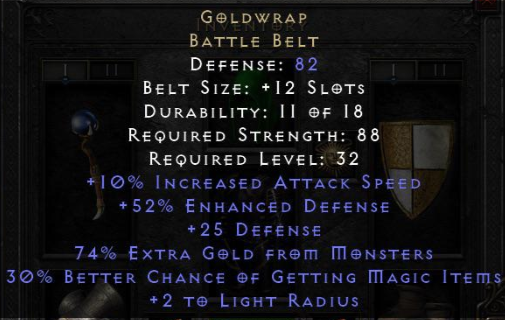
Goldwrap
When you are playing at the higher difficulty levels, you will encounter more and more enemies that inflict status ailments, such as Decrepify or Freeze. To protect yourself from the latter, you need to equip items that have the “cannot be frozen” modifier.
Normally, you wear the Raven Frost and you are set. However, the problem with the said ring is that it gives you added cold damage which, as mentioned earlier, provides you a chance to shatter the enemies’ corpses with your attacks. This is a no-go because you cannot use Find Item if there are no corpses left to search.
That is the reason why we do not recommend using the Raven Frost, especially if your only goal is to get freeze immunity. Thankfully, Raven Frost is not the only item in D2R that does that; Trang-Oul’s Girth provides that all-important “cannot be frozen” mod as well.
This belt not only makes you immune to freeze, but it also gives you a hefty amount of life, mana, and stamina. And yes, it does replenish your life a little bit, which is not subject to your inability to leech life or mana off of your enemies with Berserk.
Berserk does reduce your defense to zero, but this does not cover resistances and other forms of damage mitigation. For this reason, Verdungo’s Hearty Cord is an incredible choice if you find that your character lacks survivability.
Verdungo’s Hearty Cord is one of the only belts in D2R that offer “% Damage Reduction.” Additionally, this thing replenishes your life by quite a bit, and that 10% FHR, while minor, is still helpful when paired with other items with Faster Hit Recovery.
The Zerker Barb is not a caster, per se, but it certainly requires a sizable amount of FCR to be able to cast Teleport pretty quickly. If you need more Faster Cast Rate, then the Arachnid Mesh is a godsend.
It is the only item in D2R that has a high FCR bonus for its respective slot. If that is not enough to convince you, maybe its “+1 to all skills” will.
The above-mentioned belts are incredible in their own way. However, if you want the best belt for the Pitzerker, then equip the Goldwrap and never look back.
Why does the Goldwrap beat every belt on this list? Well, this belt gives huge bonuses to Magic Find chance and Gold Find. More importantly, it gives a sizable boost to your attack speed, which is always helpful when using Berserk against your intended target.
Charms
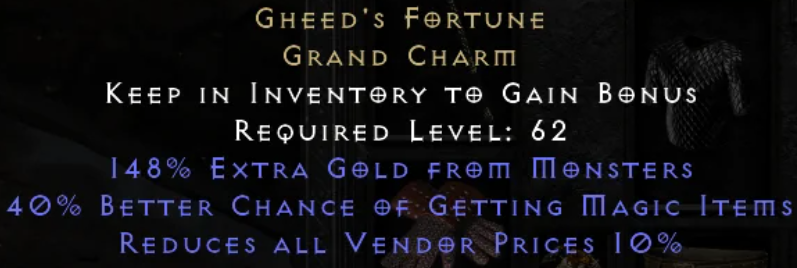
Gheed’s Fortune
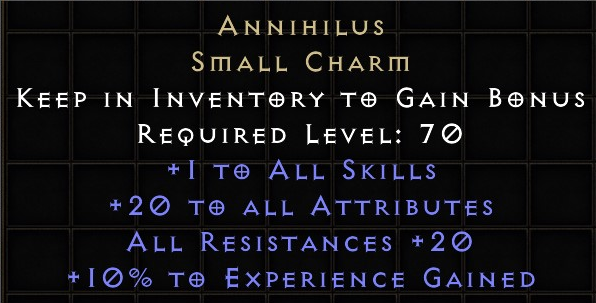
Annihilus
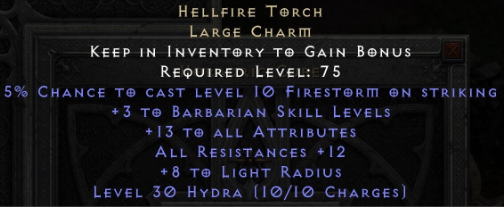
Hellfire Torch (Barbarian)
Small Charms with MF Chance
The main selling point of the Zerk Barb in Diablo II: Resurrected is that it is the quintessential Magic Find build in the game due, in large part, to the Find Item skill that’s exclusive to the Barbarian.
Since you want to have gear and items that boost MF chance, you might as well include Gheed’s Fortune. This is a grand charm that greatly increases your Gold Find and Magic Find, and you get these bonuses simply by putting this thing in your inventory!
Since your defense is virtually zero for about 1.2 seconds after using Berserk, you want your resistances to mitigate incoming damage. For a slight boost in that department, you can add the Annihilus, which is a unique small charm that is incredible for almost any D2R build out there.
The Hellfire Torch is always a welcome addition to any build. That is primarily because it raises the level of your skills by three points! It should go without saying that you get the Hellfire Torch specifically with “+3 to Barbarian Skill Levels” because this thing can roll the same mod for other classes as well.
For the rest of the slots in your inventory, you can populate them with small charms that grant Magic Find chance, life, and all resistances.
Now, if you are wondering if you need the Black Cleft Sunder Charm for this build, then the answer is no. Conceptually, Sunder Charms in D2R are useful because they break the damage immunity of certain monsters.
In the case of the Berserk Barbarian, you do not really need it because you have Concentrate to deal with magic-immune enemies.
To convince you not to use the Black Cleft, this Sunder Charm reduces your magic resistance by quite a lot, so it has no place in your inventory whatsoever!
Sockets/Jewels
40% Enhanced damage / 15 IAS magic jewels ➤ The best choice for damage boosting.
Ist rune ➤ The best choice for Magic Finding.
Um rune ➤ Use it for all-resists boosting if needed.
Perfect Diamond ➤ Can use it instead of Um runes in shields and helms.
Mercenary
Have an Act2 mercenary with Might Aura to boost your damage.
Ethereal items don’t lose durability if your mercenary wears them, so having ethereal item bases for each gear slot is preferred due to the increased defense on armor items and increased damage on weapons. In many instances, ethereal items that are great for mercenaries will be much more expensive than non-ethereal ones.
Mercenary Gear
Helm
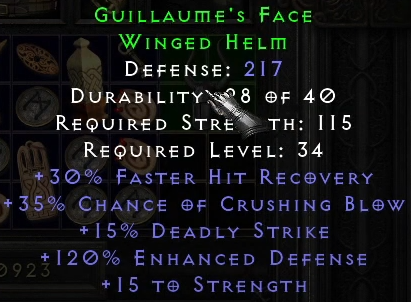
Guillaume’s Face
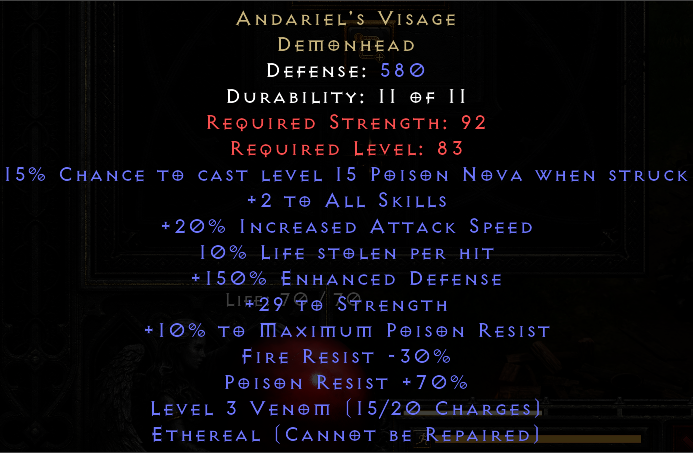
Andariel’s Visage (with Ral Rune)
A staple for many Act 2 hirelings, Guillaume’s Face (aka GFace) is great for offensive Mercenaries. This is due to the fact that it provides them with a chance to land a Crushing Blow and/or a Deadly Strike.
In most cases, you want your hireling to survive, especially in the later levels. To make sure that they can sustain themselves in Hell Difficulty, you can have them wear Andariel’s Visage.
This helmet enables your Mercenary to leech up to 10% of life per hit, which is actually insane when you also factor in its 20% IAS.
Although Andariel’s Visage reduces the fire resistance of the wearer by 30%, you can easily address that by slotting it with a single Ral rune.
Weapon
Insight
Because you’ll be teleporting around the map, you’ll constantly find yourself starving for mana. To help you with that, you can have your Mercenary use a weapon with the Insight runeword on it.
Insight is best known in D2R for providing you with the Meditation Aura. This aura greatly boosts your mana recovery, thus alleviating the need to bring mana potions with you.
The rest of the stats on this runeword does not work well for your Mercenary, but they mainly act as a supporting character anyway, so that is not a problem.

Body Armor
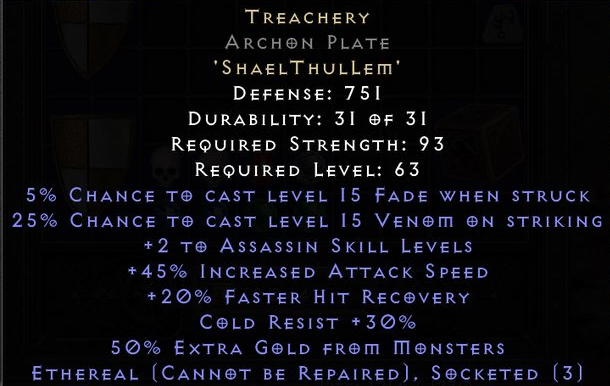
Treachery
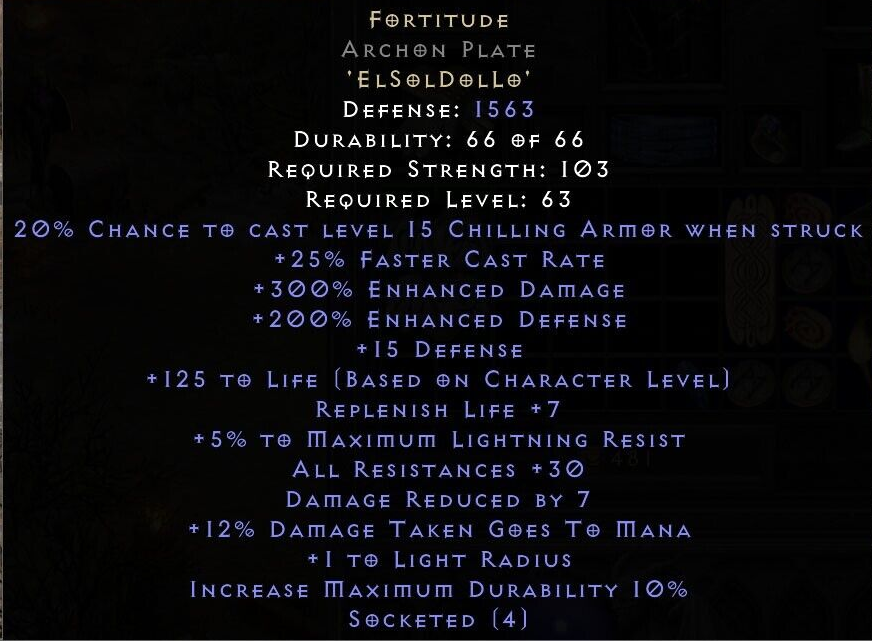
Fortitude
Treachery is a relatively affordable runeword, which is great for a budding Berserk Barbarian such as yourself. And no, you will not use it on yourself. Instead, you will have your hireling wear body armor with this particular runeword slotted in.
So, what are the stats that are useful to your hireling? For starters, it gives them a huge boost in survivability due to that Fade buff. Besides that, it grants 45% IAS, making them attack pretty quickly.
This body armor is also beneficial to you because it allows your hireling to gain extra gold from monsters.
If you can afford it, the best armor for your Mercenary is, of course, Fortitude. Just by having your hireling wear this one, they instantly gain +30 all resistances, 7 physical damage reduction, and +300% Enhanced Damage, among other useful stats.
Ladder Starter / Budget Berserk Barbarian Gear
Lore Runeword Helm ▬ Highlord’s Wrath amulet ▬ Stealth Runeword Body Armor ▬ Oath Weapon ▬ Stormshield Shield ▬ No Switch Weapon and Shield ▬ Rare resistance rings ▬ Rare 20 IAS resistance gloves ▬ String of Ears Belt ▬ Rare Boots with resistances ▬ Life and Resistance charms ▬ Perfect Diamond Item Sockets
Best Berserk Barbarian Gear
Arreat’s Face helm ▬ Highlord’s Wrath Amulet ▬ Enigma Body Armor ▬ Grief runeword Weapon ▬ Phoenix Monarch Shield ▬ Dual Heart of the Oak Switch Weapons ▬ Steelrend Gloves ▬ Verdungo’s Hearty Cord Belt ▬ Gore Rider Boots ▬ Annihilus ▬ Barbarian Hellfire Torch ▬ +Life, + Attack Rating, +Max damage charms ▬ 40% Enhanced damage 15% IAS jewel sockets
Final Thoughts
The Berserk Barbarian is hailed as the best Magic Find character in all of Diablo II: Resurrected. A huge part of that is due to Find Item – a Barbarian-exclusive skill that lets you loot the corpse of a fallen enemy again to possibly discover more loot.
Berserk is a rather interesting ability because it converts all of your physical damage to magic damage when used. Although you are able to deal huge amounts of damage to a single target, this build is not a good one in terms of clearing packs of monsters.
As a result, your playstyle is mainly using Teleport (from Enigma or Naj’s Puzzler) to find suitable targets, and then casting Howl to force lesser minions to cower in Fear, leaving only the elites or bosses behind.
Use Berserk until the intended target is eliminated. Once that’s done, use Find Item in the hopes of getting more loot, hopefully, much more worth it than the previous ones the enemy has dropped.
We cannot stress this enough: you need to be willing to invest a lot to put this build together. The items that it needs to shine are quite expensive, so you might not want to attempt this as your first character.
However, don’t let us stop you if you do. In fact, we are here to help! If you need all of the items mentioned in this build guide, then we have them all for you! Visit our D2R store to get the best prices. We ensure fast delivery and safe transactions.
So, what are you waiting for? Visit our D2R store today!
![Arreat's Face (Ladder) [Helms]](/img/tmp/product_mini_2_45364.jpg?time=1784668071)
![Mara's Kaleidoscope (Ladder) [Amulets]](/img/tmp/product_mini_2_45011.jpg?time=1784668071)
![Enigma Archon Plate (Ladder) [Enigma]](/img/tmp/product_mini_2_45117.jpg?time=1784668072)
![Grief Berserker Axe (Ladder) [Grief]](/img/tmp/product_mini_2_45039.jpg?time=1784668072)
![Breath of the Dying Berserker Axe Ethereal [Breath of the Dying]](/img/tmp/product_mini_2_42508.jpg?time=1784668072)