OSRS Prayer Leveling 1-99 Guide
07.06.2025 - 12:12:16
Game Guides , OSRS Guides , OSRS PvM , OSRS Quests & Achievements , OSRS Skills & Skilling , Runescape

The Prayer Skill is one of the most important combat skills in OSRS. Having a hard time getting to level 99?
Everyone has a tough time in OSRS figuring out which Skills to master. Whether combative or for other purposes, all of the Skills in the game are special and important in their own way. Of the 20+ Skills in the game, one that doesn't let its practicality be known from the get-go is the Prayer Skill.
It might not seem like a vital skill for your journey in the game, but it is definitely one of the best skills to get to level 99 as early as possible. Unfortunately, this is also one of the hardest Skills to master in the game, whether you're on a free or paid account. With this guide, however, we'll make that journey easier for you.
Before you dive deeper into our guide, make sure to drop by our OSRS store. We've got excellent deals and the perfect opportunity to buy OSRS gold safely, along with everything else you need to enhance your game.
What Is OSRS Prayer?
Prayer is a combat Skill that's available to all players in OSRS - non-members and members included. As you progress through the Skill, you get to unlock new Prayers which can assist you in combat in many ways. Some of the buffs include Attack boosts, Magic immunity, Hitpoint regeneration, and much more.
Once a Prayer is activated, a resource called Prayer Points are slowly drained and once out, will immediately cause your current buff to end. Regaining Prayer Points is as simple as praying at any altar scattered throughout the world. In some cases, there are monsters or areas that automatically drain your Prayer Points too.
Leveling your Prayer Skill can be done in many ways and bones are most or less likely involved. You can bury them, offer them to gilded altars, and even convert them to ectofuntus. While there are many ways to level Prayer, the challenge lies in finding the materials needed to do so.
Is Prayer Worth Training?
For all its trouble, we can safely say that yes, Prayer is worth training. The Prayers in the game are very useful in raids, boss battles, money making, and so much more. A lot of players take the time and effort to train Prayer because it makes combat a lot easier in the game.
Prayer skills basically provide you with a ton of buffs and bonuses during combat. With the right gear and setup, you can even cast Prayer skills endlessly, allowing you to take on bosses without taking any damage. If you're getting tired of training Prayer because of the work behind it, you can put it on the side first and train other things. However, we highly implore you to max this out as soon as you can.
OSRS Prayer Level 1-99 Guide
Training the Prayer skill in OSRS is infamous within the community for being extra hard and demanding. It's even more so when it comes to training your Prayer Skill on a free-to-play account. Regardless of what account type you have though, we have a guide for both of them so read on.

OSRS Prayer F2P Leveling Guide
Before you proceed reading, keep in mind that F2P Prayer training is one of the hardest and most time-consuming Skill training in the game. Even with this optimized and efficient method, it's going to take a lot of effort to get to 99 on a free account. What's important to know though is that it's doable.
Questing For A Huge Level Boost
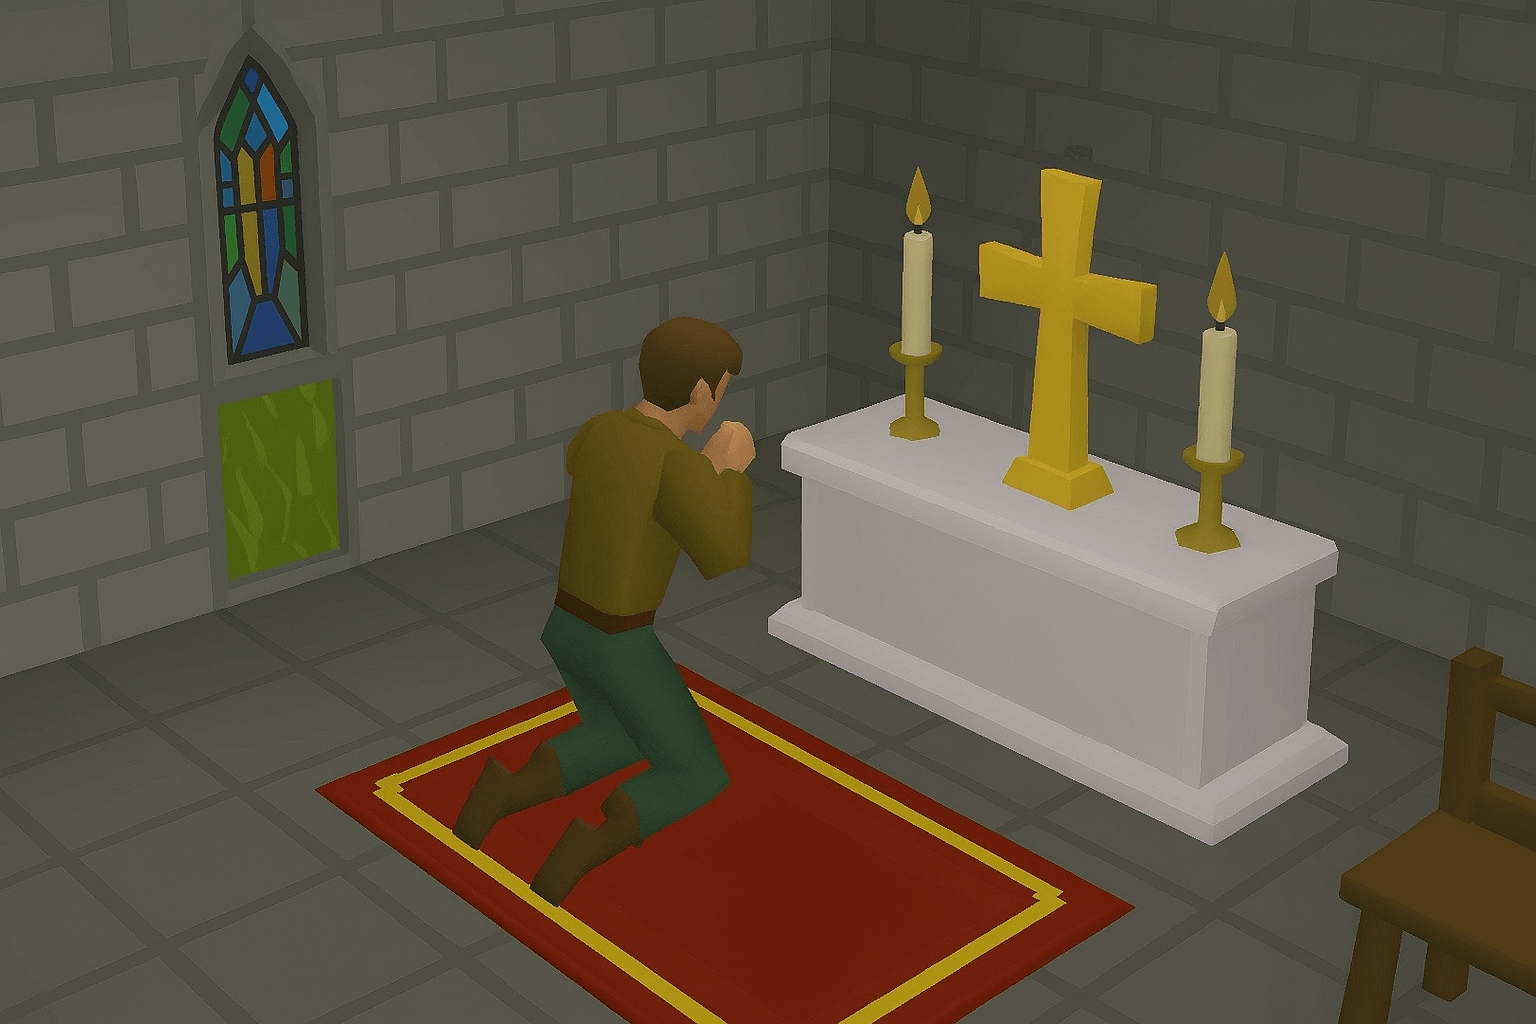
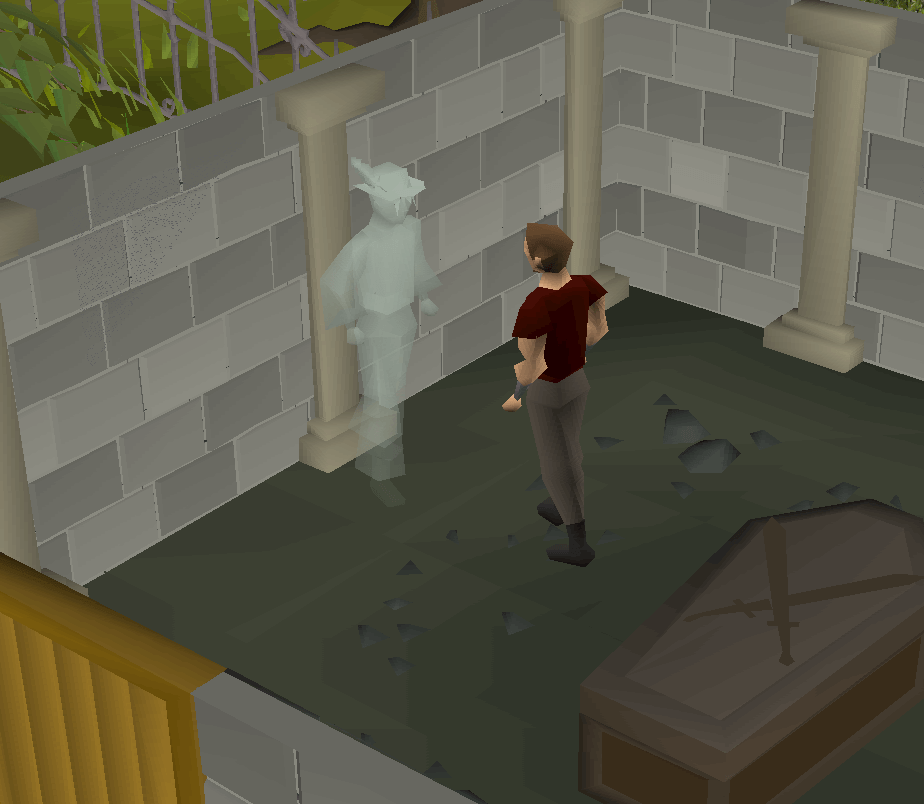
You can jumpstart your level 99 journey by doing The Restless Ghost. Finishing the quest nets you 1,125 Prayer XP which will get you to level 9 upon completion. What's great is that there are no prerequisites for this quest but you should have at least a decent defensive armor to make the quest is easier to do.
To start this quest, you'll need to speak to Father Aereck located in the chapel southeast of Lumbridge Castle. Just a fun fact, this is one of the six quests to launch with OSRS!
Camdozaal
Go to the altar in the Ruins of Camdozaal for a less click-heavy way of training Prayer. You must have at least level 7 Fishing and Cooking to use this strategy. You also should have completed Below Ice Mountain. For maximized XP gain, do this with level 33 Fishing and Cooking so that you can get tetra which offers the highest XP gain or Prayer. Here's how this step works.
- To catch fish in the neighboring fishing location in Camdozaal, use a small fishing net.
- Using a knife, prepare the fish at the preparation table. If you don't have a knife, there should be one on the floor near the table. This gives you Cooking XP.
- Take your prepared fish at the altar to get Prayer XP.
Fish | Fishing | Cooking | Prayer | |||
Level | Exp | Level | Exp | Level | Exp | |
Guppy | 7 | 8 | 7 | 12 | 1 | 4 |
Cavefish | 20 | 16 | 20 | 23 | 1 | 7 |
Tetra | 33 | 24 | 33 | 31 | 1 | 10 |
You can get 2,400 XP for Prayer per hour at best. The best thing is that you're also going to get 5,600 Fishing XP and 7,400 Cooking XP as well.
Power-Burying
In free-to-play, burying a lot of bones and demonic ashes that you bought from the Grand Exchange is the best way to get the highest prayer XP rates. Understandably, this method is both click-intensive and costly, making it a demanding approach. However, given that Prayer stands as perhaps the most challenging skill to train in the free-to-play realm, this method is arguably the most efficient one available. Though it comes with a high price tag, smart money-making strategies can help offset the costs effectively.
Focus on simultaneously spreading vile ashes and burying big bones for the fastest training in prayer. This method allows for a rapid 40 Prayer XP per tick, requiring just two swift clicks to bury and scatter, producing an approximately hourly potential of 116,000 XP. However, achieving this maximum rate in practicality is challenging due to the intense clicking and necessary banking. Realistically, expect to reach around ~100,000 XP per hour.
To illustrate the scope of this method, from Levels 1 to 99, you'd need a staggering 325,861 big bones (costing 71,689,420 GP) and an equivalent amount of vile ashes (costing 211,483,789 GP). It's a substantial investment, but it's the swiftest path to mastering your Prayer skill in free-to-play.
Here's a quick run-down on the XP gain and costs with this method.


Ash/bone type | Experience | XP/hr | Hours to 99 | # for 99 | Cost | Cost for 99 | GP/XP |
Bones | 4.5 | 13,050 | ~1000 | 2,896,541 | 68 | 196,964,788 | -15.11 |
Monkey bones | 5 | 14,500 | ~900 | 2,606,887 | 484 | 1,261,733,308 | -96.80 |
Fiendish ashes | 10 | 29,000 | ~450 | 1,303,444 | 118 | 153,806,392 | -11.80 |
Big bones | 15 | 43,500 | ~300 | 868,962 | 220 | 191,171,640 | -14.67 |
Vile ashes | 25 | 72,500 | ~180 | 521,378 | 649 | 338,374,322 | -25.96 |
Combat Leveling
You can also do combat to level your Prayer. While risky, this method gets you XP in Attack, Magic, or Range Skill so it's going to be worth it. Just make sure that you're well equipped for this.
In low-level areas, you'll find ample opportunities to gather free bones, often left behind by players who focus on monster hunting without collecting their loot. Here are some common spots and enemies where you can easily gather the bones you need for training Prayer:
- Chicken Pens - these are highly recommended for beginners as chickens have lot combat level.
- Cow Fields - these are the same with chickens but they have more defenses and HP.
- Goblins (e.g., near the gate to Al Kharid) - these are a step up from chickens and cows but they're good for training combat skills as well
- Imps (commonly found south of Falador) - they can also drop fiendish ashes aside from bones. It provides only 10 Prayer XP but it can accumulate for a ton of XP overtime.
- Lumbridge Swamp
There is always a steady supply of bones left on the ground in these well-visited places. Targeting particular monsters can help you maximize your bone collection for Prayer training as you advance into more difficult places. Monsters and locations listed below drop big bones or ashes:
Big Bones:
Big bones provide more prayer XP at the expense of the fact that they're much harder to get. If you're planning on training combat XP as well, then fighting these stronger and more aggressive monsters are a must.
- Giant Frogs (Lumbridge Swamp) - strong monsters which are good for melee combat training. Make sure to not get surrounded by them.
- Hill Giants (Edgeville Dungeon or Giants' Plateau) - Like the other giants in the game, these are excellent for melee combat training because of their high Defense and Hitpoints. They can deal major damage though.
- Ice Giants (Asgarnian Ice Dungeon) - Same with hill giants
- Moss Giants (Varrock Sewers or Crandor) - Same with will giants
- Ogresses (Corsair Cove Dungeon) - Monsters that are excellent for combat training but they can be dangerous in groups so make sure to fight them with caution.
Vile Ashes:
Vile ashes are like fiendish ashes but they yield more Prayer XP. Of course, that also means that the monsters you can get these from are far more dangerous than the monsters above.
- Lesser Demons (Crandor and Karamja Dungeon, Lava Maze, or Demonic Ruins) - If you want to make fights against these easier, make sure to use demonbane weapons. They're not that strong but can be dangerous in huge numbers.
- Greater Demons (Demonic Ruins) - Same as above but they come in fewer numbers and are more manageable.
Giant frogs are the quickest target for effective Prayer training because of their low defense and hitpoints. Though this approach delivers a lower prayer XP rate, you can also defeat weaker demons at higher levels for bigger profits.
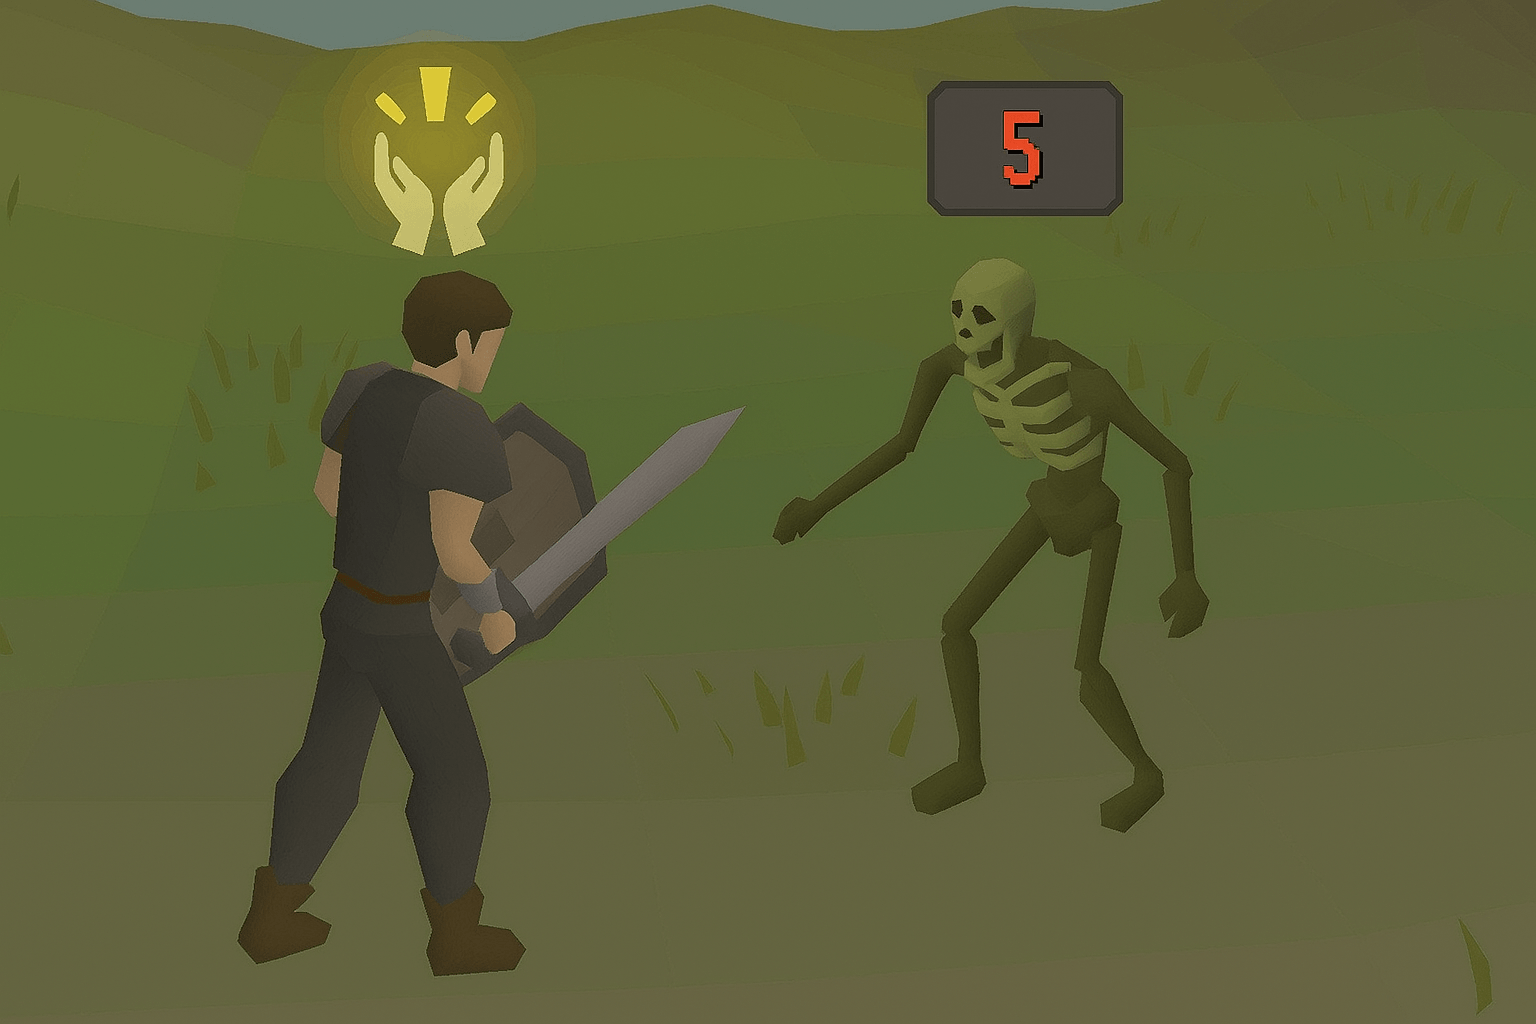
Wilderness Training
Situated in the Wilderness, north of Varrock, the BoneYard is a great place to find big bones and collect them without having to fight. To get the most out of this approach, consider the following advice and tactics:
- Food (optional): There are 20-25 skeletons around, so if you decide not to battle them, think about packing enough food to last you.
- Armor: Because of the location of the Wilderness and the skeletons there, wear armor to lose in the event of an attack.
- Weapon (optional): You will need a weapon if you choose to fight the skeletons. When you fight them, you'll receive some battle experience in addition to bones if you lose.
Method One:
- Enter quickly and begin gathering bones.
- Bury the bones after retreating to a safe location.
- Go through this cycle again.
Method Two:
- Take on skeletons and defeat them, to get their bones. This approach will be simpler if you have a higher combat level.
- After the area is secure and clear, collect every bone that has fallen.
- Bury every last one of the bones.
- Repeat these steps.
Method Three:
- This approach takes longer to begin your prayer training, but it entails waiting in two regions amid the bone piles that are not aggressive.
- The skeletons will stop acting aggressively in certain regions after 10 minutes.
- The aggression timer would reset if you ventured too far into a new hostile location.
- With this strategy, you can run around burying bones for a long time without running out of run energy, and you don't even need food or armor if you maintain your weight at 0 kg.
- Even though you have to wait 10 minutes to start training, once you begin consistently gathering and burying bones, you should expect a faster rate of XP points.
OSRS Prayer P2P Leveling Guide
Leveling up your Prayer Skill to 99 on a P2P account is still very difficult, but it's still far simpler than on a free account. Apart from that, there are other Prayers, quests, and locations like Herblore training 1–99 where you can train Prayer. As you level up Prayer on a P2P account, consider implementing these techniques.
Questing
Just like with the F2P approach, you should begin by completing a few quests. You'll get a big level boost from these missions. You should complete these objectives before beginning any formal Prayer training.
- Restless Ghost
Quick Guide |
Getting Started
Ghostspeak amulet
The Skull
|
- Priest in Peril
Quick Guide |
The vampire
The River Salve
|
- Recruitment Drive
Quick Guide |
Caution: If a Hardcore Ironman dies to Sir Kuam Ferentse, they will no longer be considered Hardcore Ironmen. Reminder: You only have 10 seconds after entering to find the solution, so be ready for Lady Table.
Lady Table (statue room)
Sir Ren Itchood (standing on a crate)
Sir Tinley
Sir Spishyus (Grain, Chicken and Fox)
Ms. Hynn Terprett (sitting on the throne) Choose the following answers:
Miss Cheevers (Bookshelf room)
|
- Holy Grail
Quick Guide |
King Arthur and Merlin Reminder: You will need to bank everything before heading to Entrana if you begin the quest with the necessary or advised weapons and armor.
Searching for the Holy Grail
The Fisher Realm Reminder: Bring armor, a magic whistle, food, and an Excalibur to battle the Black Knight Titan. Keep in mind that he is very resistant to magic and ranged attacks, therefore melee is advised. If your combat level is less than 41, bring antipoison. For most of the battle against the Black Knight Titan, you can switch up your weapon, but Excalibur is required for the last blows. If you haven't used the Excalibur for your last attack, he will heal to full health.
Finishing Up Required Items: Falador teleport, 2 magic whistles
|
- Twilight's Promise
This quest doesn't give Prayer XP but we're going to need it for a very effective training method later on.
You will receive 14,531 Prayer XP upon finishing these four tasks, which is more than sufficient to advance your level on a free account from 1 to 30.
Bones At The Gilded Altar
The best way to quickly level up your Prayer ability is to sacrifice bones at a gilded altar in a player-owned home. At the altar, lighting both incense burners grants you an amazing 350% increase in EX points for each bone. For instance, a dragon bone that is buried gives 72 Prayer XP; yet it gives 252 XP when used on the gilded altar with both burners aflamed.
To build a gilded altar, you must have a minimum level 75 Construction, which is momentarily increased. There is no difference in the XP benefit between oak, mahogany, and marble incense burners they all offer the same increase and remain burned for the same amount of time. Level 30 Firemaking and a marrentill plant are needed to light an incense burner. For teleportation spells like Teleport to House and Camelot Teleport, it's also advised to have level 45 Magic.
In a PvP world, it's good to use the bank chest next to Camelot Castle while offering bones. This chest shields you from prospective player killers because it's the closest to a teleport and is situated in a secure region. Equip yourself with a dust battlestaff and make sure your inventory contains law runes and a tinderbox. Take out 2 marrentills and 24 bones from the bank, travel back home, light the incense burners, and present the bones at the gilded altar. Using every bone on the altar manually will expedite the process. Then teleport back to Camelot and do it all over again.

A house party host's altar can be used if you lack the Construction level required to make a gilded altar. The Rimmington house portal lists 330 (US East), 465 (Germany), and 512 (UK) as the official worlds for hosted gilded altars. For a price of 5 coins per note, you can bring noted bones and utilize Phials in the house next to the portal to unnote them.
Depending on your efficiency and the kind of bone you use, the XP rates can change. You can offer about 2,550 bones in an hour if you use every bone on the altar manually and have perfect banking and clicks. This corresponds to roughly 1,340,000 XP per hour in the case of superior dragon bones and 643,000 XP in the case of dragon bones. The charges can go up to roughly 3,500 bones per hour if you use several accounts to light the incense burners and get bones from the bank; they can go even higher if you hire runners. You can sacrifice up to 1,070 bones in an hour, though, if you do not use the bones on the altar by hand.
Bones At The Chaos Temple
Offering bones at the altar in the Chaos Temple in the Wilderness is a feasible way to train Prayer if you're looking for a slightly lower but much more economical technique. This temple, situated in level 38 Wilderness within a multi-combat zone, houses an altar that offers the same experience boost as a gilded altar with two burners lit. Furthermore, there is a 50% possibility that the bone may remain unconsumed, which means that the experience obtained from each bone is doubted. However, exercise caution as encountering player killers is a real risk due to the dangerous nature of the area.
The Elder Chaos druid outside the temple will un-note bones that you bring in for 50 coins each note if you choose to use this technique. Remember that this raises the possibility of players killing you and taking your bones with them. Keeping simply an inventory of unnoted bones and suicidal thoughts to bank for more bones is a good way to reduce risk.
Ghorrock Teleport (or the corresponding house portal) can be used to quickly travel south and reach the altar. If you don't have the Magic level for Ghorrock Teleport, you can use the respective teleport tablet instead. Alternatively, you can use the Ancient Obelisk in your player-owned home to teleport to level 44 Wilderness and then flee south after finishing challenging tasks in the Wilderness Diary. While a little slower, another way to go north is to use Cemetery Teleport on the Arceuus spellbook or the corresponding house portal.
Depending on the bone used and interactions with player killers, experience rates can change. When manually using bones on the altar, you can offer approximately 2,000 bone offerings per hour. This means that with dragon or wyvern bones, you can gain about 500,000 experience every hour, and with superior dragon bones, you can gain an astounding 1,050,000 experience per hour. With maximum efficiency and uninterrupted training, you could potentially gain up to 1,800,000 experience per hour when using superior dragon bones. If you incorporate runners into the process, slightly higher rates can be achieved.
Strategy For Chaos Temple Run
Understandably, this method is particularly risky. To help mitigate the risks involved, here's a simple strategy to follow.
To reduce risk, think about taking the suicide route to return to the bank swiftly after each inventory of bones, then traveling to the altar from there. This method is a little slower, but it's still less dangerous than carrying noted bones to the altar.
It is strongly advised that you have Edgeville or Ferox Enclave selected as your respawn point before attempting this strategy. Although you will need to spend 5,000,000 coins to unlock them, these are the nearest respawn locations to a bank. In PvP worlds, on the other hand, a bank chest is conveniently situated near a respawn spot.
Here's how to use this technique:
- Collect bones, a teleport to the WIlderness, and (optionally) either a dwarven rock cake or a locator orb from the bank.
- To present the bones at the altar, teleport to the Wilderness and proceed to the Chaos Temple.
- Use the locator orb or the dwarven rock cake to reduce your hitpoints before taking your own life by drinking the wine of zamorak spawn. Or you may allow the Chaos Fanatic to kill you.
- To obtain more bones, sprint to the closest bank from the respawn location. Do this once more.
- You may decide to put on a protective item like Dinh's bulwark for more protection against player killers. By doing this, you will have a better chance of surviving long enough to use all of your bones before being attacked.
Another way to go about using the suicide tactic is to use Zealot's robes. The altar's ability to preserve bones combines with the Zealot's robes to give the bones a little higher value. Furthermore, the Zealot's robes shield the bones after death.
If you encounter a precarious situation, logging out is always an option to consider. There's a short window in between dying and logging out successfully though so keep your cursor on the logout button.
Reanimating Ensouled Heads
When looking for a less intensive yet cost-effective method for Prayer training, reanimating ensouled heads and dealing with the reanimated monsters in the Dark Altar could be your solution. While it's not the fastest training method, it demands less effort compared to manually offering bones at altars.
To embark on this method, ensure you have at least 60% favor in Arceuus. You'll also need quick access to the Dark Altar, which can be facilitated by unlocking the fairy ring code "cis."
It is also helpful to have quick access to fairy rings, such as the one in your Player-Owned House, quest point cape, or Salve Graveyard Teleport. It is strongly advised to carry a rune pouch to conserve inventory space. Given that ensouled heads sometimes have low trade volumes on the Grand Exchange, it is a smart idea to stock up on them in preparation.
Depending on the sort of ensouled head and your combat stats, experience rates will change. Up to 220 ensouled heads can be reanimated per hour if your combat stats are strong enough, resulting in approximately 343,000 experience per hour when using ensouled dragon heads.
Your rates can be raised by using a cannon to kill reanimated monsters more quickly, but the cost is slightly higher. Moreover, this training will give you some passive combat and magic experience.
Noted Bones
It is riskier, but it happens far faster, to bring noted bones than to commit suicide. However, this method is only recommended for players with a combat level of at least 50 and up. The risk of getting PK'd is significantly high with this method.
Nonetheless, a degree of caution should still be exercised because the altar occasionally has low-level combat pure player killers.
To increase your chances of avoiding player kills if you're a high-level player, you should pack some Saradomin brews, sanfew serums, or super restores, and wear decent defensive gear while 3- or 4-iteming more expensive armor pieces.
Because it is ideal to have as much inventory space as possible for the bones, you will also have extremely little room for supplies.
Your available funds will determine the different gear sets. Prioritizing Magic protection is usually the wisest course of action, even with respectable defensive advantages against melee and Ranged attacks.
The fortified Masori body or the Armadyl chestplate, a tank shield like the elysian/spectral spirit shield or dinh's bulwark, and the staff of the dead (if using an off-hand shield) are seen to be the finest choices when selecting protected goods. The remaining equipment should be made up of reasonably priced or readily interchangeable parts.
The serpentine helm or the fortified Masori chaps (or the Armadyl chainskirt) can be brought as an extra item if you feel comfortable using Protect item. Reducing the smite risk could be a good approach because getting smited is still a possibility. Prioritize accumulating enough Prayer points to maintain the activation of Protect Items in a certain death scenario.
Passive Training Methods
When paired with other activities like Slayer training or in locations like the Nightmare Zone where extended stays are planned without the need for bank drops, passive training offers a time- and money-efficient method of training Prayer.
Bonecrusher
When you fight a monster that drops bones, the bonecrusher will automatically smash the bones using the bonecrusher or bonecrusher necklace charged with ecto-tokens. You'll receive half the Prayer experience you would have gained from burying the bones yourself, or the full amount if you've completed the elite Morytania Diary. Each usage consumes one charge.
Ash Sanctifier
Slaying an ash-dropping monster will disperse ashes automatically if you have an ash sanctifier imbued with death runes. This grants you half the Prayer experience you would have received from scattering the ashes yourself, or the full amount if you've completed the elite Kourend & Kebos Diary. Using the sanctifier consumes one charge.
Ectoplasmator
When you defeat a spectral creature, such as an aberrant specter, the ectoplasmator is a powerful instrument that grants you Prayer experience equivalent to 20% of the creature's maximum health. It may be acquired as a reward from the Soul Wars minigame for 250 Zeal Tokens, requiring 40 Prayer. It also stacks with the bonecrusher when you fight spectral monsters like ankou that drop bones.
Bird's Eggs
You can sometimes find nests with red, green, or blue bird eggs when doing tasks like clearing wood or emptying bird houses. These nests can be traded for 100 Prayer XP a piece in the woodcutting guild shrine, granting passive experience gain while developing other skills.
Varlamore New AFK Training Method

Earlier this year, the developers of the game finally launched the Varlamore update which added loads of new things to the game. Lucky for you, there's a new training method that will let you train Mining and Prayer at the same time.
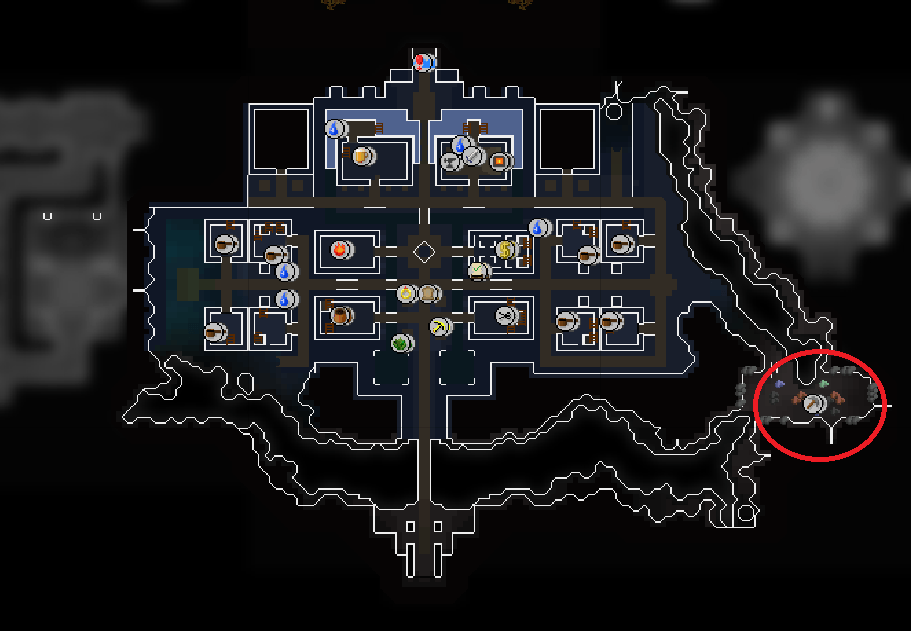
Once you've done Twilight's Promise, you can finally head to Civitas Illa Fortis. Using the teleport drops you right at the center of the city. From there, you should continue walking west until you reach a new area called Cam Torum.
Cam Torum is a large area but once you're inside, you're going to want to head north and then right from the entrance. You'll know you're in the right place if there are several mining spots already. This map below should show you exactly where you should be going.
This part of this leveling method results in a ton of Mining XP. Look at the mining spots and target ones where there are waterfalls. Mining these spots will give you a chance at getting Blessed Bone Shards. Try to get as many of the bone shards as you can. The area is very small for you can AFK mine here as there's very little movement needed to interact with the spots.
Aside from Mining XP, the bone shards will also net you a small amount of Prayer XP. You can sell the shards for a profit but if you want to train Prayer, you'll have to keep them all. The mining spots also regularly drop Calficified Deposits. Smashing these at an anvil will give you 10 Blessed Bone Shards each which of course, means more Prayer XP. You can crush the deposits at an anvil just inside Cam Torum. Bring as many Blessed Bone Shards as you can and head to Ralos' Rise. This is north of Cam Torum.
You're going to have to use the bone shards to bless wines next. You can add more bone shards by using a chisel on any bones you have. Each type of bone yields a certain amount of shards. A staggering 400 bone shards are needed to make a single blessed wine.
This is a lengthy training process but the results are worth it. Here's a quick guide to make it easier for you. These instructions below assume you already have the bone shards needed.
- Head to the exposed altar in Ralos' Rise. If you have regular bone shards in your storage, bless them from the altar here.
- Now, fill your inventory with both blessed bone shards and jugs of wine. You can also use sunfire wine.
- At the altar, consecrate your wine. The process is relatively the same when you're blessing regular bone shards.
- From Ralos' Rise, head north and go to the Libation Pool that's inside the Teomat Monastery. If you have both required items in your inventory, you'll be creating blessed wine automatically. You can make things go faster by clicking. You'll lose 100 bone shards every time they're used but this will give you 500 Prayer XP for regular wine and 600 Prayer XP for sunfire wine.
- If you run out of Prayer Points, you can heal them at the Shrine of Ralos which is just nearby.
- Once you've run out of bone shards and wine, you can bank all of your blessed wine for profit. You can use the money to buy more regular wine. Repeat the process until you get the XP you need for Prayer training.
A max inventory will earn you around 64,800 Prayer XP which is one of the largest of all the techniques in the game so far. This method is going to be more rewarding especially if you create blessed bone shards of your own. Below is a table that shows the XP yield for the types of bones and wine.
Bones | Shard yield | Base bone XP/GP | Blessed wine | Blessed sunfire wine | ||||
Prayer XP per bone | Base XP increase | GP/XP | Prayer XP per bone | Base XP increase | GP/XP | |||
Regular | 4 | -17.78 | 20 | 444.44% | -4.00 | 24 | 533.33% | -3.33 |
Bat | 5 | -98.11 | 25 | 471.7% | -20.80 | 30 | 566.04% | -17.33 |
Big | 12 | -16.20 | 60 | 400% | -4.05 | 72 | 480% | -3.37 |
Zogre | 18 | -42.98 | 90 | 400% | -10.74 | 108 | 480% | -8.95 |
Wyrmling | 21 | -22.10 | 105 | 500% | -4.42 | 126 | 600% | -3.68 |
Baby dragon | 24 | -39.30 | 120 | 400% | -9.82 | 144 | 480% | -8.19 |
Wyrm | 42 | -39.84 | 210 | 420% | -9.49 | 252 | 504% | -7.90 |
Sun-kissed | 45 | N/A | 225 | N/A | N/A | 270 | N/A | N/A |
Wyvern | 58 | -48.32 | 290 | 402.78% | -12.00 | 348 | 483.33% | -10.00 |
Dragon | 58 | -49.78 | 290 | 402.78% | -12.36 | 348 | 483.33% | -10.30 |
Drake | 64 | -52.74 | 320 | 400% | -13.18 | 384 | 480% | -10.99 |
Fayrg | 67 | -58.74 | 335 | 398.81% | -14.73 | 402 | 478.57% | -12.27 |
Lava dragon | 68 | -52.65 | 340 | 400% | -13.16 | 408 | 480% | -10.97 |
Raurg | 77 | -81.26 | 385 | 401.04% | -20.26 | 462 | 481.25% | -16.89 |
Hydra | 93 | -69.34 | 465 | 422.73% | -16.40 | 558 | 507.27% | -13.67 |
Dagannoth | 100 | -92.78 | 500 | 400% | -23.20 | 600 | 480% | -19.33 |
Ourg | 115 | -344.16 | 575 | 410.71% | -83.79 | 690 | 492.86% | -69.83 |
Superior dragon | 121 | -79.17 | 605 | 403.33% | -19.63 | 726 | 484% | -16.36 |
OSRS Prayer Mechanics Explained
When it comes to the Prayer Skill in OSRS, there are a lot of mechanics to be mindful of. These mechanics will more or less make your life a lot easier, especially when it comes to training and getting the most out of the Skill. For this section of the guide, we'll talk about those mechanics and dive deep into how they work exactly.
Prayer Drain
Every prayer progressively uses up your prayer points while it's active. Prayer points are expanded at varying rates by different prayers; higher-level prayers such as Steel Skin deplete more quickly than lower-level prayers such as Thick Skin.
The prayer bonus, determined by equipped gear, helps to reduce the rate at which prayer points are drained. you can easily view their prayer bonus in the Equipment Stats window. Only specific types of armor, clothing, weapons, and jewelry provide a prayer bonus.
The length of time that prayer points last is actually increased by about 3.33% for every point of bonus prayer.
Let's take Protect from Melee for example. Your points will start to decrease at a pace of 1 point every 3 seconds if your prayer bonus is 0. If you have a gear that provides a +15 Prayer bonus, you can increase the duration of the prayer by 50% as it will deplete at 1 point per 4.5 seconds instead of every 3 seconds.
It is important to remember that the prayer bonus is ineffective in mitigating the negative impacts of places and monsters that deplete prayer.
In terms of prayer drain mechanics, every prayer has a corresponding drain effect, and each game tick, the total of all activated prayers adds to an internal prayer drain counter. One prayer point is taken away and the player's current prayer drain counter value is reduced by their prayer drain resistance when this counter rises above a certain threshold, which is referred to as their prayer drain resistance. Since this can occur more than once per game tick, it's possible to lose more than one prayer point within a single game tick.
you begin with a base prayer drain resistance of 60, which is increased by 2 for every point of prayer bonus. In the example provided earlier, a player with a prayer bonus of +15 would have a prayer drain resistance of 90, instead of the base 60. Consequently, this would extend the average duration for prayer points to deplete by about 50%.
Some areas drain and enemies drain your Prayer Points faster. An example of this is the Crypts area in the Barrows.
Prayer Flicking
Using a tactic known as "prayer flicking," you can use prayers to fight while lowering the regular cost of prayer drain. The essence of this technique lies in activating prayers right before their effects are necessary and swiftly deactivating them immediately after.
By doing so, you can prevent their prayer points from being continuously drained between attacks. Specifically, for protection prayers in prayer flicking, the player activates the prayer just before being hit and turns it off right after the hit lands. This efficient method consumes minimal prayer points and, when executed rapidly, can completely negate prayer point usage.
Although prayer flicking requires accuracy and timing skill, it can provide several benefits. Successful prayer flicking conserves prayer points, enabling you to engage in combat for extended durations or boost damage rates through offensive prayers. In certain situations, prayer flicking can exploit game mechanics, rendering adversaries like Dessous incapable of attacking the player. With flawless execution, no prayer points will be depleted, regardless of the fight's duration.
However, it's important to acknowledge that achieving perfect timing may be challenging for most players. Wearing gear with a substantial prayer bonus significantly extends the duration for which one can effectively pray. Flicking becomes notably simpler when battling a monster that aligns with the weapon's speed, especially when accompanied by in-game sounds. A metronome set to 100 beats per minute (or once every 0.6 seconds) can aid in practice and refining one's timing.
On the flip side, prayer flicking comes with its downsides. It necessitates a high degree of click intensity, involving the constant activation and deactivation of prayers. Additionally, investing time to develop proficiency and consistency in this technique is imperative. Incorrectly executing prayer flicking, especially in high-risk scenarios, can lead to unfavorable outcomes, as you may find yourself without prayers active at critical moments.
Time is everything when it comes to praying flicking. Here's a thorough method for using prayer flicking effectively:
- Combat Prayers: On the game tick when you attack, activate the prayer.
- Protection Prayers: When your enemy's attack animation starts, activate the prayer (not necessary when you receive damage).
- Against Monsters: It helps to know how quickly the monster attacks if you want to pray flick effectively.
Offensive Prayer Flicking:
- Just before your attack animation starts (and the XP point drop occurs, if your hit is successful), activate the offensive prayer.
- In order to prevent using up prayer points, quickly disable the prayer during the following tick.
Choosing the Right Monster for Practice:
- If you are unfamiliar with prayer flicking, start with enemies that have a 2.4-second (4-tick) melee attack interval while wielding a 4-tick weapon.
- If you want to learn safely, try to practice throughout Slayer tasks.
- With their accurate hits, lack of aggression, and ease of access, monsters such as Mutated Bloodvelds are perfect for practice.
Prayer Bonus
There is gear that provides bonuses for Ranged, Attack, and Magic. There are also gear that provides Prayer Bonus. These work differently than other offensive bonuses though.
A single point of Prayer Bonus results in a 3.33% decrease in the rate at which Prayer points drain. To put it in simpler terms, your Prayers will last longer the higher your Prayer Bonus is. With the current state of the game, the max Prayer bonus you can have in your setup is 73 points. Reaching this is very hard but is possible with specific gear. If you get this high a bonus, you're extending the duration of your Prayer by three times.

OSRS Prayer List
The ability to employ prayers in battle is undoubtedly the most significant feature of the skill. These are some of the most useful abilities in the game and are known for turning things around when it comes to the toughest fights that OSRS has to offer. Here's what those Prayers are.
Prayer Level | Prayer | Effect | Drain Rate | Drain Effect | Membership Required? |
1 | Thick Skin | +5% Defense | 1 point per 12 seconds | 3 | No |
4 | Burst of Strength | +5% Strength | 1 point per 12 seconds | 3 | No |
7 | Clarity of Thought | +5% Attack | 1 point per 12 seconds | 3 | No |
8 | Sharp Eye | +5% Ranged | 1 point per 12 seconds | 3 | No |
9 | Mystic Will | +5% Magic Attack and Defense | 1 point per 12 seconds | 3 | No |
10 | Rock Skin | +10% Defense | 1 point per 6 seconds | 6 | No |
13 | Superhuman Strength | +10% Strength | 1 point per 6 seconds | 6 | No |
16 | Improved Reflexes | +10% Attack | 1 point per 6 seconds | 6 | No |
19 | Rapid Restore | 2x restore rate for all skills, except Hitpoints and Prayer | 1 point per 36 seconds | 1 | No |
22 | Rapid Heal | 2x Restore rate for Hitpoints | 1 point per 18 seconds | 2 | No |
25 | Protect Item | Keep one extra item upon death | 1 point per 18 seconds | 2 | No |
26 | Hawk Eye | +10% Ranged | 1 point per 6 seconds | 6 | No |
27 | Mystic Lore | +10% Magic Attack and Defense | 1 point per 6 seconds | 6 | No |
28 | Steel Skin | +15% Defense | 1 point per 3 seconds | 12 | No |
31 | Ultimate Strength | +15% Strength | 1 point per 3 seconds | 12 | No |
34 | Incredible Reflexes | +15% Attack | 1 point per 3 seconds | 12 | No |
37 | Protect from Magic | 100% protection from magic attacks by NPCs, 40% from players | 1 point per 3 seconds | 12 | No |
40 | Protect from Missiles | 100% protection from ranged attacks by NPCs, 40% from players | 1 point per 3 seconds | 12 | No |
43 | Protect from Melee | 100% protection from melee attacks by NPCs, 40% from players | 1 point per 3 seconds | 12 | No |
44 | Eagle Eye | +15% Ranged | 1 point per 3 seconds | 12 | No |
45 | Mystic Might | +15% Magic Attack and Defense | 1 point per 3 seconds | 12 | No |
46 | Retribution | Upon death, deals damage up to 25% of the player's base Prayer level to targets in a 3x3 radius | 1 point per 12 seconds | 3 | Yes |
49 | Redemption | Heals the player by 25% of their base Prayer level if they fall below 10% health, draining their prayer points fully | 1 point per 6 seconds | 6 | Yes |
52 | Smite | Reduces the opponent's prayer points by 25% of damage dealt | 1 point per 2 seconds | 18 | Yes |
55 | Preserve | Boosted stats last 50% longer | 1 point per 18 seconds | 2 | Yes |
60 | Chivalry | +15% Attack, +18% Strength, and +20% Defense | 1 point per 1.5 seconds | 24 | Yes |
70 | Piety | +20% Attack, +23% Strength, and +25% Defense | 1 point per 1.5 seconds | 24 | Yes |
74 | Rigour | +20% Ranged attack, +23% Ranged Strength, and +25% Defense | 1 point per 1.5 seconds | 24 | Yes |
77 | Augury | +25% Magic Attack and Defence, +25% Defense | 1 point per 1.5 seconds | 24 | Yes |
Dominate Mobs With Prayer

Undoubtedly, one of the best ways to level up in OSRS is through prayer. The sheer amount of use you can get out of Prayers warrants the time and effort you put into this Skill. Once you have access to more Prayers and Prayer Points, you'll find it hard to stop in OSRS.
Once you've maxed out your Prayer skill, it might be time to train your Ranged skill next to completely max out your character.
FAQs
What's the fastest way to train Prayer in OSRS?
The fastest Prayer training in OSRS is using Dragon or Superior Dragon Bones on a Gilded Altar with both burners lit in aPOH. You can also use ensouled heads at the Arceuus Spellbook's Reanimation spells once you hit 60 Prayer.
How much does it cost to get 99 Prayer in OSRS?
Using Dragon Bones on a Gilded Altar costs approximately 150-250M GP but this depends on the current market prices. Cheaper methods like ensouled heads or Ectofuntus reduce cost, but these require more effort.
What are the best bones for Prayer training in OSRS?
Top-tier bones include:
- Dragon Bones (affordable + decent XP)
- Wyvern and Dagannoth Bones (expensive but high XP)
- Superior Dragon Bones (best XP per bone)
- Ensouled Dragon/Greater Demon Heads (via Arceuus)
Is Ectofuntus still a good method for Prayer XP?
Yes, Ectofuntus offers 4x XP per bone but requires more effort. It's the best choice for ironmen or cost-conscious players. Use Ecto-tokens, buckets of slime, and bone grinding to get the most out of mid-tier bones.
What's the best Prayer method for Ironman accounts?
If you're on an Ironman run, you should use Ectofuntus early, farm ensouled heads, and eventually work towards having your own Gilded Altar. Barrows and Slayer also provide consistent bones/heads for long-term passive gains.
Which milestones unlock the best prayers in OSRS?
Key unlocks include:
- 43 Prayer - All protection prayers (Melee, Missiles, Magic)
- 70 Prayer - Piety (melee boost)
- 74 Prayer - Rigour (ranged boost)
- 77 Prayer - Augury (magic boost)
![OSRS Gold (1M) [⏱️ 5-10 Min via In-Game Trade]](/img/tmp/product_mini_2_2939.jpg?time=1781313870)
![OSRS Services [Achievements, Fire Cape, Infernal Cape, Minigames, PvM, Raids, Quests]](/img/tmp/product_mini_2_52597.jpg?time=1781313870)

![Twisted Bow [OSRS Item]](/img/tmp/product_mini_2_3337.jpg?time=1781313870)
![Scythe of Vitur (Uncharged) [OSRS Item]](/img/tmp/product_mini_2_4419.jpg?time=1781313870)