Summoner Necromancer Build Guide - D2R 2.8 - Beginner Friendly
02.10.2025 - 14:04:41
Character Builds , Diablo 2: Resurrected , Game Guides

Do you want to command a legion of the undead to fight for you in Diablo II: Resurrected? If so, we invite you to read this article to completion!
Today, we are going to talk about a build where you act as the general, overseeing your troops as they demolish any monster that is foolish enough to come your way.
If you are interested to know more, then read further. This is our ultimate build guide for the Summoner D2R Necromancer for Season 10! Don’t forget to visit our D2R Store if you want to buy the best weapons for the Summonmancer!
Build Introduction
The Summoner Necromancer, also known as the “Skelemancer” or “Summonmancer,” is a powerful minion-based in Diablo II: Resurrected build that relies on your summoned army to do your bidding. As your undead army decimates any monster they see, you are in the background, supporting them by casting Amplify Damage and Corpse Explosion.
This build certainly packs a punch due to the powerful combination of a Summoner with fantastic skills and a minion army that is filled with unique warriors and mages that bring something new to the table.
Once you have everything set, you will be able to summon more than 30 minions at a time, filling the entire screen with subservient beings that are ready to move at your behest.
This guide will teach you the strengths and weaknesses of the build, as well as provide useful tips and gearing options for you to build an effective Summonmancer in Diablo II: Resurrected.


Strengths
1. Safety
Your large army provides an impenetrable damage-soaking wall. As such, you can freely teleport into large hordes knowing your army will soak the damage.
2. Varied Damage Types
Your undead army is filled with minions with various capabilities. The skeletons attack at melee range and deal physical damage, while your “revived” minions offer something unique depending on the monster you have brought back to life with the aptly named Revive spell.
Being a Necromancer, you have a whole host of powerful curses that you can use on a whim. For the most part, Amplify Damage and Decrepify are used to prime your enemies for the kill.
When your undead army piles the screen up with corpses, do not forget to use Corpse Explosion to deal massive damage to nearby enemies.
3. Full End-game Clear Capabilities: Terror Zones and Ubers
The Summonmancer is capable of clearing all areas in the game. Take note that the effectiveness of Corpse Explosion is reduced (due to minion HP scaling at higher player counts), so clear speed will be affected if map difficulty is set to more than four players.
If you want to farm Uber Tristram, make sure to go there with an army of Urdar minions, as they have a fairly high % chance of Crushing Blow, which quickly reduces any Boss's life. Urdars can be found in the River of Flame. You cannot miss them because their bodies resemble that of an Ogre, with a huge wooden club to boot.
4. Valuable Party Member: Aura Provision and Minion Damage Soakers
This build thrives in parties. You can simply raise your army by the corpses left behind by your party members. When playing solo, raising your army is fairly slow, but once that's done, you will be able to farm at a decent speed.
Cast Amplify Damage at enemy monsters so your summons can deal huge amounts of physical damage. In parties, other curses can be considered both for survivability and damage increase.
Lower Resist can help out elemental casters, Life Tap heals melee attackers, and Decrepify acts both as an offensive and a defensive curse by slowing enemy monsters and increasing physical damage taken. Additionally, the Summonmancers build contains useful aura from certain items, which will buff your party and minions.
5. Best 1-Point Wonder: Corpse Explosion
Corpse Explosion is one of the best map-clearing abilities in D2:R. In fact, some say that this skill is S-Tier in that regard alongside abilities like Lightning Fury (Amazon) and Blizzard (Sorceress).
More points invested in this skill only increase its radius, so putting just one skill point and allowing “+to Skill Items” to buff the radius is sufficient. This allows you to invest more points into the “Summoning” Tree.
Having said that, Corpse Explosion deals 50% physical and 50% fire damage based on a percentage of a dead monster's max HP. You should also use Amplify Damage as a curse to double the physical damage output of your summons, as well as take advantage of the physical component of Corpse Explosion.
Weaknesses
1. Slow Run Acceleration
The Summonmancer has a glaring weakness in that it takes a bit of time to ramp up. That is because you have to wait for your Mercenary to kill enemies for the initial round of corpses that are necessary to summon skeletons and revived monsters.
2. Lower Interactivity
This build is not ideal for those who want to be in the thick of things. The playstyle of the Skelemancer involves waiting in the background, casting curses when needed, and initiating Corpse Explosions to slay the minions of Hell.
3. Reliance on Expensive Items for Optimization
An optimized Summonmancer is an expensive build, relying on Runewords like Beast, Enigma, Pride, and Bramble, which require heavy investment to obtain. However, the Summonmancer is still an effective map clearer even on budget gear. That is why the build is a reliable ladder starter (though slower than Sorcs with teleport and builds with more upfront damage).
Stats
- Strength: Put just enough points on it to be able to wear your gear.
- Dexterity: Put just enough points on it to be able to wear your gear. If you play hardcore, you can put extra points on dexterity to boost your chance to block up to 75%.
- Vitality: Put all remaining points on it.
- Energy: Don't put any points on it.
Stat allocation for the Summoner Necromancer is largely the same for almost all D2R builds. Since you are going to use a popular Runeword for your main shield, you need to put 156 points on STR.
There is no definitive number of points to be allocated to Dexterity. Just look at the items that you want to use and then put points to this attribute accordingly.
Despite being a summoner, you don’t actually need Energy on this build, so leave it as is.
After you have satisfied the attribute requirements of your gear, you can dump all of your stat points into Vitality to increase your HP and stamina manifold.
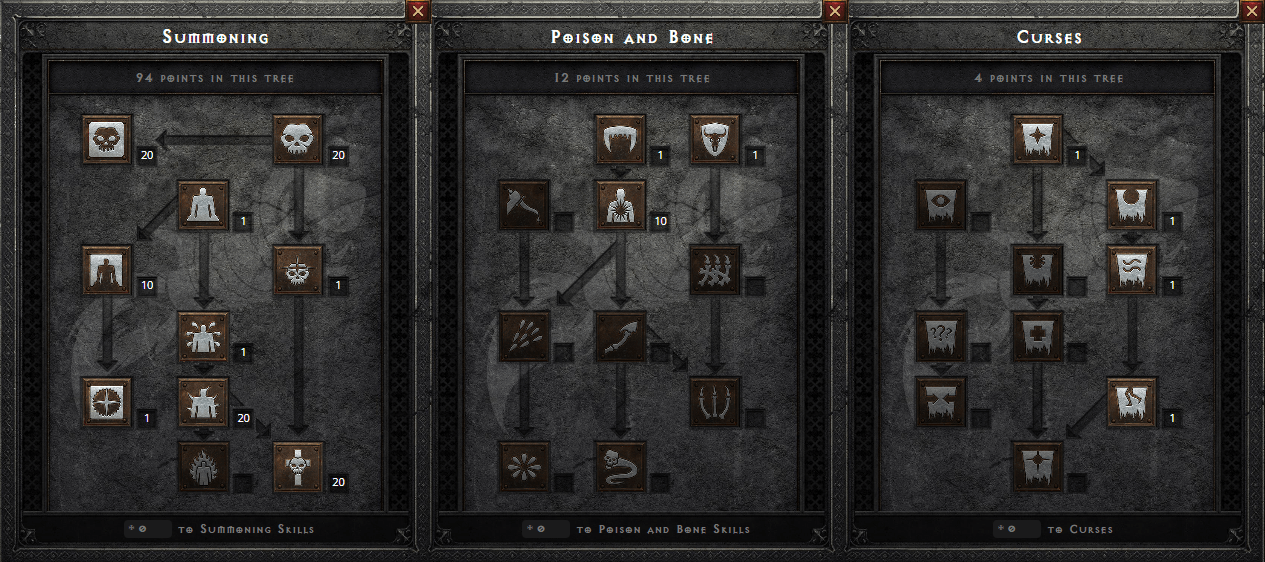
Skills
- 20 Points in Raise Skeleton
- 20 Points in Skeleton Mastery
- 20 Points in Iron Golem
- 20 Points in Revive
- 10 Points in Corpse Explosion
- 10 Points in Golem Mastery
- Put 1 point on the following skills:
- Teeth
- Bone Armor
- Amplify Damage
- Weaken
- Terror
- Decrepify
- Clay Golem
- Blood Golem
- Summon Resist
Discussion
Raise Skeleton, Revive, and Iron Golem are your primary skills on this build. The first two skills require corpses to use, so you have to wait for your Mercenary to kill the initial set of monsters to get things rolling.
Iron Golem does not require a corpse. Rather, you have to lay down a piece of armor or weapon on the ground before you can use the said skill. The Iron Golem inherits the modifiers that are on the item you have used to summon it. That is why you will use a couple of D2R Runewords, which will be discussed in greater detail later in the build guide.
Now, you are probably wondering why we have only placed 10 points on Corpse Explosion. Isn’t it one of your main skills for this build? Yes, that is true, it is actually the best damage-dealing ability that is available to the Summonmancer.
However, the reason why you only need to put a limited number of points on the skill is that Corpse Explosion damage does not scale with higher levels. The only thing that changes when you level it up is the AoE of the resulting explosion. So, unless you really want to achieve the highest AoE possible for said skill, stick to just 10 points for Corpse Explosion so that you can allocate the rest to something else.
Corpse Explosion is okay to leave at level 1 because you have items that raise the level of your skills anyway. If you are going this route, you could spend more points on Golem Mastery to further boost the survivability of your Iron Golem.
In terms of curses, you only need to focus on two: Amplify Damage and Decrepify. Use Amplify Damage because it severely reduces the physical resistance of affected monsters, making them so much easier to kill.
Decrepify is reserved for situations where you want to slow a bunch of monsters down, while also making them suffer a 50% increased physical damage taken.
A single skill point is spent on Bone Armor just as a means of improving your survivability. If you are fine without it, you can spend it on Amplify Damage or Decrepify if you want to. Heck, even Golem Mastery is nice!
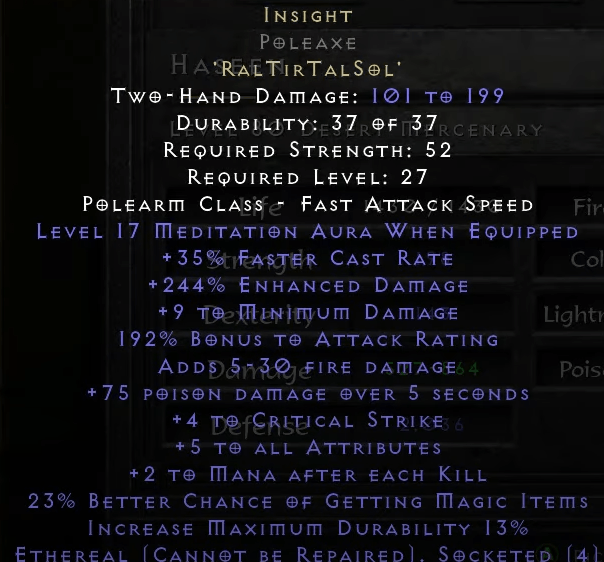
Iron Golem
The weapon or armor of choice for your Iron Golem ultimately depends on which aura you want to have activated. Insight is a popular choice for the Iron Golem given its relatively low cost, and the useful Meditation aura which will relieve you and your party of all mana problems. Given you lose your item on your golem’s death (which is triggered by your own character's death as well), it is not recommended that you make your Golem with expensive Runewords like Pride or Beast unless you have excess wealth.
In the early game, a Clay Golem is a very powerful crowd control tool against bosses, significantly slowing them down, and reducing them to near standstill when coupled with Decrepify. While Clay Golem's effectiveness is surpassed by the aura-wielding Iron Golem in the endgame, it is a fantastic low-investment option for traversing early game and leveling.
Breakpoints
Diablo II: Resurrected, being a largely 2D game, is able to produce 25 frames per second. Each skill or action in the game has its own set of animations that require certain frames to complete.
Did you know that you can actually reduce the number of frames that it takes for them to complete their respective animations? That is where breakpoints come in. There are several breakpoints in D2R, but you only really need to concern yourself with Faster Cast Rate or FCR.
Without any FCR modifiers on gear, Necromancer skills take about 15 frames to complete. That is why you should aim to have at least 75% FCR to reduce that number to just 11 frames. The next breakpoint is a bit more difficult to achieve (125%), but if you can reach that number, then your skills will only take 10 frames to finish!
Check out our Necromancer Breakpoints guide for more info.
Summoner Gear
Helmet
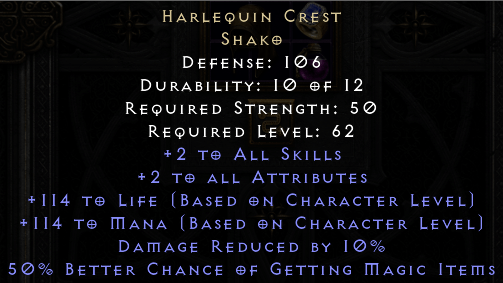
- Harlequin Crest “Shako” unique helm
A very strong option offering +2 skills which enhances your Battle Orders, as well as item auras. The extra life and mana provided by the Harlequin Crest are also helpful, along with damage reduction and Magic Find.
- Rare Circlet with +2 to Necromancer skills, 20% faster cast rate
A strong alternative that offers you more FCR to reach the higher speed breakpoints. While Necromancer skills will not increase your auras or Battle Orders, these rare or magic circlets can come with 1 to 2 sockets and/or a whole host of useful mods like life, mana, resistances, or stats.
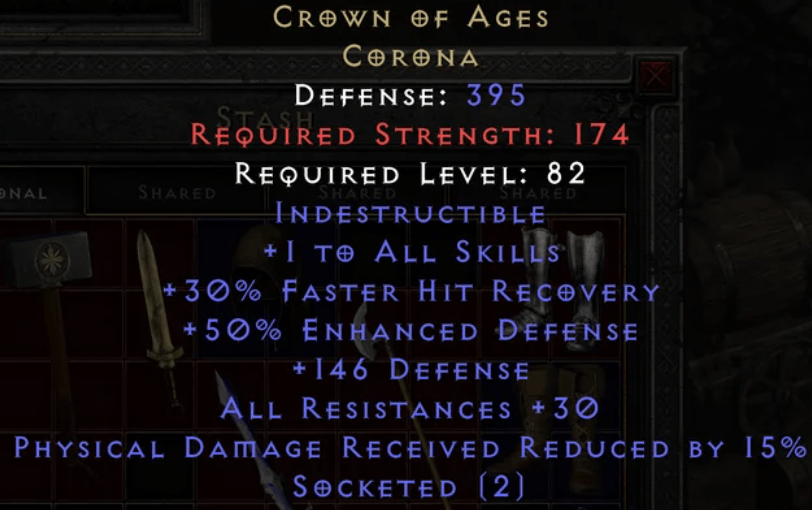
- Crown of Ages unique helm
The Crown of Ages is a fantastic hardcore or survivability-focused helmet that grants a huge boost to resistances, damage reduction, as well as offering skills and defenses. The downside is the huge strength requirement detracting from your investment in vitality, and therefore raw HP. Consider socketing the Crown of Ages with -15 requirement jewels, ideally with extra resistance mods to help offset this.
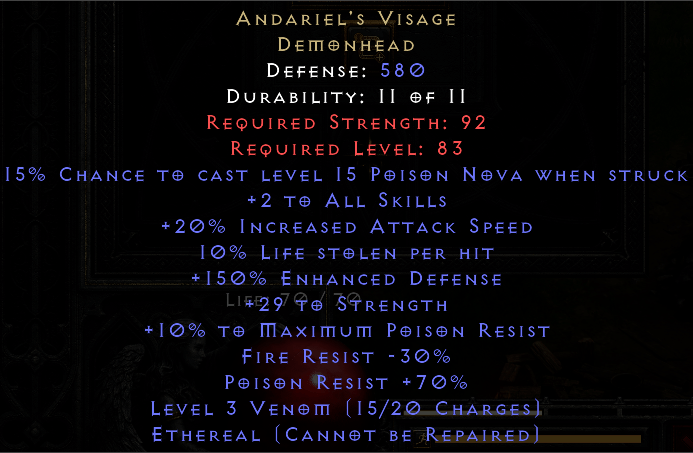
Andariel’s Visage is expensive but that is due to the fact that it provides you with a lot of useful bonuses, including +2 to all skills, 10% life leech, and +30 strength, among many others.
Now, Andy’s Visage has a downside that reduces your fire resistance by 30% when you wear the helmet. Do not worry, this can easily be addressed by inserting a single Ral rune.

Amulet
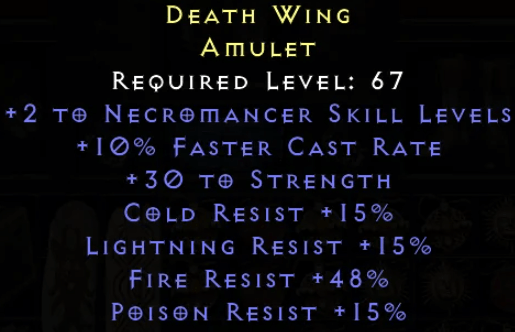
- Crafted Necromancer Amulet with +2 Necromancer skills and a 10-20% Faster Cast Rate
The amulet slot is one of the best slots in terms of pushing for important Faster Cast Rate breakpoints. FCR is crucial as it allows you to use your skills more quickly. That is why a crafted amulet with +2 to Necromancer Skills and a 20% FCR is highly sought after, particularly when you do not have high runes to trade for other amulets, that is.
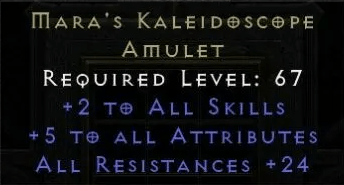
- Mara's Kaleidoscope
Mara’s Kaleidoscope is the de facto caster amulet for those not requiring FCR from this slot. The +2 to all skills is superior to only boosting Necromancer skills, and up to 30 to all resistances offer a significant boost to survivability in Hell Difficulty.
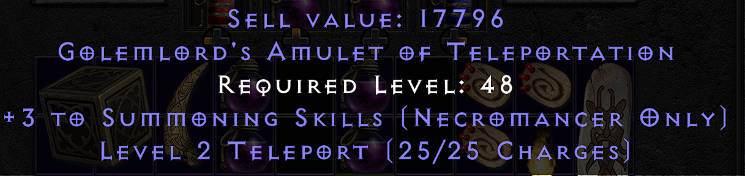
- +3 Necromancer Skills Magic Amulet
A good option that can be relatively inexpensive and easily attained via gambling is a +3 Summoning skill (or +2 Necromancer skill) magic amulet. These can spawn with one other mod, making them suitable as a temporary amulet until you can acquire a Mara's or an FCR amulet. Useful additional mods to look for are 100 life, 10% FCR, and up to 30 strength/dexterity.
Weapon
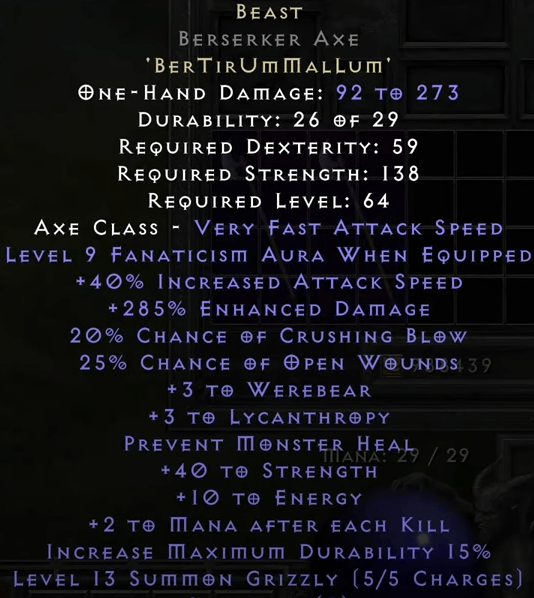
- Beast Runeword
Beast is the best-in-slot Runeword for the Summoner Necromancer in Diablo II: Resurrected. This thing is primarily used for its Fanaticism Aura, which grants a buff to your minions’ attack damage, attack rating, and attack speed.
The Runeword requires you to place the Ber, Tir, Um, Mal, and Lum runes into a five-socketed weapon, preferably a Double Axe as a base for its low attribute requirements.
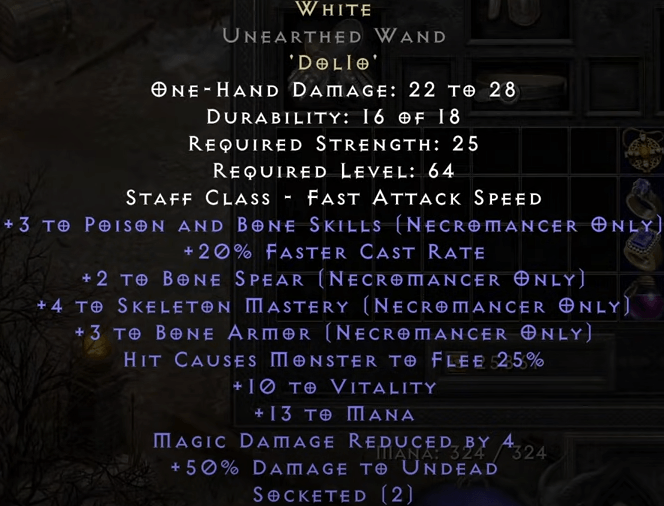
- White Runeword
If you want to attain the higher FCR breakpoints for the Necromancer, then you might want to consider using White. This is a D2R Runeword that is best known for raising the level of Skeleton Mastery by four, as well as that 20% FCR.
In order to form the Runeword, you must insert the Dol and Io runes into a wand with two sockets.
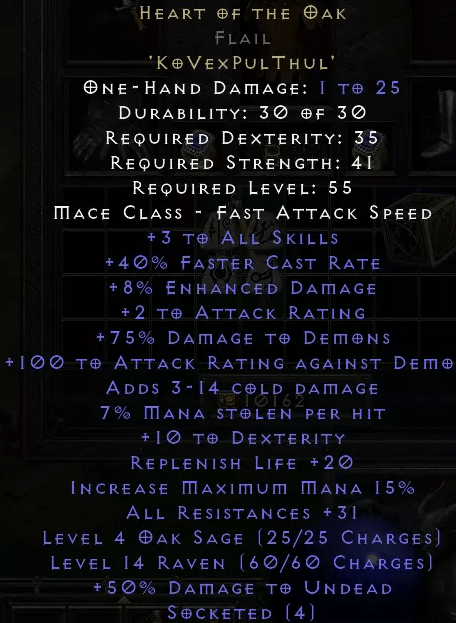
- Heart of the Oak Flail
Also known as “HOTO,” Heart of the Oak is a popular well-rounded caster weapon in D2R that offers a fantastic set of bonuses, such as +3 to all skills, +75% damage to demons, and +40% Faster Cast Rate, to name a few.
The Oak Sage charges are often overlooked but can further enhance the survivability of your entire army. Heart of the Oak enables you to reach faster FCR breakpoints, thus increasing your mobility significantly, and offering more versatility in other slots. The raw damage output, however, is not comparable to the buffs provided by Beast's Fanaticism Aura.
Anyway, grab a Flail with four sockets and put the following runes into it in the exact order: Ko, Vex, Pul, and Thul.
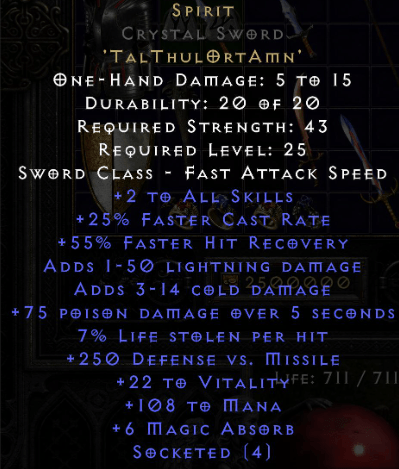
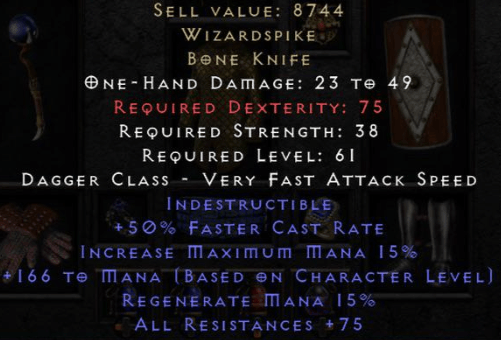
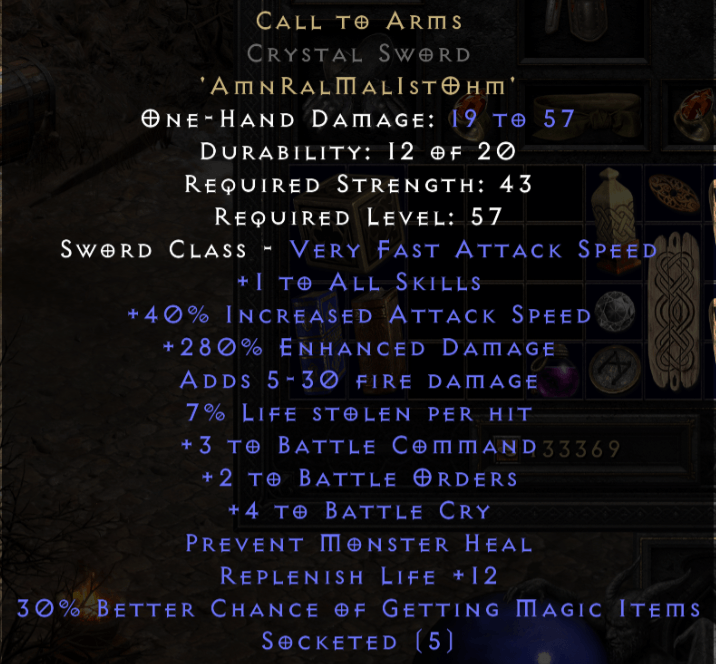
- Spirit Weapon / Wizardspike / Arm of King Leoric
Spirit is always a pretty nice Runeword for caster builds such as the Skelemancer. Its +2 to all skills coupled with up to 35% Faster Cast Rate are incredibly tough to beat for a Runeword that does not cost an arm and a leg.
If you want to use Spirit, grab a Crystal Sword with four sockets and insert Tal, Thul, Ort, and Amn runes in that order. The Crystal Sword is used as the base mainly for its relatively low stat requirements.
The Wizardspike provides you with a huge boost to FCR at 50%. That is coupled with other useful bonuses, including 15% increased mana regeneration, 15% increased maximum mana, and +75 to all-resists. The only problem here is that it requires you to have a considerable amount of dexterity. Other than that, the Wizardspike is actually not that bad for the Summoner Necromancer.
The Arm of King Leoric is specifically made for summoner builds such as the Skelemancer. Sure, it only grants a 10% FCR bonus, but all the other modifiers can benefit the build in more ways than one.

Shield
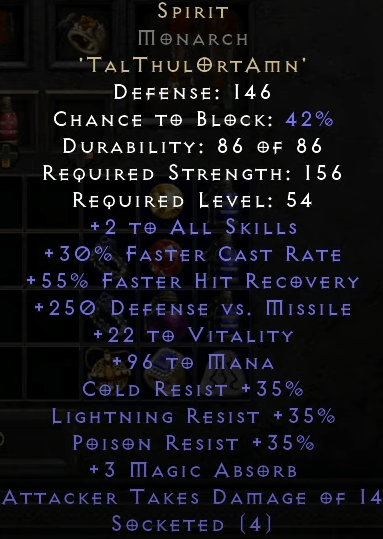
- Spirit Monarch
Spirit is the best all-around non-max block shield given its superior FCR (up to 35%), along with +2 all skills and good resistances. The big boost to mana is also a quality that is greatly appreciated by Necromancer Builds in D2R. Teleport speed should be prioritized over max block except in Hardcore Mode due to the inherent safety of the build itself. Your minion blockade will prevent attacks and missiles from reaching you while teleporting so max block's additional survivability buff is not integral here.
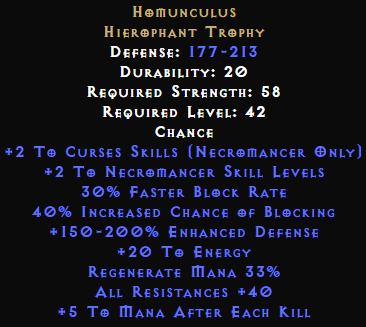
- Homunculus
Since your undead army are the ones that will kill the monsters for you, the only thing left for you to do is survive. If you want to bolster your defenses, the Homunculus is definitely something to consider.
This is a Necromancer-only off-hand item that increases your chance of blocking attacks by 40%. Even though you do not need to worry about Faster Block Rate (FBR) at all, this thing still provides you with a 30% boost.
While its defensive bonuses are great, the Homunculus is also known for raising the level of your skills by a couple of points and your curses by an additional two points.
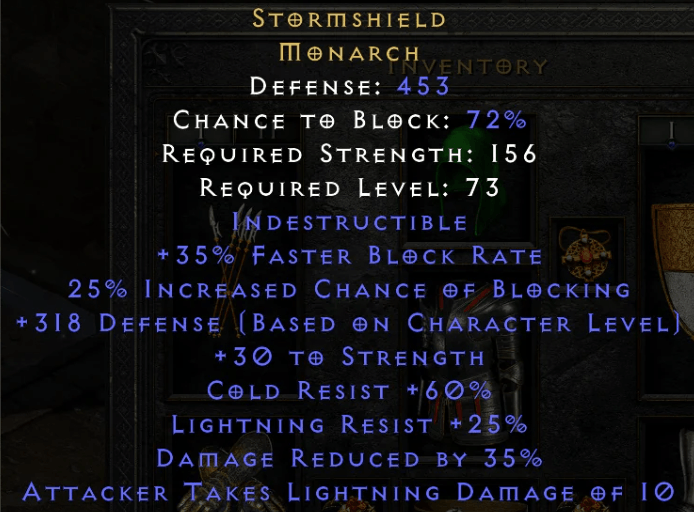
- Stormshield
If you are quite ballsy and you want to play in Hardcore, then the Stormshield is quite an appealing choice. This unique shield reduces the damage you take by 35%, which is the highest among all other items in Diablo II: Resurrected.
- Lidless Wall / Rhyme / Ancient's Pledge
While the Spirit Runeword is awesome, the Monarch Shield that is used as a base has a rather steep strength requirement. If you want a viable alternative to Spirit, then look at the Lidless Wall to see if it works for you.
The Lidless wall has the usual +1 to all skills and 20% FCR, but it does increase your mana pool by quite a bit just by wearing the shield.

As you take on the higher difficulty levels, you will encounter enemies that have the ability to freeze you to death. While wearing the Raven Frost ring is an approach used by many D2R players, the choice of rings for this build is, shall we say, already set in stone.
For this reason, you want to get the “Cannot Be Frozen” modifier somewhere else. Fortunately, there is such an item and that is in the form of a Runeword called “Rhyme.”
By inserting the Shael and Eth runes into a shield or off-hand with two sockets, you’ll get a Runeword that makes you immune to being frozen. Furthermore, you get 40% FBR, +25 to all-resists, and 25% Magic Find, among other things.

Armor
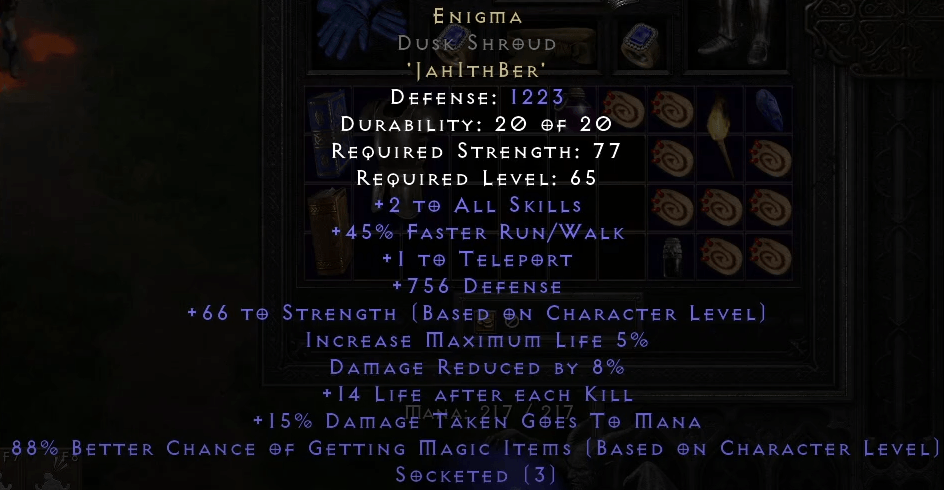
- Enigma
Enigma removes some of the Summonmancer's greatest weaknesses – his mobility, speed, and lack of agency in regard to controlling his minions' damage output. The ability to reposition your entire army, as well as quickly teleport through areas, makes Enigma a priority item and a core part of this build.
In addition, Enigma's other mods are top-tier, offering +2 to all skills, faster run/walk speed, 8% damage reduction, high-defense mods, and a huge boost to strength, thus allowing you to equip other items without investing too many points on the said attribute. Additionally, Enigma offers the highest Magic Find bonus in the game.
Even though Enigma is very useful for the Summonmancer, the runes required to create this Runeword (Jah, Ith, Ber) are on the expensive side. Therefore, only attempt this if you are willing to put a ton of investment into this body armor.
If you want to obtain this runeword the easy way, then buy Enigma directly from our D2R Store!
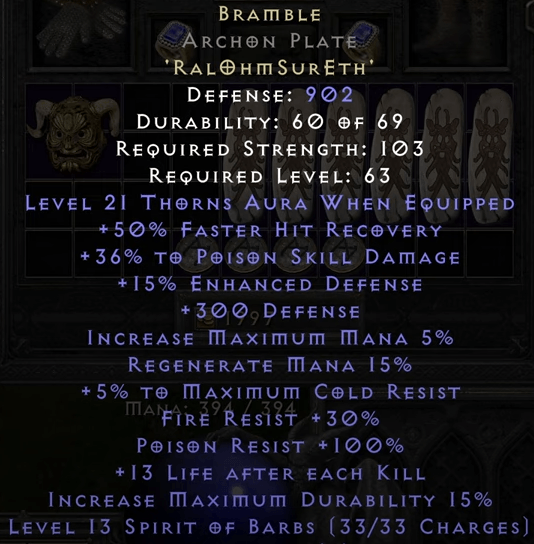
- Bramble
On the surface, you might think that Bramble is a bad recommendation for this build, but that is not the case. In fact, it is actually a viable Runeword for the Summoner Necromancer because of its ability to grant the Thorns Aura and a level 13 Spirit of Barbs.
Thorns Aura reflects the damage done by your enemies to them, which is, in itself, a clearing ability. Spirit of Barbs does the same thing, albeit in a pet form. Bramble is no slouch in the defense department because it gives +300 defense, +100% poison resistance, and a considerable +50% Faster Hit Recovery.
Now, the highest rune required for this armor is a Sur Rune, so this serves as a viable mid-game gap filler prior to acquiring Enigma. The exact order to establish the Runeword is Ral, Ohm, Sur, and Eth.

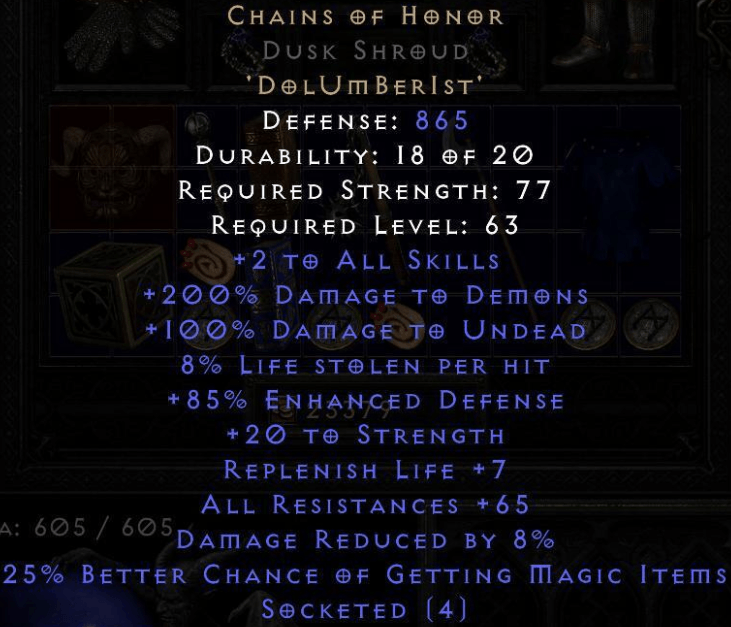
- Chains of Honor
This next body armor is amazing if you want to turn the Summonmancer into a bonafide boss killer. Chains of Honor is quite a popular Runeword for boss killer builds in Diablo II: Resurrected due to the insane damage boost against demons and undead monsters.
On top of that, Chains of Honor grants +2 to all skills, +65 all-resists, and 8% damage reduction. That tiny increase in Magic Find (25%) is a welcome bonus nevertheless.
If you are willing to let go of the teleport skill in favor of a huge damage boost against most of the monsters in the game, then Chains of Honor will not disappoint!
- Skin of the Vipermagi
If you care about achieving high FCR numbers, then you might be interested in wearing the Skin of the Vipermagi. This unique body armor boasts the highest FCR value in this equipment slot. This is coupled with other useful bonuses, including +1 to all skills, +120% Enhanced Defense, and a small reduction in magic damage received.
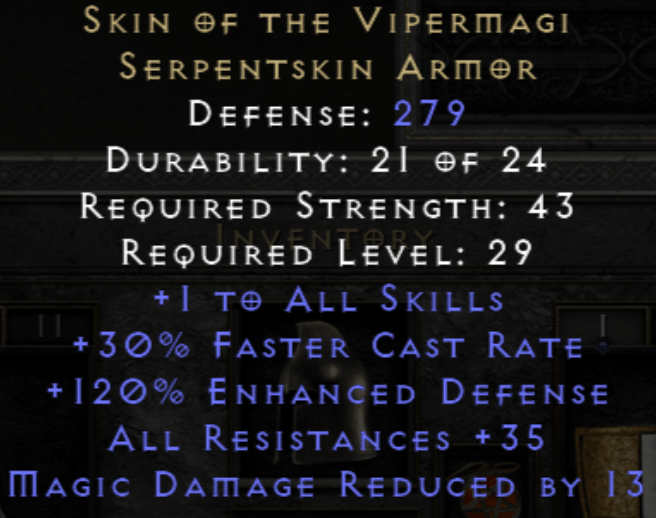
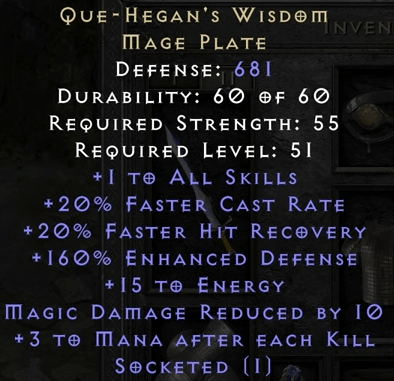
Skin of the Vipermagi could be very expensive, especially at the early stages of a Ladder. For this reason, you can opt for Que-Hegan's Wisdom instead. This body armor has almost the same set of modifiers as that of Skin of the Vipermagi, though without the resistance bonuses.
Belt
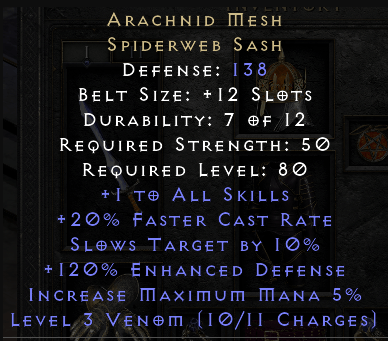
- Arachnid Mesh unique belt
Do you want to wear as many items with FCR and additional skill levels? Well, you are in luck! There is only one belt that satisfies your requirements and that is the Arachnid Mesh. This is the only item in the game that has Faster Cast Rate and +1 to all skills.
Although the above-mentioned modifiers are already great, the Arachnid Mesh also has the added benefit of slowing nearby monsters by 10%. When you use Decrepify, the degree of slowness that your enemies experience is enhanced even further!
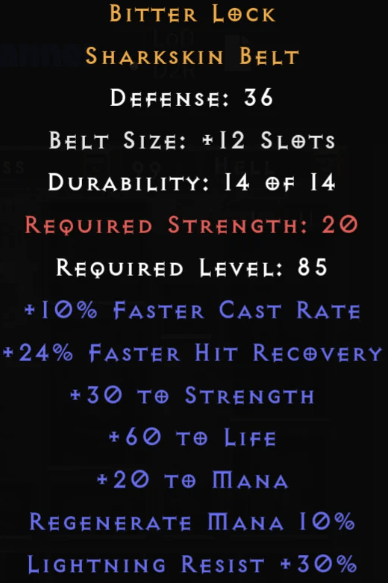
- Crafted Caster Belt
You can craft belts specifically for caster or summoner builds in D2R by taking advantage of a Horadric Cube Recipe. Grab a belt of magic rarity and put it inside the Horadric Cube along with a Perfect Amethyst, an Ith Rune, and a jewel of your choosing. Once you are done, you should have a belt that looks something like this:
Rings
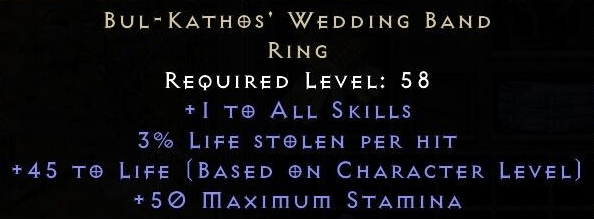
- Stone of Jordan / Bul-Kathos' Wedding Band
The standard +1 skill rings are most predominantly used, with the wearer choosing between Mana (SOJ) or additional life for survivability (BK).

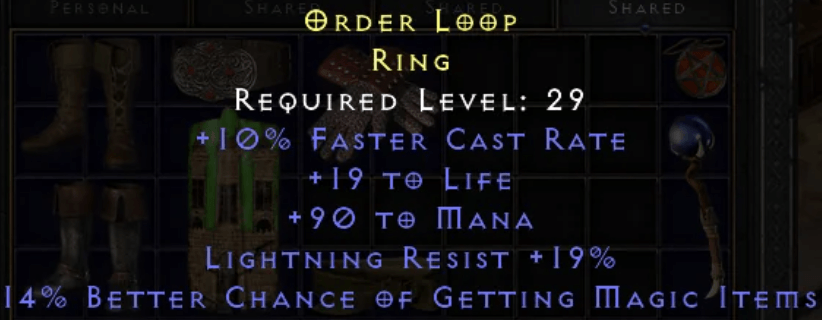
- Rare ring with FCR and other mods
Where additional FCR is required to meet teleporting breakpoints, a rare FCR ring with other mods will ideally be used. Other great mods to look for (up to 6 including FCR) are: Life, mana, all resistances, individual resistances, mana after kill, replenish life, and raw stats.
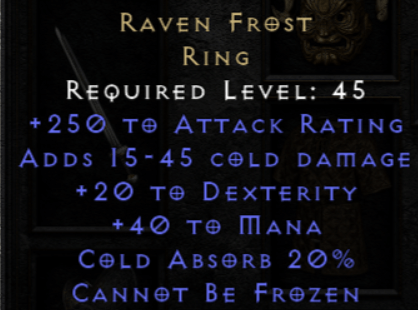
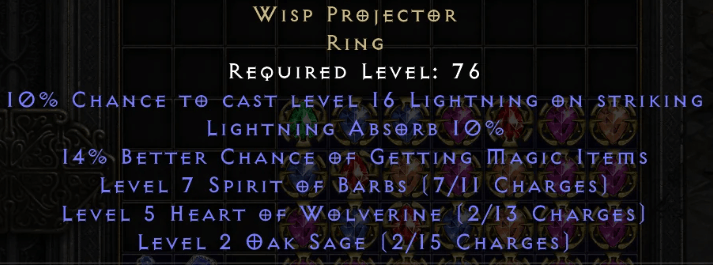
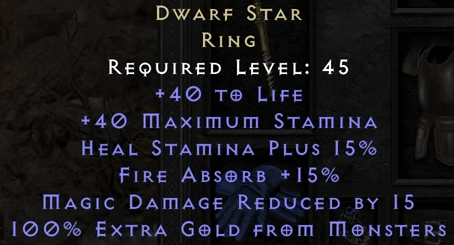
- Raven Frost / Wisp Projector / Dwarf Star
Absorb rings like raven, wisp, and dwarf are fantastic for specific areas where one elemental type is dense (i.e. Souls). Wisp offers the added benefit of Oak sage charges which are great for your army. Use these rings as required to traverse particularly challenging areas.
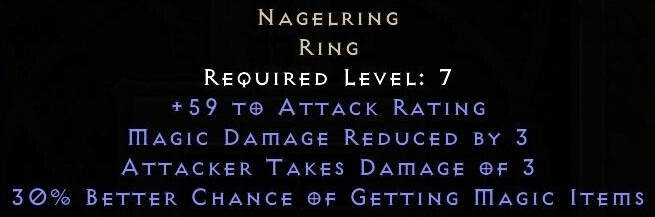
- Cheap FCR ring / Nagelring
Cheap FCR rings with minimal mods can be substituted when you require FCR but do not have a good end-game ring. The Nagelring is great as a temporary accessory to boost magic finding until you can acquire better gear. Magic rings can also drop with up to 40% MF.

Gloves
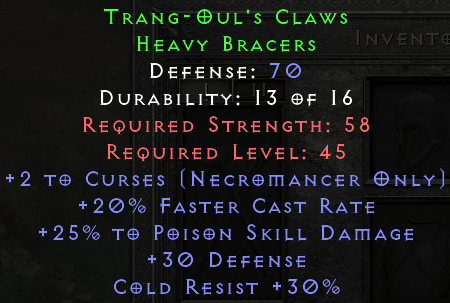
- Trang Oul's Claws
Trang-Oul's Claws is part of a complete set, though you are only wearing the gloves because of their useful modifiers, including 20% FCR, +30% cold resistance, and +2 to curse skills.
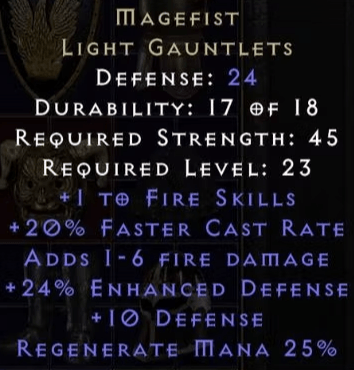
- Magefist unique gloves
A viable option offering the same FCR as Trang-Oul's gloves, with mana instead of curse skills and resistances. If you are struggling with mana issues, you may consider wearing the Magefist.
Boots
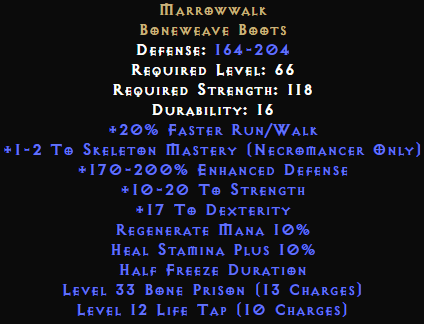
- Marrowwalk unique boots
Marrowwalk is a fantastic pair of boots that you can use for the Summonmancer. If you manage to get a pair of perfectly rolled boots, you will get an additional two levels added to Skeleton Mastery.
These unique boots are for utility purposes as well. The level 33 Bone Prison lets you encase monsters in place, which is useful for escaping tough situations, or ensuring that your intended target is not going anywhere. You can replenish the charges by repairing the boots.
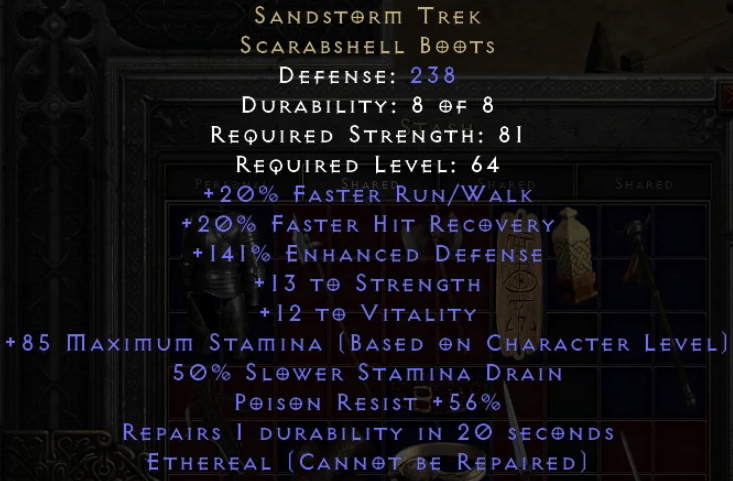
- Sandstorm Trek
This next pair of boots works great if all you want is a summoner that can take a beating. The Sandstorm Trek provides a considerable increase in strength and vitality. More importantly, you gain 20% FHR and 20% FRW, making these boots a solid choice for the Skelemancer.
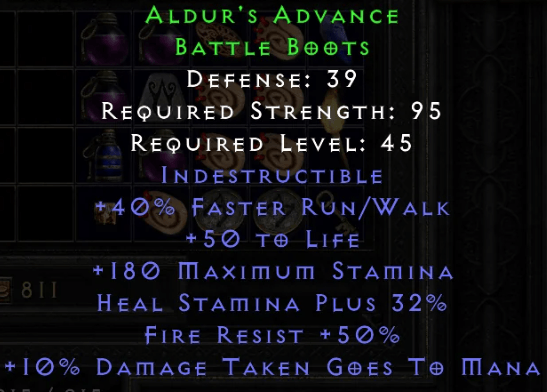
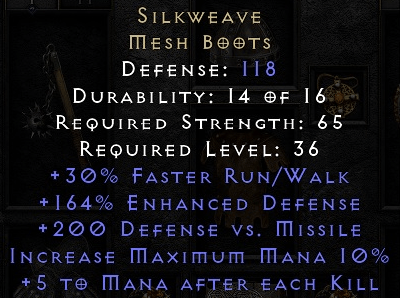
- Aldur's Advance / Silkweave / Treehaunch
There are a few relatively affordable choices when it comes to the boots for the Summoner Necromancer. For one, Aldur's Advance gives a good amount of HP, faster run/walk speed, fire resistance, and stamina. This is more for defense, but you can never go wrong if you decide to wear Aldur's Advance.
If you are struggling to sustain mana somehow, then the Silkweave is an incredible choice. This pair of boots increases your maximum mana and grants a small amount of mana back every time you and your minions kill a monster.
Charms
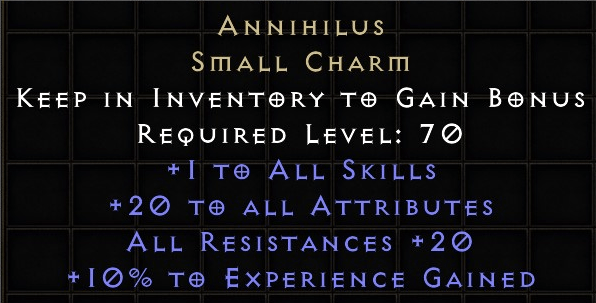
- Annihilus unique small charm
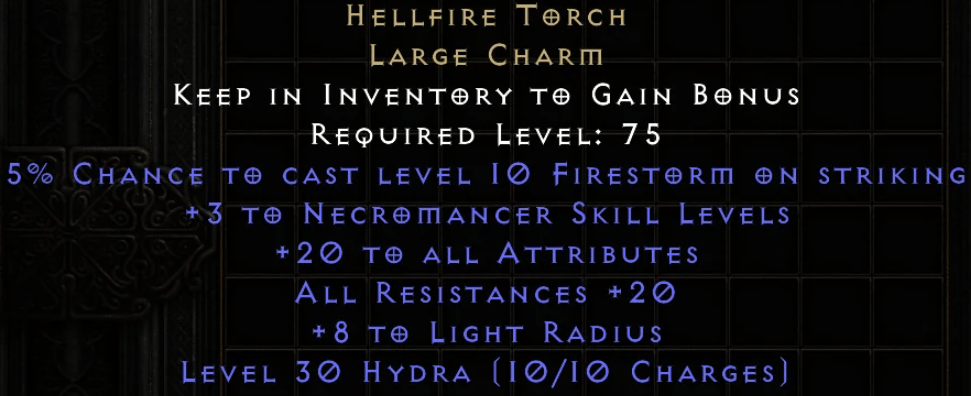
- Hellfire Torch unique large charm
- +1 to Necromancer Summoning Skills grand charm (look for additional mods like life, or FHR)
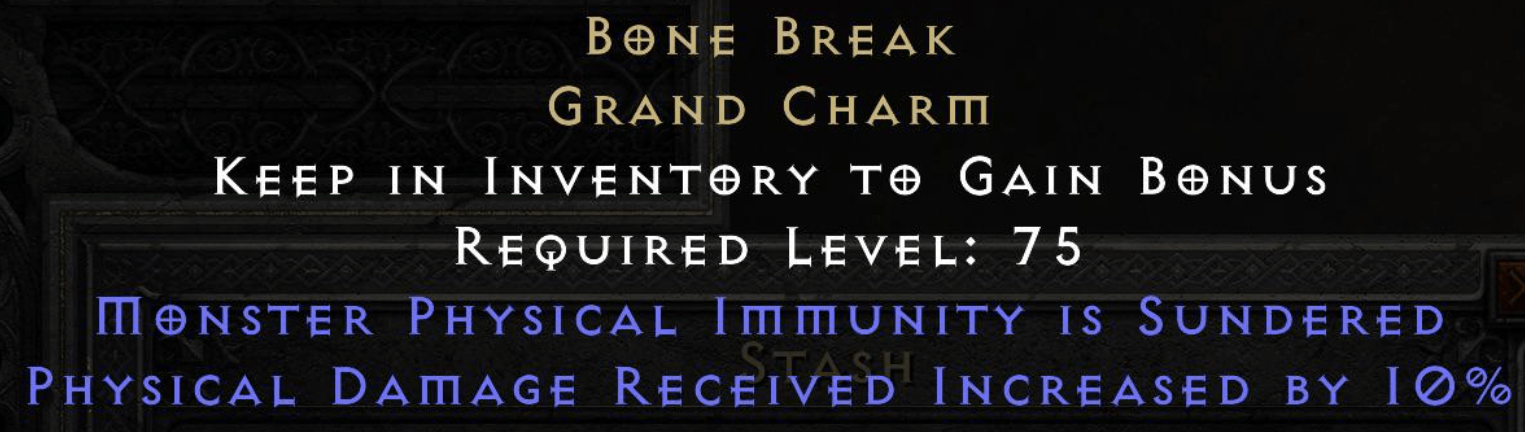
- Bone Break Sunder Charm
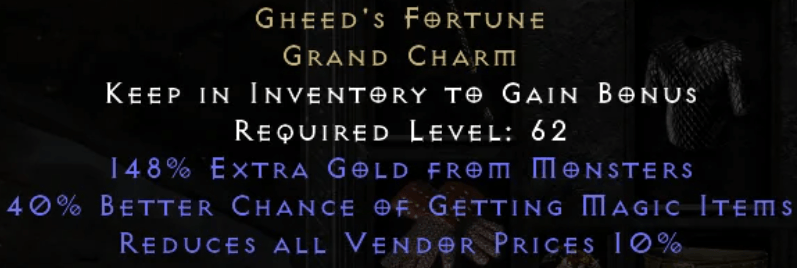
- Gheed's Fortune unique grand charm
- Magic small charms with resistances and life or FHR and resistances
- 7% to magic find magic small charms, look for additional resistances
In Diablo II: Resurrected, there is great value in putting as many charms you can fit in your inventory as possible. However, there are several charms that you must obtain, pronto!
The first is Annihilus—a unique small charm that raises the level of your skills by one, as well as provides you with +20 attributes and +20 all-resists.
On the topic of raising skill levels, the Hellfire Torch is pretty good in that regard because it does that by increasing your skill levels by three! If you are going to purchase this from someone, make sure to get one that is specifically for the Necromancer.
Your skeleton minions, Iron Golem, and revived monsters mostly deal physical damage. When you play D2:R in Hell Difficulty, you will occasionally encounter enemies that are immune to the said damage type. For this reason, put the Bone Break Sunder Charm in your inventory so that you can easily deal with such monsters without a hitch.
To maximize the effect of Bone Break, be sure to cast Amplify Damage on the monsters to further reduce their resistance to physical damage, making them a lot easier to kill.
Gheed's Fortune might not make sense to you given that this is not a particularly MF build. However, you can still benefit from it thanks to the bonuses it provides.
Switch Weapon / Shield
- Call to Arms
- Spirit Monarch
Spirit needs no introduction. It is the same Runeword mentioned earlier, but it returns here mainly to buff Call to Arms. Speaking of which, Call to Arms is a popular Runeword in Diablo II: Resurrected because it gives you the ability to cast Battle Command and Battle Orders.
The way both of these Runewords work is that you do a weapon swap by pressing "W" on the keyboard and then casting the said skills mentioned above. After which, simply press "W" again and you are good to go!
Keep an eye out on the buffs and make sure to recast them when they fall off.
Mercenary
The Act 2 Offense Mercenary is the perfect companion for the Summonmancer, mainly due to its high-level Might Aura. Do not hire a Merc that has Holy Freeze because you need the corpses for Corpse Explosion and for summoning your minion army.
Ethereal items don't lose durability if your mercenary wears them, so having ethereal item bases for each gear slot is preferred due to their increased defense on armor items and increased damage on weapons. In many instances, ethereal items that are great for Mercenaries will be much more expensive than non-ethereal ones.
Mercenary Gear
Helm
- Andariel's Visage
Andariel's Visage is the BiS helmet for the Act 2 Mercenary. The desert Merc will find great value in that 20% increased attack speed (IAS) bonus. Besides that, the faster attack speed makes great use of the helmet's inherent 10 life leech (LL).
Weapon
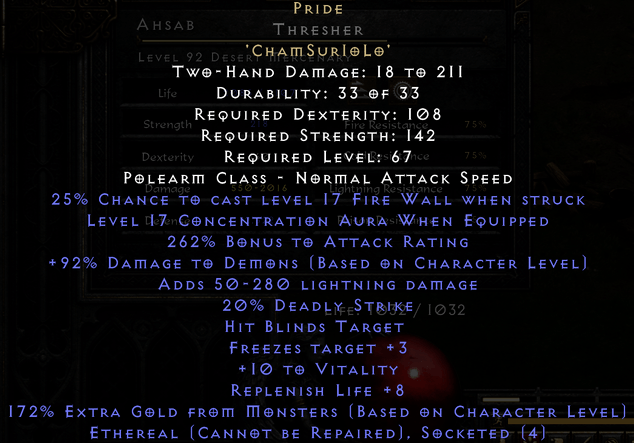
- Pride Runeword
Pride is a powerful Runeword offering the wielder Concentration Aura up to level 20 (345% bonus damage). This aura stacks with the other auras on your character, making this a solid weapon that your Merc can wield. The other mods on this Runeword are lacking when compared to some of our other options, but the Concentration Aura pretty much makes up for its shortcomings.
The Pride Runeword requires a four-socketed weapon and the following runes: Cham, Sur, Io, and Lo.
- Insight Runeword
Theoretically, an Insight, Cure, and Prayer-based A2 Merc has incredible synergy as these abilities stack with each other. However, forgoing Might is suboptimal, even when using an Iron Golem with the Pride or Beast Runewords.
Armor
- Bramble
Given that the Act 2 Mercenary fights in melee range, you can actually have him wear body armor with the Bramble Runeword. The Thorns Aura provides an interesting way of eliminating the forces of evil. The hefty boost in fire and poison resistance ensures that your Merc will not die when fighting against Act 4 monsters anytime soon.
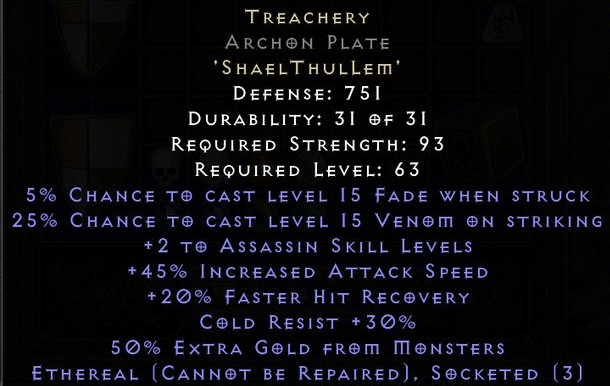
- Chains of Honor / Treachery
Chains of Honor is a great option if you are having merc survivability issues in the endgame, while Treachery is a great early- to mid-game option for general survivability.

Leveling
Leveling with a Summonmancer is relatively simple as your skills progress uniformly with your primary summons (Skeletal Warriors) being available from level 1. As such, you can focus on buffing them as you level. If you find that your summons are ineffective at certain points during your leveling journey, you may consider reallocating your points to Poison or Bone skills to get over the hump.
This can be particularly helpful for act bosses such as Duriel, which can quickly wipe your army of summons if you're not careful. Your mercenary is very important as well, so remember to hire one as soon as possible to enhance your army's strength. If you are participating in party play, make sure you allow your minions to tank for your allies.
Beast and Bramble Summon Necro
This video provides a detailed guide on building a powerful summon Necromancer in Diablo 2 Resurrected, highlighting the use of Beast and Bramble rune words for enhancing minions with Fanaticism and Thorns auras. The creator explains optimal skill and gear setups, emphasizing the importance of maximizing Raise Skeleton and Golem Mastery while utilizing gear like Berserker Axe and Spirit Shield for increased damage and survivability. The video showcases the build's effectiveness in high-difficulty areas, demonstrating its formidable magic find capabilities and efficient corpse explosion strategy.
Final Thoughts
The Summoner Necromancer is a fun build to play in D2R, especially if you are the type of person who wants to command a legion of undead minions.
Although it takes a bit of time to ramp up due to the fact that you have to wait for corpses to show up, the Skelemancer is quite powerful once you get things rolling.
This build uses a wide variety of items, so it is up to you which ones work best for your current setup, as well as your budget.
If you're on the race to the top of Ladder Season 10, check out our store for the latest Ladder Gear, which is updated daily.
![Necromancer - Summoner Build [Build Gear Pack]](/img/tmp/product_mini_2_42487.jpg?time=1781716476)
![Harlequin Crest Shako (Ladder) [Helms]](/img/tmp/product_mini_2_45394.jpg?time=1781716476)
![Crafted Amulet [2 Necromancer Skills & 20 FCR]](/img/tmp/product_mini_2_61364.jpg?time=1781716476)
![Beast [Runeword Runes Pack]](/img/tmp/product_mini_2_41257.jpg?time=1781716476)
![Heart of the Oak Flail (Ladder) [Heart of the Oak]](/img/tmp/product_mini_2_45449.jpg?time=1781716476)
Concerned Purchaser
22.01.2022 - 12:39:43
Gud !