Mosaic Martial Arts Assassin D2R 2.8 Build Guide
15.11.2025 - 23:50:13
Character Builds , Diablo 2: Resurrected , Game Guides

Welcome to our comprehensive Mosaic Assassin D2R build guide. This guide will cover all the essential information you need to know to become a skilled Mosaic Assassin in Season 12.
As a beginner, this guide will help you understand the class's skills, stat allocation, gear options, leveling strategies, and endgame content. Follow the guide, and you'll be on your way to becoming one of the most viable, fastest clearing characters in the game, capable of tackling any area in Hell, including Ubers and Dclone.
Since this build requires a particular runeword, you might want to go to our D2R Store and buy Mosaic from us. This is so that you can enjoy what the build has to offer without going through the hassle!
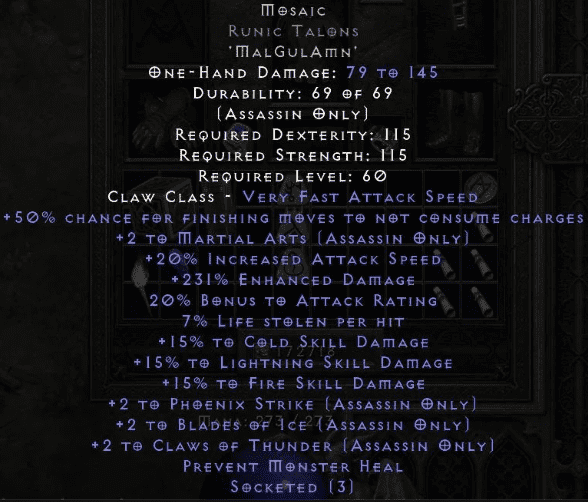
The Mosaic Runeword (Mal + Gul + Amn in a 3 socket Claw base)
+ 2 to Martial Arts Skills
20% Increased Attack Speed
200 - 250 Enhanced Damage
20% Bonus to Attack Rating
3-14 Cold Damage
Prevent Monster Heal
*50% chance not to consume charges on striking for your Finishing Moves
Let's take a closer look at the stats of this runeword. Compared to other claws, like Bartucs, Ghostsin runewords, or even some rare/magic claws, Mosaic offers minimal utility or damage at face value. However, the main selling point of Mosaic is its unique effect, where you have a 50% chance not to consume any of your built-up charges when using your finishing moves.
Take note that a claw in Diablo II: Resurrected is a one-handed weapon, which means that you get a full 100% chance to not consume charges if you dual-wield Mosaic, allowing you to kick monsters with powerful effects!
With Mosaic, you only have to worry about the duration of the charges themselves, which is roughly 15 seconds. To keep them going, you have to hit an enemy with any of your “charge-up” skills once every 14 seconds.
Now, unlike other cookie-cutter builds, the Mosaic Assassin is incredibly versatile in how you can build her. The versatility of her build tree also means there is less reliance on “core” items found in other builds.
Enigma is nice but not mandatory given she can teleport towards the enemy with Dragonflight, and Infinity is not required as she has the most varied damage profile in the game (encompassing physical, lightning, fire, cold, and even poison).
However, this does not mean that you shouldn't use those items. If anything, we actually recommend that you do. What we are saying is that you have plenty of options to choose from, so you are not really forced into using only one or two choices for each gear slot.
Despite its many variations, we are going to focus only on a build that utilizes Dragon Talon as the finisher. This will be discussed in greater detail later on in the build guide.


Class Overview
The Mosaic Assassin is a versatile and powerful Assassin build in Diablo II: Resurrected that excels in both single-target and AoE damage thanks, in large part, to its “charge-up” skills.
Fists of Fire, Claws of Thunder, Blades of Ice, and Phoenix Strike enable the Assassin to build up to three charges each, which will then be unleashed by using Dragon Talon.
Additionally, by dual-wielding a couple of claws with the Mosaic runeword on them, you have a 100% chance of not consuming charges when using your finishing move (in this case, the Dragon Talon).
Of course, you can definitely try out the other finishing moves in the Assassin's Martial Arts tree. However, for the purposes of this build guide, we are only going to hone in on Dragon Talon since it is the most popular and widely used.
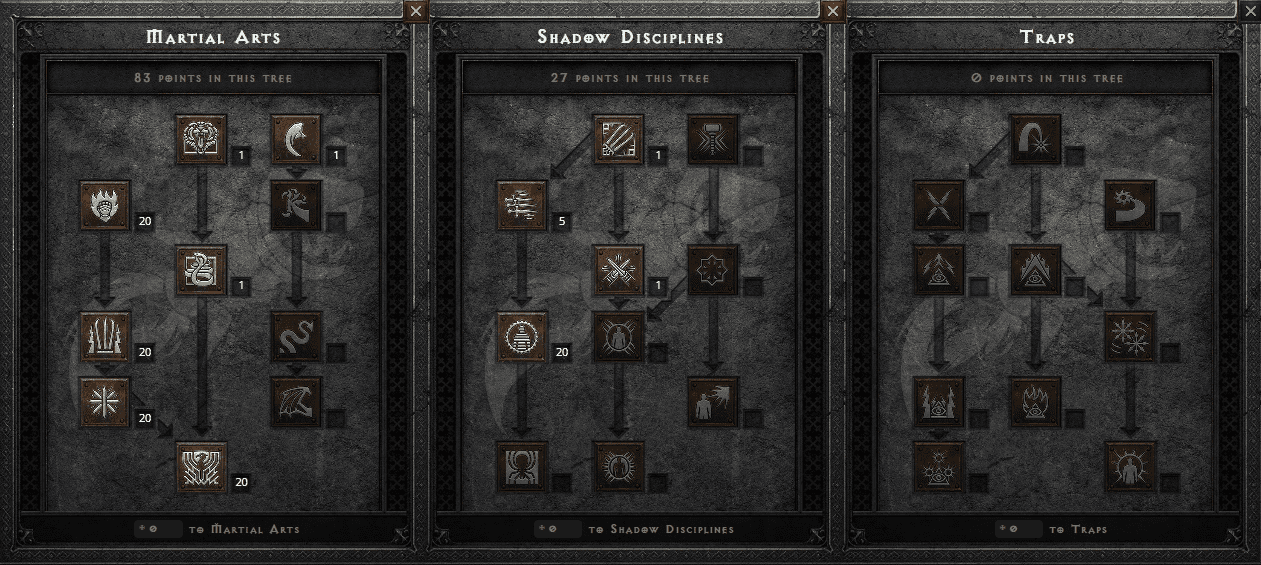
Skills
The core skills for the Mosaic Assassin are contained within the Martial Arts tree, with your support abilities contained within Shadow Disciplines.
Martial Arts Tree
The build suggestion here will be for the meta elemental-based build using Phoenix Strike as your main charge-up skill. If you are opting for a different build or using some of our alternative suggestions, consider tinkering with these skills depending on your preferences and choice of gear.
Tiger Strike (1): This is mainly taken as a prerequisite, but you can also utilize this to boost the damage of your preferred finishing move
Dragon Talon (1): For this build, you are going to use Dragon Talon to utilize all of the charges you have built up. This is your only finishing move, at least, in this variation of the Mosaic Assassin. This gives you the ability to kick a certain target four times, unleashing all of your pent-up charges for insane amounts of damage.
Fists of Fire (~20): This is one of your “charge-up” skills. Every time you use Fists of Fire and you're able to land successful hits with it, you create a couple of charges (due to dual-wielding Mosaic weapons). You can build up a maximum of three charges, with the third charge granting the ability to unleash an AoE fire explosion that leaves behind a patch of flame, dealing fire damage to those who stand on it.
While not explicitly stated in the skill's description, Fists of Fire converts your physical damage to fire damage at a rate of (its current skill level * 3). For example, if you have a level 34 FoF, you will essentially convert all of your physical damage to fire damage as a result.
Now, you could achieve a level 34 FoF for maximum damage. However, because all of your attacks will be converted, you can no longer enjoy any life/mana leech simply because the said mechanic only affects physical attacks, not elemental ones.
That said, if you rely on life/mana leech for sustain, make sure that Fists of Fire has a level of below 32 (with skiller Grand Charms and other +skill items accounted for).
Fists of Fire provides synergy to Phoenix Strike at +10% fire damage and +6% burn damage per skill level.
Cobra Strike (1): Primarily taken as a means of unlocking Phoenix Strike later on, Cobra Strike is actually more useful than you think. This skill enhances your Dragon Talon by granting it the ability to leech life and mana from enemies.
It is important to remember that if you are to utilize Cobra Strike as a means of sustaining your character, you have to reduce the level of Fists of Fire accordingly so as to not convert all of your physical damage to fire damage.
Claws of Thunder (20): One of the most powerful synergies to Phoenix Strike, Claws of Thunder allows you to build up to three charges (similar to Fists of Fire). The second and third charges, in particular, give Dragon Talon the power to punish monsters with Charged Bolts and a lightning Nova at the same time.
Now, if you are unaware, Claws of Thunder is a skill that is subject to a 4-frame Next Hit Delay (or NHD). As a result, your primary target that is hit by Dragon Talon may not take damage from Charged Bolts and the Nova from Claws of Thunder. Unless Blizzard makes suitable changes to this, the only way to fully utilize the 2- or 3-charged CoT is by hitting another target in the hopes of damaging your previous target with the Nova and Charged Bolts.
Anyway, Claws of Thunder gives +8% lightning damage to Phoenix Strike per skill level.
Blades of Ice (20): A useful charge-up skill, Blades of Ice gives you the power to unleash an AoE cold explosion that freezes nearby enemies. Again, this effect is unlocked by building up three charges and using Dragon Talon.
Having said that, Blades of Ice amplifies Phoenix Strike's cold damage at +8% per skill level.
Phoenix Strike (20): Your primary charge-up skill for the Mosaic Assassin, Phoenix Strike prepares your Dragon Talon and amplifies it with powerful elemental energies.
This skill only launches the active charge. This means that if you currently have two charges, using Dragon Talon unleashes a Chain Lightning (from Phoenix Strike) only.
Phoenix Strike gains even more power if you have built up charges using the other charge-up skills mentioned above. We know that pressing each and every charge-up skill is a cumbersome process, but you only have to use them once per run because Mosaic does not consume those charges when you use a finishing move.
For efficiency, you can just use Cobra Strike to gain three charges and then Phoenix Strike before you use Dragon Talon. This ensures that you have some sustain thanks to Cobra Strike's inherent life/mana leech.
Shadow Disciplines Tree
Claw Mastery (1-20): We recommend that you only put one skill point on Claw Mastery for this particular version of the build so that you can improve the effects of your active skills. However, given that this passive skill increases your damage, attack rating, and critical strike chance, you can put more than one point into it, especially if you are going for the physical damage variant of the Mosaic Assassin.
Burst of Speed (1-5): Boosts attack and movement speed. This can be used to hit certain breakpoints where required. Enigma largely negates the need for additional FRW buffs, but BoS is particularly helpful where Enigma is not used.
For our version of the build, we recommend that you spend five points on this skill to significantly increase your attack speed, allowing you to build up charges more quickly.
Fade (20): An ability that significantly increases your tankiness, use this where additional resistances and/or damage reduction is required. Particularly useful for difficult areas like Ubers.
Since you can use Sunder Charms on this build, maxing out Fade to address the heavy resistance penalty of the said items makes sense.
Weapon Block (1): With your insane attack speed wielding dual claws, the only thing really left for you to do is to improve your survivability and that is what Weapon Block provides.
This passive skill essentially lets you block attacks just by using two claws at the same time. And no, you do not have to worry about spending a lot of points on DEX to improve block chance because that is not necessary for Weapon Block.
Mosaic Assassin Skill Build
Playstyle
The Mosaic Assassin is a Martial Arts master. But, in order for her to unleash her full potential, she must use several charge-up skills to make her finishing move even more potent.
For our particular version of the build, you typically use Phoenix Strike and Cobra Strike to kill normal mobs. If you encounter elites or bosses, you have to use every single charge-up skill mentioned in the previous section of the build guide.
Since Mosaic has a unique effect that basically makes it so that charges are not consumed when using a finishing move, you only have to worry about the duration of the charges. With this in mind, use any of the charge-up skills at your disposal just to keep all of your charges alive (roughly every 14 seconds).
Stat Allocation
Strength: Enough to equip your desired gear.
Dexterity: Enough to equip your claws
Vitality: All remaining points should go here to increase your survivability.
Energy: Not required; focus on items and charms with mana, mana regeneration, or leech to meet your required mana sustain needs. This will depend on individual preferences. Mana after kills is a particularly useful mod on this build given the high kill volume/speed of Mosaic Sins.
Breakpoints
There are two different breakpoints that you need to be aware of when playing the Mosaic Assassin build in D2R. The first is Faster Cast Rate (FCR) and the second is Increased Attack Speed (IAS).
Having said that, you will need about 65% FCR to make Teleport (from Enigma) a lot smoother to use. Additionally, there is no specific breakpoint for IAS; you just stack as much attack speed as you possibly can. By doing so, you gain charges rather quickly, so you can focus on kicking your enemies to the depths of Hell instead of spending so much time building charges.
Gear
The Mosaic Martial Arts Assassin has plenty of room for flexibility when it comes to gearing options. The only common denominator is the weapon you are going to use. For everything else, you have the freedom to choose whichever item you want.
If you want some recommendations, be sure to read the entire gear section to learn more.
Weapons
1. Dual Mosaic Runic Talons
Mosaic is your bread and butter for this build. This runeword was buffed several patches ago where each claw grants a 50% chance for finishing moves to not consume charges. This effect is stackable, which means that if you equip two claws with this runeword on them, you will get the full 100%!
Having said that, we highly recommend that you use a pair of three-socketed Runic Talons. Why? Because this weapon has the highest base attack speed among the elite katars in D2R.
If you are wondering why the claws need to have a few sockets, it is because you need to put the Mal, Gul, and Amn runes inside, which are socketed in the exact order they are mentioned.
Armor
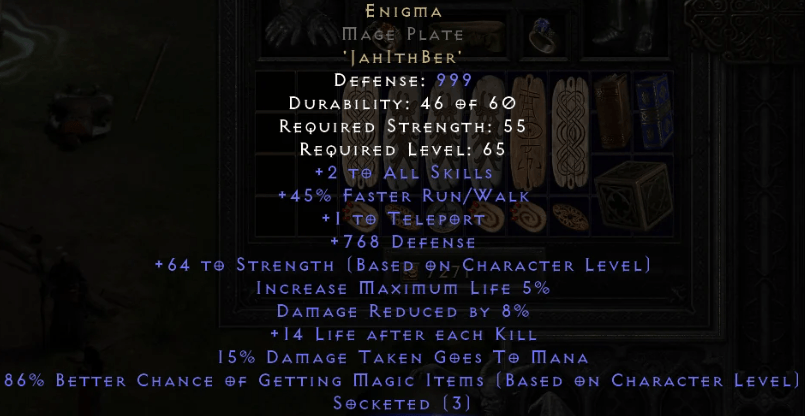
1. Enigma
While not necessary, Enigma is still one of the best, if not the best option. Teleport will help you maintain charges by shortening the time it takes to find new mobs to engage. This is quite useful, especially if you do not have Dragon Flight allocated for mobility.
Teleport is not the only thing that's great about Enigma, though. This runeword also grants 45% Faster Run/Walk speed (FRW), which helps you move around town more quickly.
On top of that, Enigma bolsters your defenses by providing you with an 8% damage reduction.
The only problem with Enigma, really, is its price. You see, this runeword requires some pretty expensive runes, including Jah, Ith, and Ber.
If you do not mind the price, Enigma is definitely one of the best for the Mosaic Martial Arts Assassin. Better yet, purchase Enigma directly from our D2R Store and save yourself the trouble of farming those extremely rare runes!
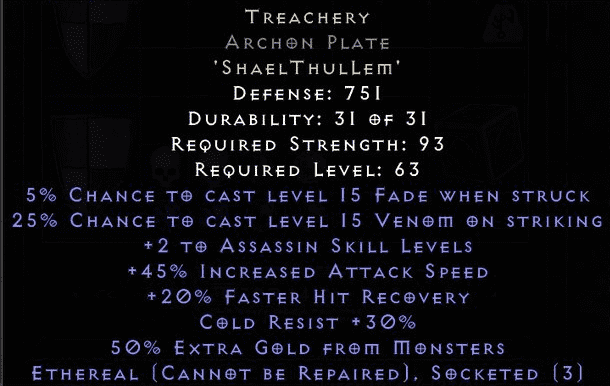
2. Treachery
Treachery is a fantastic low-cost option that provides good all-around defensive stats, and a high-level Fade proc (less useful on an Assassin). The Increased attack speed is helpful and not found in other armor options. Use this in early leveling or until you can farm one of the other armor runewords.
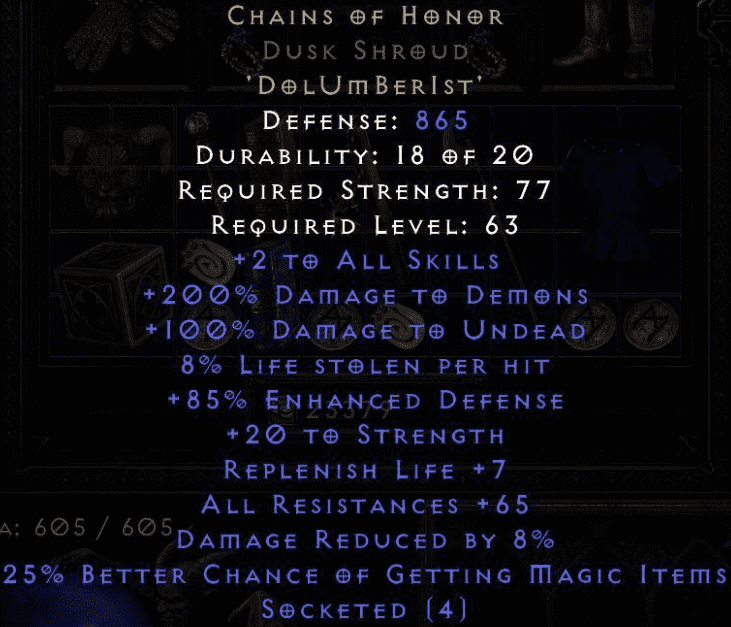
3. Chains of Honor
A bit expensive in terms of the runes needed to create this RW, Chains of Honor provides incredible bonuses that are useful to the Mosaic Assassin.
For starters, Chains of Honor grants an 8% life leech already, thus alleviating the need to use Cobra Strike for sustainability.
In addition, this thing significantly increases your resistances, which is something that you need if you are to use any of the elemental Sunder Charms in Diablo II: Resurrected.
Other noteworthy mods on Chains of Honor include +2 to all skills, 8% damage reduction, and 25% Magic Find chance.
Helmet
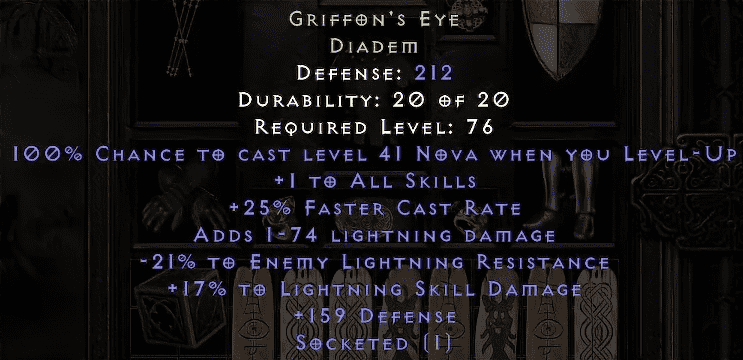
1. Griffon's Eye Diadem
Griffon's Eye is one of the best helmets you can use on this build. Just by wearing this unique helmet, you reduce the lightning resistance of nearby enemies by up to 20%. Furthermore, this item boosts your lightning damage by a considerable amount.
In addition, Griffon's Eye provides you with a 25% Faster Cast Rate. Equipping this helmet aids you in achieving that 65% FCR breakpoint for smoother teleports (with Enigma).
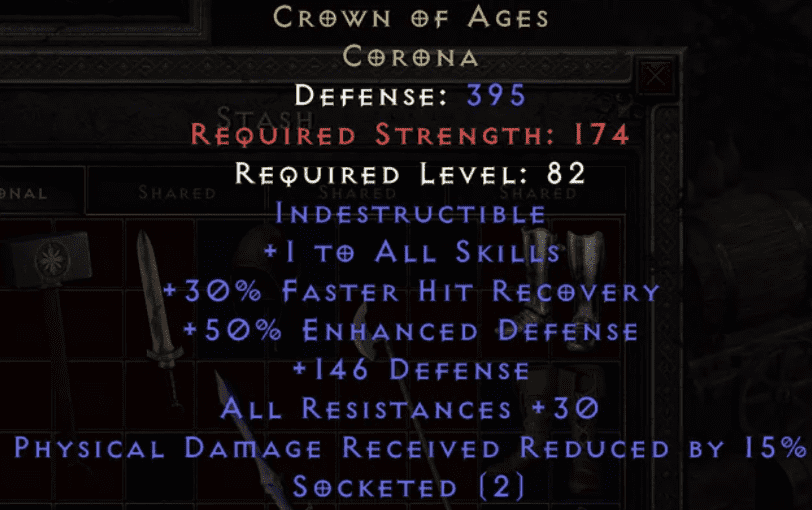
2. Crown of Ages
A very powerful defensive option that has one drawback—a massive strength requirement. This can be counterbalanced with the huge strength boost from Enigma and some rare jewelry with some STR on them.
Anyway, Crown of Ages is such an incredible defensive piece of gear due to its enhanced defense, physical damage reduction, and resistance bonuses.
Ideally, you want to socket a couple of Ber Runes to improve its physical damage reduction even further, though that will undoubtedly require some major investment given the price of the said rune.
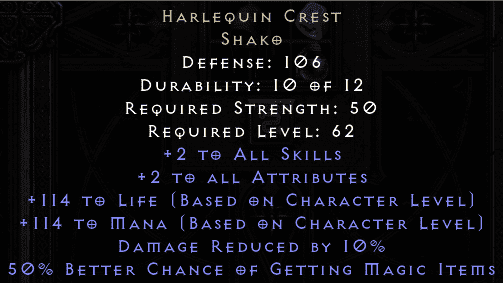
3. Harlequin Crest
Famously known as the Shako due to the base of this item, the Harlequin Crest is another viable option for the Mosaic Martial Arts Assassin.
This unique helmet scales your life and mana based on your current level. Thanks to the Shako, you can get huge amounts of HP and mana as a result!
The physical damage reduction provided by the Harlequin Crest is great in terms of improving your survivability. As you can already tell, this build can certainly use damage reduction items, even more so, than other D2R builds.
In the endgame, the Harlequin Crest is an invaluable tool as it gives you a huge increase in Magic Find (MF) chance. Whether you are farming DClone or the Uber Bosses, do consider the Shako as your primary helmet.
4. Flickering Flame
The Flickering Flame provides substantial value to the build. By putting the Nef, Pul, and Vex runes into your three-socketed helmet of choice, you get an item that reduces the fire resistance of your enemies by up to 15%, which is a toned-down version of the Sunder Charm, Flame Rift.
Aside from that, the Flickering Flame is awesome from a defensive standpoint as well. For starters, you gain more defense against ranged attacks, which become even more common as you progress through the game.
In addition, the length of the poison status effect, should you ever get affected by it, is significantly reduced when you have the Flickering Flame on.
Although the previously mentioned helmets are better in terms of what they can provide, the Flickering Flame is not bad at all. If you can find a normal Circlet or Diadem that has "+ to Assassin Skills," then use that as the base for Flickering Flame.

Gloves
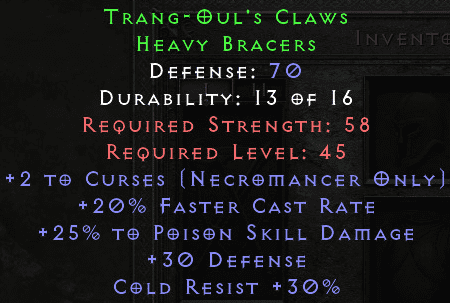
1. Trang-Oul's Claws
Trang-Oul's Claws are a very affordable pair of gloves that give you a 20% Faster Cast Rate and 30% cold resistance. Although these gloves are a part of a set armor that was made for the Necromancer, you only really need to use these gloves only for the modifiers just mentioned.
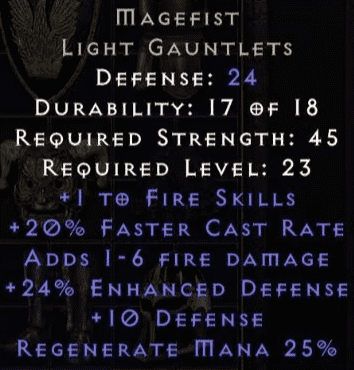
2. Magefist
If you do not have problems with your resistances, then you might want to use Magefist over Trang-Oul's Claws. The reason is that these gloves boost your mana regeneration considerably, alleviating the need for mana potions whenever you use Enigma's Teleport ability.
As if that is not enough, the Magefist also gives you 20% FCR. With these gloves equipped, you only need a couple more items to achieve the 65% breakpoint mentioned earlier in this D2R build guide.
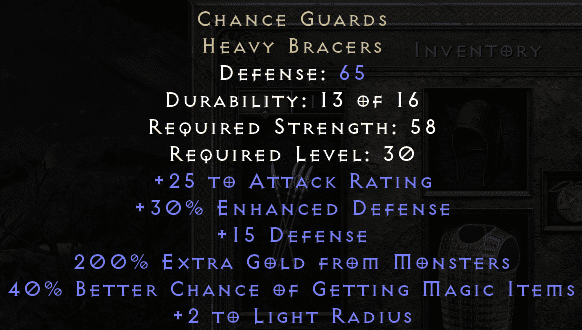
3. Chance Guards
Mainly to improve your Magic Find chance and extra Gold Find, the Chance Guards provide a bit of offense and defense in the form of attack rating and enhanced defense, respectively. Only use this if you want to heavily lean on creating a Magic Find version of the Mosaic Assassin.
4. Rare/Crafted IAS Gloves
Equip a pair of IAS gloves to reach your desired IAS breakpoint. Useful additional mods will be +2 to Martial Arts, life, stats, and resistances. These may be harder to come across, so consider using any 20 IAS gloves as a temporary solution (i.e. Laying of Hands).
Boots
1. Gore Rider
If you want to maximize your damage output, then the Gore Rider is a fantastic choice. These boots give you the ability to land a Crushing Blow or inflict Open Wounds on your foes.
In case you do not know, Crushing Blow is a damage mechanic in Diablo II: Resurrected where you deal 12.5% damage based on the current HP of the enemy you are fighting against (25% for normal monsters). This makes it so much easier for you to obliterate any monster from Hell!
Open Wounds is another incredible addition to any build simply because it inflicts a status effect that deals damage over time.
Now, it is important to note that although Gore Rider lets you land a Deadly Strike on the enemy, this mechanic does not work for the Dragon Talon.
Other than that, the Gore Rider grants incredible bonuses that work well with the Mosaic Assassin Build in D2R, such as 200% Enhanced Defense, +20 to maximum stamina, and 30% FRW to sweeten the deal.

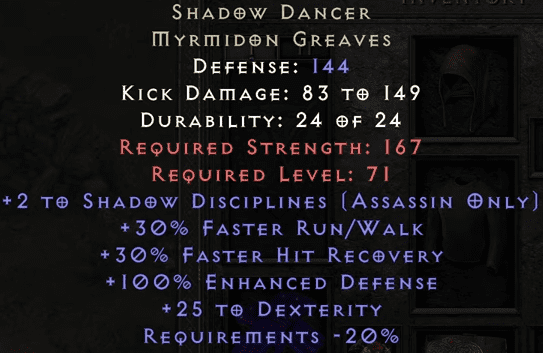
2. Shadow Dancer
You could argue that this next pair of boots is specifically made for the "Kicksin" but it is actually not the first option we would like you to wear.
The Shadow Dancer is the best when it comes to improving the damage of your Dragon Talon. You see, Dragon Talon's damage is calculated based on the boots you are wearing; not your weapons.
Since the Myrmidon Greaves, which are the base item for the Shadow Dancer, deal huge amounts of damage compared to the other boots in the game, you could use this if your sole purpose is to amplify the damage of your finishing move.
However, there are better options out there, especially considering that the Shadow Dancer has a much higher STR requirement compared to a Monarch Shield, for example.
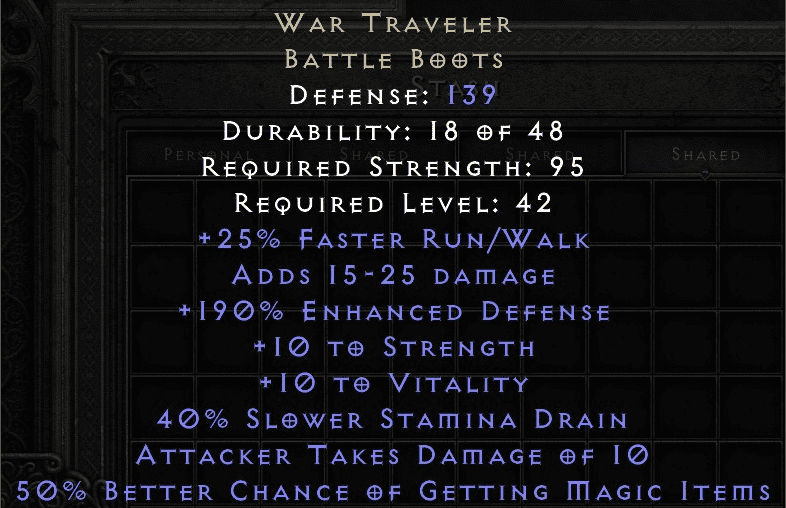
3. War Traveler
Otherwise known as "War Travs," these boots are actually what some people, who play Mosaic Assassins, prefer over the Gore Rider in terms of endgame utility. That is because most builds typically lean more towards improving MF chance over damage.
Aside from the bonus MF Chance (which can go up to 50%), the War Traveler grants +10 to STR/VIT, 25% FRW, and up to 190% Enhanced Defense. So, even if you are not focusing on Magic Find, per se, these boots are still a viable alternative to Gore Rider.
If you are going to wear this one or the Gore Rider, make sure to upgrade their bases by utilizing a certain Horadric Cube Recipe. This is to provide more oomph in the damage of your Dragon Talon skill.
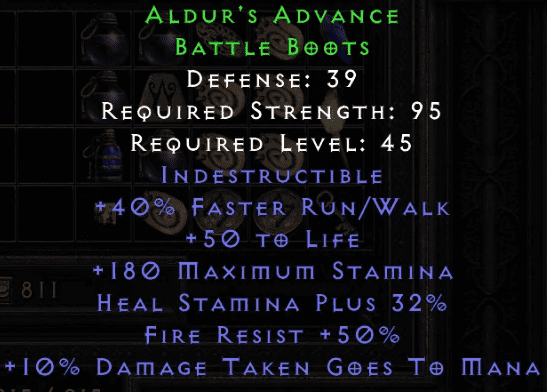
4. Aldur's Advance
If you have plans of putting the Flame Rift Sunder Charm in your inventory, then you might want to wear this next pair of boots.
Aldur's Advance is not bad, considering that it grants a huge bonus to fire resistance, helping you address the resistance penalty that is inherent in Sunder Charms in D2R.
Apart from that, Aldur's Advance is known for having the fastest FRW bonus out there. Although this is not at all too important when you already have Enigma, it is still a quality-of-life change if you move around town a lot.
Weapon Swap
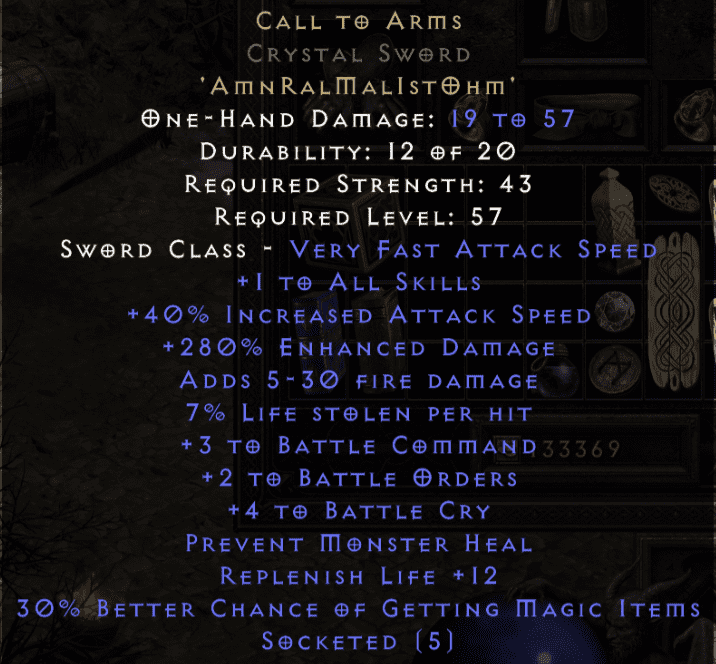
1. Call to Arms
Otherwise known as CTA, Call to Arms gives you the power to use a few Barbarian-exclusive skills, namely Battle Command, Battle Orders, and Battle Cry.
Call to Arms is primarily used as a means of using those skills in conjunction with your Assassin-specific buffs, including Burst of Speed and Fade.
Use a Crystal Sword with five sockets as a base for the runeword. This is because the said weapon has low attribute requirements compared to other weapon base types that can roll several sockets.
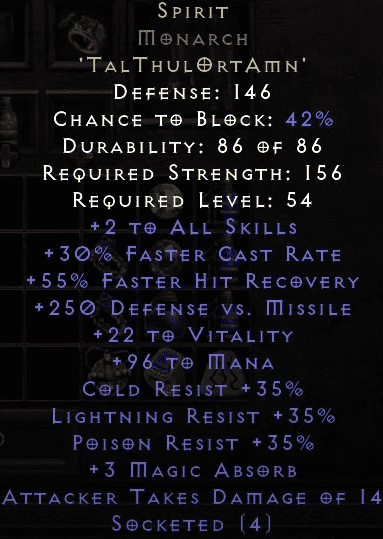
2. Spirit
Spirit, by itself, is actually not bad when it comes to stats. However, you are only utilizing it for its "+2 to all skills" modifier. This not only boosts the effects of your skills but the Barb-exclusive buffs from Call to Arms as well.
Having said that, grab a Monarch Shield and insert the Tal, Thul, Ort, and Amn runes in the exact order. If you are wondering why you use the Monarch as the base, it is because this shield has the lowest STR requirement among other shields that can roll with four sockets in Diablo II: Resurrected.
Belt
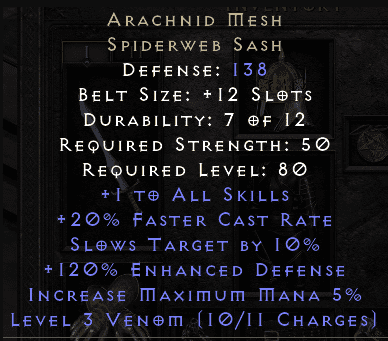
1. Arachnid Mesh
When it comes to items that provide a ton of value, the Arachnid Mesh is certainly one of them. This is one of the only items in D2R that provides both 20% FCR and +1 to all skills. The Faster Cast Rate bonus helps make Teleport a lot smoother to use.
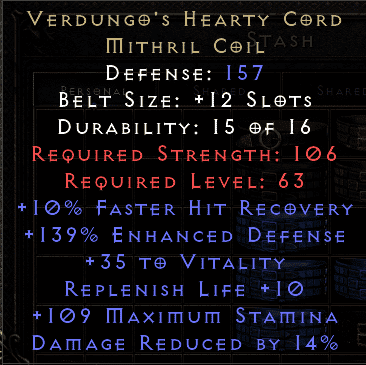
2. Verdungo's Hearty Cord
If you do not mind sacrificing FCR for more survivability, then Verdungo's Hearty Cord is an incredible option for the Mosaic Martial Arts Assassin.
This thing is best known for its 15% physical damage reduction. If that still does not convince you to wear it, this belt also gives you up to 40 points of Vitality, making you incredibly tanky!
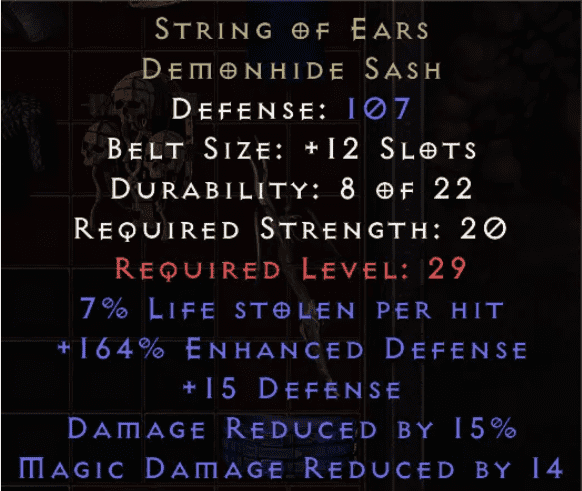
3. String of Ears
A nice alternative to the previous belt, the String of Ears not only provides you with up to 15% physical damage reduction, but it reduces the magic damage you receive as well.
Additionally, the String of Ears allows you to steal up to 8% life from your enemies per hit. Since you naturally attack fast, you will get the most out of this mechanic without the need for Cobra Strike.
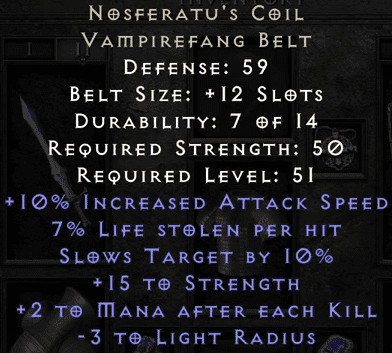
4. Nosferatu's Coil
The "Nos Belt" is a great option if you need more attack speed. It also grants additional life leech. Alongside Goldwrap, these are the only belts that offer IAS in the game.
Rings
1. Bul-Kathos' Wedding Band
A great ring choice offering life leech, skills, and life. Bul-Kathos' Wedding Band is the superior option to SOJ which can still be considered if you are suffering heavily from mana issues.

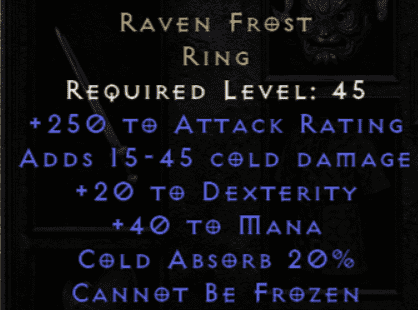
2. Raven Frost
As you reach the higher difficulty levels in Diablo II: Resurrected, you will encounter more and more enemies that are not shy of inflicting nasty status effects on you, most notably Freeze and Decrepify. To protect yourself from the former, you will need certain items that grant freeze immunity. Thankfully, there is one in the form of the Raven Frost.
Aside from the highly coveted "Cannot Be Frozen" mod, the Raven Frost provides you with other goodies, including +250 attack rating, +45 cold damage, and +20 DEX.
The added cold absorption bolsters your defense against the said elemental damage type. This is also quite useful when you plan on using the Cold Rupture Sunder Charm.
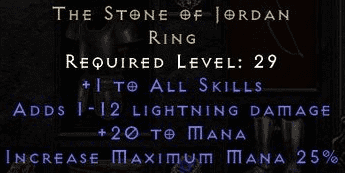
3. Stone of Jordan
While it does not give you mana leech, the Stone of Jordan is still useful for this build mainly for that +1 to all skills. You get heaps of mana for casting your skills as well.
4. Nagelring
Remember what we've said earlier about most D2R builds leaning toward MF chance more than anything in the endgame? Well, if that is also your approach to playing this game, then the Nagelring can help you with that.
The Nagelring boasts a whopping 30% Magic Find chance – one of the highest in a piece of accessory in Diablo II: Resurrected.
Moreover, you want your charge-up skills like Claws of Thunder and Phoenix Strike to hit enemies consistently, so you need your attack rating to be at a considerably high level. Fortunately, the Nagelring also aids you in that regard.

5. Rare Ring with Life and Resistances
After equipping the Raven Frost, you can opt to wear a rare ring (crafted or otherwise) with some resistances and added life. The former should be emphasized if you are to use any of the Sunder Charms mentioned earlier in the build guide.
Amulet
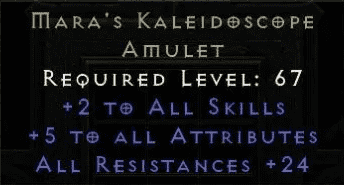
1. Mara's Kaleidoscope
On the surface, you might think that this amulet is quite simple, but you really do not need any fancy thing to be effective, right? You only need to provide the essentials, which Mara's Kaleidoscope does with flying colors.
For the Mosaic Assassin, in particular, since this build has problems addressing its resistances, Mara's Kaleidoscope helps rectify that by granting up to 30 to all resistances. Besides that, you get that all-important +2 to all skills, making your active, passive, and utility skills even more effective.
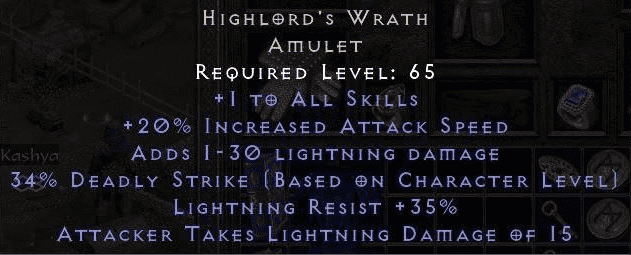
2. Highlord's Wrath
Do you have a need for speed? The Highlord's Wrath satisfies that by giving you a 20% attack speed boost just by wearing the amulet.
Even though the Dragon Talon does not benefit from Deadly Strike, your charge-up skills do. So, simply whacking enemies with Phoenix Strike is enough to proc Deadly Strike for double the damage output!
Aside from that, Highlord's Wrath brings even more stuff to the table, such as +1 to all skills, 35% lightning resistance, and 1-30 added lightning damage.
Charms
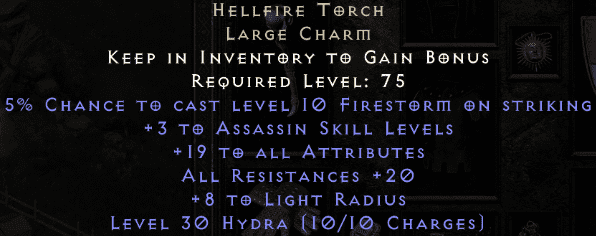
1. Hellfire Torch
With +20 to resistances, +20 to attributes, and +3 to skill levels, what is more to ask for if you have the Hellfire Torch? This unique large charm is incredibly tough to beat and is always a welcome addition to your inventory.
Just make sure that you get one that says "+3 to Assassin Skill Levels" because this thing can roll the same mod, albeit for other classes.
If you do not want to leave things to chance, you can buy the Hellfire Torch (Assassin) in our D2R Store.
2. Annihilus
Want to have a small charm that works almost as similar to the Hellfire Torch above, except it only takes a single square of inventory space? The Annihilus is another staple small charm that you should include in your inventory.
It has all of the makings of a great item in Diablo II: Resurrected, including +1 to all skills, +20 to attributes, and +20 to resistances. And oh, this item helps you with leveling your character as well!

3. Sunder Charms
In case you are not aware, Sunder Charms are a class of charms in D2R that essentially breaks a monster's immunity to certain damage types.
For our version of the Mosaic Assassin, you can choose to incorporate Crack of the Heavens (lightning), Cold Rupture (cold), and Flame Rift (fire) into the build.
However, it is worth pointing out that while Sunder Charms are useful in dealing with enemies that have natural immunities, they come at a huge cost. What is it, exactly?
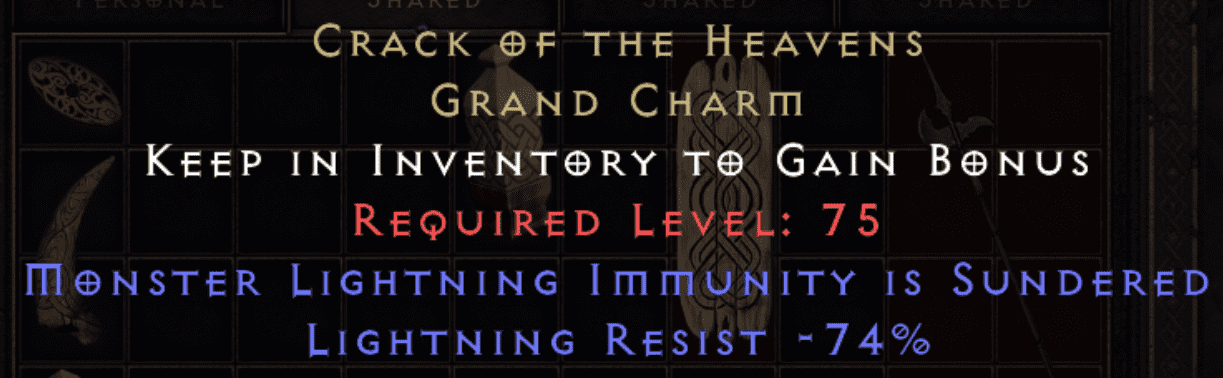
Simply putting Sunder Charms in your inventory will reduce your resistance to their respective damage types. So, if you have Crack of the Heavens with you, your lightning resistance gets reduced significantly as a consequence.

Therefore, if you are to place any of these unique grand charms in your bag, make sure to address the heavy resistance penalty through your gear.

4. Gheed's Fortune
Want to get your hands on some highly coveted items? What about getting huge vendor discounts? Do you like obtaining more gold from enemies? If the answer to these questions is a resounding yes, then definitely reserve some space for Gheed's Fortune!

Top Gear for the Mosaic Martial Arts Assassin in Diablo II: Resurrected Season 12
| Gear Slot | Best Items |
| Weapon | -2x Mosaic (non-negotiable) |
| Armor | -Enigma -Treachery -Chains of Honor |
| Helmet | -Griffon’s Eye (Diadem or Circlet) -Crown of Ages -Harlequin Crest -Flickering Flame |
| Gloves | -Trang-Oul’s Claws -Magefist -Chance Guards -Rare/Crafted IAS Gloves Note: IAS means “Increased Attack Speed” |
| Boots | -Gore Rider -Shadow Dancer -War Traveler -Aldur’s Advance |
| Weapon Swap | -Call to Arms -Spirit |
| Rings | -Bul-Kathos’ Wedding Band -Raven Frost -Stone of Jordan -Nagelring -Rare Ring with Life and Resistances |
| Belt | -Arachnid Mesh -Verdungo’s Hearty Cord -String of Ears -Nosferatu’s Coil |
| Amulet | -Mara’s Kaleidoscope -Highlord’s Wrath |
| Charms | -Hellfire Torch (Must have “+3 to Assassin Skill Levels”) -Annihilus -Sunder Charms -Gheed’s Fortune |
Leveling Strategy
Leveling as a Mosaic Assassin is fairly straightforward. Start by taking Fire Blast from the “Traps” skill tree. You should consider using traps for early leveling (like Wake of Fire), which will become your primary damage source early on.
Then, slowly work on your core skills and synergies, while simultaneously investing in Shadow Disciplines as needed. Once Lightning Sentry is available, it will become your main damage dealer. You can switch back to an MA build once you can use some of the gear mentioned earlier, which should alleviate early difficulties like problems with mana, for example.
At level 30, you can remove the skill points from Lightning Sentry and prioritize Phoenix Strike from that point onward. Once Phoenix Strike is maxed out, consider putting points to its other synergies, including Fists of Fire, Claws of Thunder, and Blades of Ice.
By level 60, obtain a three-socketed Runic Talon and insert the Mal, Gul, and Amn runes to create the Mosaic Runeword. The game becomes trivial when that time comes because of the power Mosaic gives to this build.
Mercenary
An Act 2 Combat Mercenary is recommended for the Mosaic Assassin, as they provide excellent support and utility with their auras.
Holy Freeze: This aura slows enemies around you, offering great crowd control and increased safety. This is a standard merc option for good reason, particularly in Hardcore.
Prayer: A source of passive healing, synergizing well with your survivability-focused build.
Might: This aura boosts your physical damage output and should be considered for builds that focus on physical damage
Blessed Aim: This is an often overlooked merc variant that provides strong utility through improving your AR (on-hit chance). If you are struggling with hitting targets, especially in higher-level areas like Terror Zones, then consider the Blessed Aim aura.
Equip your mercenary with gear that enhances their survivability, damage, and auras. The best choices are listed here. Check out our In-depth Merc Guide here.
Weapon
1. Infinity
Despite its expensive price, you should invest in the runes necessary to form Insight. This particular runeword gives your Mercenary the power to use Conviction Aura — a Paladin-exclusive skill that reduces enemy resistances by 85%!
Aside from that, Infinity grants your hireling a 40% chance of Crushing Blow, 325% Enhanced Damage, and the ability to prevent monster healing.

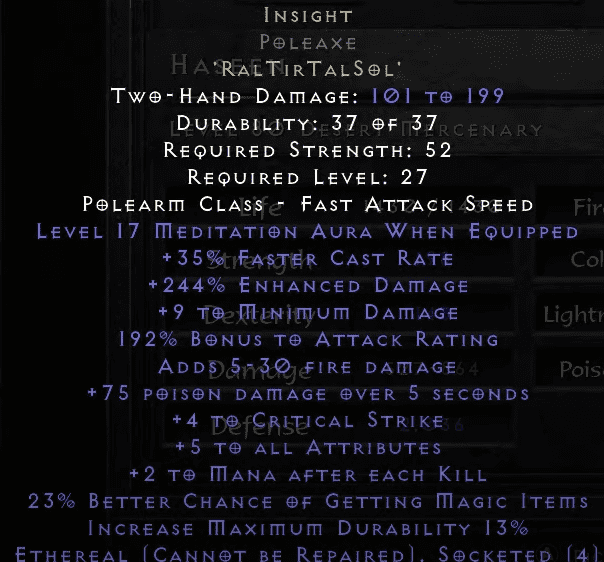
2. Insight
If Infinity is out of your budget for now, you can have your Act 2 Mercenary use Insight. This gives them the power to activate another buff—Meditation Aura. This significantly boosts your mana regeneration, alleviating the need for mana potions while you’re using your primary skills.
What’s great about this compared to Infinity is that the runes that you need (Ral, Tir, Tal, and Sol) are so much cheaper than the previously-mentioned runeword.
Helmet
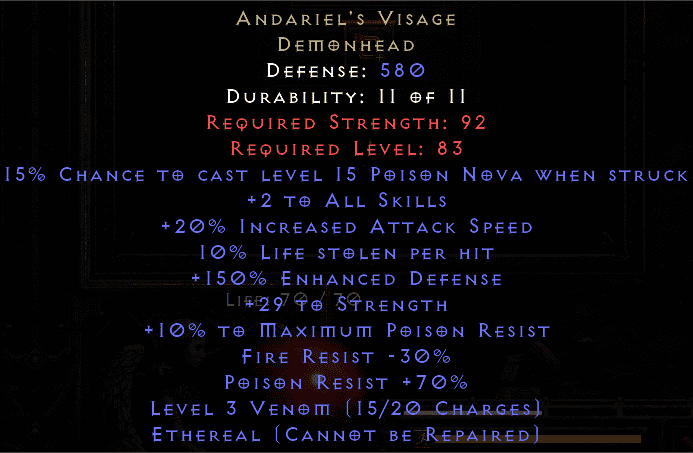
1. Andariel’s Visage
This is considered a staple helmet for desert hirelings in D2R, Andy’s Visage (as it's popularly called in the community) is great for Mercenaries due to the fact that it provides 20% IAS and 10% life leech.
Do not worry about that -30% to fire resistance because that can easily be addressed by inserting a single Ral rune.
Andariel’s Visage is incredible for helping the Mercenary sustain himself, particularly at Hell Difficulty.
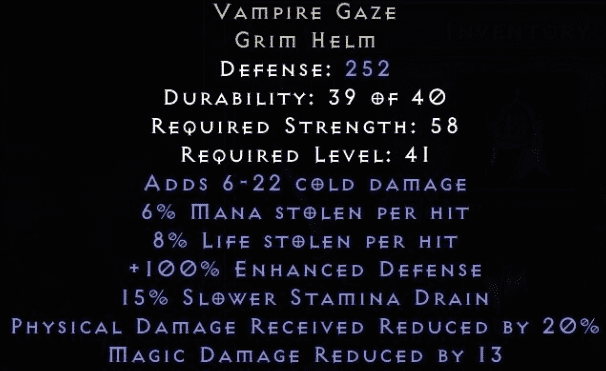
2. Vampire Gaze
If you are unable to get your hands on Andariel’s Visage for whatever reason, have your Act 2 Mercenary wear the Vampire Gaze.
This unique helmet may not have IAS, but what it does offer are life leech, physical damage reduction, and magic damage reduction, among others.
Armor
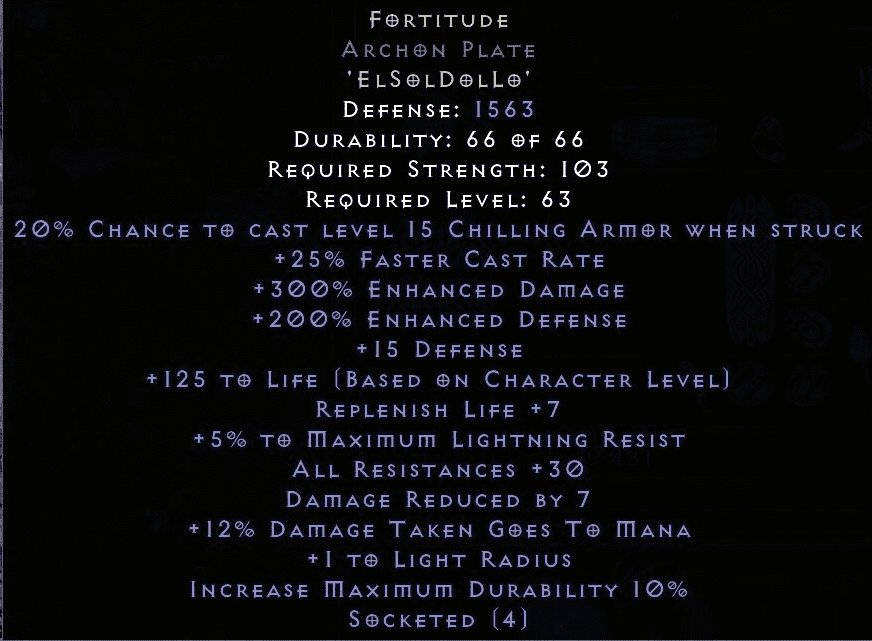
1. Fortitude
Your Mercenary is more than just a supporting character for this build. You also want to give him enough power to decimate any monster he comes across. Fortitude provides them with a huge damage boost thanks to that 300% Enhanced Damage. That’s right! This bonus is also available when you put the El, Sol, Dol, and Lo runes into a four-socketed body armor!
2. Treachery
If you are wondering whether there is a viable alternative to Fortitude for the Act 2 Mercenary, yes there is! That comes in the form of Treachery—a D2R runeword that is created by inserting the Shael, Thul, and Lem runes into body armor with three sockets.
One of the features that stands out here is the chance to cast level 15 Fade when struck. This heavily improves the survivability of your hireling, so you do not have to worry about them while on the battlefield.
Moreover, Treachery grants 45% IAS, which is incredibly tough to beat, especially when you consider the gear slot for this specific runeword.

Gameplay Tips
Always make it a point to increase your attack speed at the soonest possible time. Allocating points to Burst of Speed is a good start, though you certainly need to add more through your choice of gear.
The reason why you want to have a relatively high IAS is so that you can build up charges rather quickly. Remember, you need to use several charge-up skills in order to maximize Dragon Talon’s full potential.
If you do not want to activate all of them during your farming runs, you could opt for just Phoenix Strike, Cobra Strike, and Claws of Thunder. This is applicable only if you want to zoom in and out of maps.
For maximum effectiveness, however, you need to use Claws of Thunder, Fists of Fire, Blades of Ice, Cobra Strike, and Phoenix Strike.
It is also worth remembering that you have a 15-second window before your charges dissipate. To ensure that they are up for most of the time, you need to hit an enemy with any of the charge-up skills every 13 to 14 seconds.
While not really mandatory for the build to work, we highly recommend that you wear body armor with the Enigma runeword on it as teleporting is still the best and most efficient means of going around areas in D2R.
Endgame Content
The Mosaic Assassin performs well in endgame content, such as:
- Key farming: Farm the Countess, Summoner, and Nihlathak for keys, which are used to open the portals to the Uber Tristram event.
- Uber Tristram: Defeat Uber Mephisto, Uber Baal, and Uber Diablo to obtain a Hellfire Torch, which offers powerful bonuses.
- High-Level Areas (e.g., Chaos Sanctuary, Worldstone Keep): Farm these areas for experience, runes, and unique items.
- Chaos or Baal runs: in Players 8
- Terror Zones
- Cow Levels
How Should I Farm Uber Tristram with My Mosaic Assassin in D2R Season 12?
Farming Uber Tristram with a Mosaic Assassin in Diablo II: Resurrected can be insanely effective—but only if you're properly prepared. The build has excellent single-target burst and sustain, but Ubers require specific attention to resistances, life leech, crowd control, and survivability. Here's a step-by-step guide on how to prep and run Ubers efficiently:
BUILD SETUP
Core Gear (Ideal or Budget)
| Gear Slot | Best Items |
| Weapons | Dual Mosaic (Claw base: Greater Talons or Runic Talons for Speed) |
| Helmet | Guillaume’s Face (for Crushing Blow) or Vampire Gaze (for damage reduction and life leech) |
| Armor | Treachery (for additional resistance and damage reduction through Fade Proc) or Fortitude (for more damage and tankiness) |
| Amulet | Highlord’s Wrath or Crafted Blood Amulet (with + to Assassin Skills and life leech) |
| Rings | Raven Frost (freeze immunity) or Rare crafted ring (with life leech, life, resistance, and stats) |
| Belt | Verdungo’s Hearty Cord or String of Ears (for damage reduction) or Thundergod’s Visor (specifically against Mephisto) |
| Boots | Gore Riders (for Crushing Blow, Open Wounds, Deadly Strike) |
Resistances
- Stack overcapped res: Meph in Uber Tristram casts Conviction (-125 res), so:
- Aim for ~300% resist all in stash
- Pre-buff with Fade (via Treachery) for +60% res and 15% DR
Inventory
- Life Tap wand for pre-casting (or Dracul's if not using Life Tap charges)
- Annihilus, Hellfire Torch, and Martial Arts Grand Charms
- Stack +life, +resist, and +FHR small charms
Strategy: Uber Tristram
Before Entering
- Prebuff Fade: Go into River of Flame or Act 5, stand in fire with Treachery until Fade procs.
- Buff up: BO (if you use CTA), Fade, Shadow Master, Burst of Speed (if not using Fade).
- Cast Life Tap on the boss before engaging (if using wand).
- Use Cloak of Shadows to blind ads around the bosses.
Uber Mephisto (Biggest Threat)
- High elemental damage + Conviction aura.
- Kill him first.
- Precast Life Tap, get in close, dump charges with Finisher (Dragon Claw / Dragon Talon if you hybrid).
- Fade helps a lot—watch your res bar.
- Stay mobile and re-cast Shadow Master if she dies.
Uber Baal
- Summons clones and uses mana burn.
- Can be annoying, but not super dangerous.
- Focus DPS, ignore clones if possible.
Uber Diablo
- High physical/fire damage + Firestorm.
- Face-tankable if you have Life Tap and Crushing Blow.
Pro Tips
- Cloak of Shadows = MVP. Use it to neutralize ads and reduce the chance to get overwhelmed.
- Life Tap = Lifeline: If it drops, you're in danger. Watch for it.
- If struggling, consider a Dragon Talon + CB hybrid setup: 1pt DTalon + CB gear = boss melter.
Is the Mosaic Assassin Worth It in Season 12?
With this comprehensive build guide, you should now be equipped with the knowledge necessary to master the Mosaic Assassin in Diablo II: Resurrected. Although this build did not receive any changes in Season 12, it's still performs admirably well. Keep in mind that this build is versatile and can adapt to various playstyles, so don't hesitate to experiment and discover what works best for you.
You will find out quickly that this is one of the most powerful builds in the game! Once you get a couple of the necessary weapon runewords, the Mosaic Assassin comes alive and can obliterate the opposition with ease!
The Mosaic Assassin is a potent boss killer in D2R, and an exceptional item farmer, especially in Terror Zones and Chaos Sanctuary. So, if you want to play arguably the most busted build in the game, then definitely give the Mosaic Assassin a try in Diablo II: Resurrected Ladder Season 12!
If you're looking to get ahead quickly, check out the D2R Store for all price ranges, across all servers (Ladder or Non-Ladder, including Hardcore).
PROS
- Insane damage output, so much so that the Mosaic Assassin has been deemed one of the best builds in D2R for quite some time
- High mobility thanks to Burst of Speed and Dragon Flight, makes it quite easy to finish large areas like the Chaos Sanctuary and Travincal
- Strong uber boss killer
CONS
- Must have two Mosaic Runewords for maximum damage
- Requires hitting enemies every 14 seconds to maintain charges
- Not as tanky as other D2R builds
![Enigma Archon Plate (Ladder) [Enigma]](/img/tmp/product_mini_2_45117.jpg?time=1783542193)
![Griffon's Eye (Ladder) [Helms]](/img/tmp/product_mini_2_45392.jpg?time=1783542193)